소개
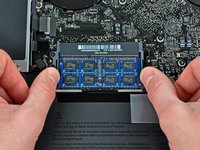
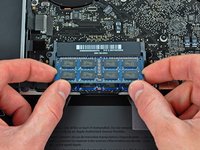
RAM을 업그레이드 하여 속도를 즉시 늘리세요.
필요한 것
-
-
하단 케이스를 상단 케이스에 고정하는 다음 나사 열 개를 풀어주세요:
-
3mm Phillips/십자 나사 일곱 개
-
13.5mm Phillips/십자 나사 세 개
-
-


기기를 재조립하려면 이 지침을 역순으로 따르세요.
다른 160명이 해당 안내서를 완성하였습니다.
다음 번역가들에게 특별히 감사 드립니다:
100%

Christian Kim님은 저희가 세상을 수리하는데 동참하신 분입니다! 기여하시겠습니까?
번역 시작하기 ›

5가이드 댓글
I bought and installed 4GB x2 RAM for my Mid 2009 15 inch MacBook Pro and it was easy and is working great. Before this I had 4GB and it was being maxed out. It was very easy. I did purchase the required tools which made it simple. I also swapped the battery at the same time. I am writing this from the same computer and it is working well. Good luck!
I had no trouble installing the 4 GB RAM I bought for my Mid 2009 15 Inch MacBook Pro. The mistake I made though was not realising that my machine has two RAM slots. I only bought one chip! So now I have to buy another one.
If you read this before you buy some RAM, make sure you check how many slots your computer has!
Also, I must say the customer support from ifixit is great. I messaged them about this and some other issues I was having and I got a detailed response from them within a couple of days. Thanks guys!
I replaced my original 2x 2gb ram with 2x 4gb RAM following your instructions. However, upon boot up, it’s only showing 1 of the 2 4gb chips. Any tips on how to get both seated correctly?
Never mind. I was able to pop the second chip back out and get it seated properly.