이 버전에는 잘못된 편집 사항이 있을 수 있습니다. 최신 확인된 스냅샷으로 전환하십시오.
필요한 것
-
-
하단 케이스를 상단 케이스에 고정하는 다음 나사 열 개를 풀어주세요:
-
13.5mm (14.1mm) Phillips/십자 나사 세 개.
-
3mm Phillips/십자 나사 일곱 개
-
-
-
배터리 케이블 커넥터에 접근할 수 있도록 배터리를 충분히 뒤로 젖히세요.
-
배터리 케이블 커넥터를 로직 보드 소켓에서 빼고 배터리를 상단 케이스에서 분리하세요.
-
배터리를 100% 충전한 다음 최소 두 시간 더 충전하세요. 그런 다음 플러그는 뽑고 정상적으로 사용하여 배터리를 방전하세요. 배터리 부족 경고가 나타나면 작업을 저장하고 배터리 부족으로 인해 절전 모드가 활성화될 때까지 노트북을 켜놓으세요. 최소한 5시간 이상을 기다리고 나서 노트북을 중단없이 100% 충전하세요.
-
새 배터리를 설치한 다음 비정상적 작동 또는 문제가 발생하면 MacBook의 SMC를 재설정해야 합니다.
-
-
이 단계는 번역되지 않았습니다. 번역을 도와주십시오
-
Use the flat end of a spudger to carefully pry the AirPort/Bluetooth ribbon cable up off its socket on the logic board.
-
-
이 단계는 번역되지 않았습니다. 번역을 도와주십시오
-
Pull the camera cable connector straight out of its socket on the logic board.
-
-
이 단계는 번역되지 않았습니다. 번역을 도와주십시오
-
Use the tip of a spudger to pry the three antenna connectors up off the AirPort/Bluetooth board.
-
-
이 단계는 번역되지 않았습니다. 번역을 도와주십시오
-
De-route all three antenna cables from their channels in the AirPort/Bluetooth housing.
-
De-route the camera cable from its channel in the AirPort/Bluetooth housing.
-
-
-
이 단계는 번역되지 않았습니다. 번역을 도와주십시오
-
Remove the following two screws securing the AirPort/Bluetooth housing to the upper case:
-
One 3.8 mm Phillips
-
One 8.6 mm Phillips
-
-
이 단계는 번역되지 않았습니다. 번역을 도와주십시오
-
Remove the AirPort/Bluetooth assembly from the upper case, minding any cables that may get caught.
-
-
이 단계는 번역되지 않았습니다. 번역을 도와주십시오
-
Remove the 8.6 mm Phillips screw securing the antenna/camera cable retainer to the upper case.
-
Remove the antenna/camera cable retainer from the upper case.
-
-
이 단계는 번역되지 않았습니다. 번역을 도와주십시오
-
Remove two of the three 6 mm T6 Torx screws securing the right side of the display to the upper case.
-
-
이 단계는 번역되지 않았습니다. 번역을 도와주십시오
-
Grab the plastic pull tab secured to the display data cable lock and rotate it toward the DC-In side of the computer.
-
Pull the display data cable straight out of its socket on the logic board.
-
-
이 단계는 번역되지 않았습니다. 번역을 도와주십시오
-
Remove the 8.6 mm Phillips screw securing the display data cable retainer to the upper case.
-
Remove the display data cable retainer from the upper case.
-
-
이 단계는 번역되지 않았습니다. 번역을 도와주십시오
-
Remove two of the three 6 mm T6 Torx screws securing the left side of the display to the upper case.
-
-
이 단계는 번역되지 않았습니다. 번역을 도와주십시오
-
Open your MacBook Pro so the display is perpendicular to the upper case.
-
Place your opened MacBook Pro on a table as pictured.
-
While holding the display and upper case together with your left hand, remove the remaining T6 Torx screw from the upper display bracket.
-
-
이 단계는 번역되지 않았습니다. 번역을 도와주십시오
-
Remove the last remaining T6 Torx screw securing the display to the upper case.
-
-
이 단계는 번역되지 않았습니다. 번역을 도와주십시오
-
Grab the upper case with your right hand and rotate it slightly toward the top of the display so the upper display bracket clears the edge of the upper case.
-
Rotate the display slightly away from the upper case.
-
Lift the display up and away from the upper case, minding any brackets or cables that may get caught.
-
-
이 단계는 번역되지 않았습니다. 번역을 도와주십시오
-
Before starting, be sure to clean the display glass with lint-free cloth moistened with a mild solution; it will make the suction cup adhere better, and will make checking for dust on reassembly easier
-
With the heat gun set to low, start by heating the outer black border near the upper right corner of the glass panel.
-
-
이 단계는 번역되지 않았습니다. 번역을 도와주십시오
-
With the panel sufficiently heated, fasten a heavy-duty suction cup near the upper right corner of the display glass.
-
Slowly and gently pull the corner of the display glass up off the display assembly.
-
-
이 단계는 번역되지 않았습니다. 번역을 도와주십시오
-
Gently lift the corner of the display glass enough to insert a spudger between it and the display assembly.
-
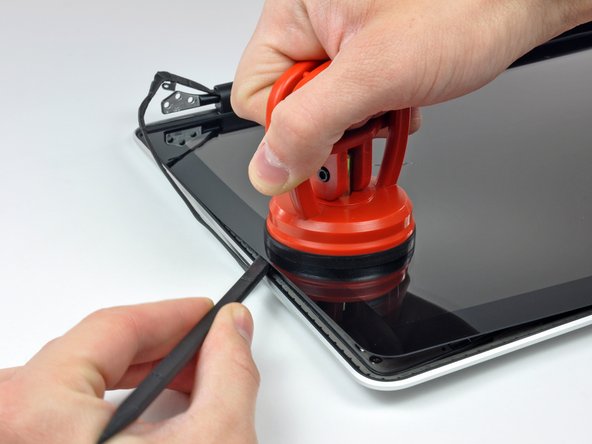
Use the flat end of a spudger to gently pry up the adhesive securing the front glass to the display.
-
Pry up the glass panel a few inches away from the upper right corner along the top and right edges of the display.
-
-
이 단계는 번역되지 않았습니다. 번역을 도와주십시오
-
Use a heat gun to soften the adhesive under the black strip along the right side of the front glass panel.
-
Attach a suction cup along the right side of the front glass panel.
-
Pull up on the glass panel while you use the flat end of a spudger to separate it from the rest of the display assembly.
-
Continue working along the right edge of the front display glass until it is separated from the display.
-
-
이 단계는 번역되지 않았습니다. 번역을 도와주십시오
-
Use your heat gun to soften the adhesive under the black strip along the top edge of the glass display panel.
-
Attach a suction cup near the top edge of the glass display panel and use it to pull the glass panel up off the display.
-
Work along the top edge of the glass panel, carefully using the flat end of a spudger to separate the adhesive if necessary.
-
-
이 단계는 번역되지 않았습니다. 번역을 도와주십시오
-
Use a heat gun to soften the adhesive under the black strip near the upper left corner of the glass display panel.
-
Attach a suction cup near the upper left corner of the glass display panel.
-
Pull up on the suction cup and use the flat end of a spudger to carefully pry the glass display panel out of the display assembly.
-
-
이 단계는 번역되지 않았습니다. 번역을 도와주십시오
-
Use a heat gun to soften the adhesive under the black strip along the left side of the front glass panel.
-
Attach a suction cup along the left side of the front glass panel.
-
Pull up on the glass panel while you use the flat end of a spudger to separate it from the rest of the display assembly.
-
Continue working along the left edge of the front display glass until it is separated from the display.
-
-
이 단계는 번역되지 않았습니다. 번역을 도와주십시오
-
Now that the top, left, and right edges of the glass are free from the display, slowly lift the top edge of the glass panel and gently rotate it out of the display.
-
-
이 단계는 번역되지 않았습니다. 번역을 도와주십시오
-
Insert the edge of a plastic opening tool between the display glass and the camera bracket, and run it around the camera bracket to separate it from the display glass.
-
-
이 단계는 번역되지 않았습니다. 번역을 도와주십시오
-
To reconnect the cable, first use the tip of a spudger to remove the piece of foam tape over the camera cable ZIF socket.
-
Use the tip of a spudger to flip up the ZIF cable retainer on the camera cable socket.
-
Insert the camera cable into its socket on the camera board and use the tip of a spudger to snap down the ZIF cable retainer, locking the cable in place.
-


다른 21명이 해당 안내서를 완성하였습니다.

댓글 6개
It is easier to start in one of the lower corners. The glass is not held by the rubber bushing.
Is it really necessary to remove the display from the uppercase? Why can't you just start from step 21?
I was wondering the same, is absolutely necessary to disassemble the screen to change the glass? Can I jump to step 21?
No you don't need to remove the Top or Display to replace the glass.
I'm under the presumption that this method would be similar for other unibody versions such as the early / late 2011?