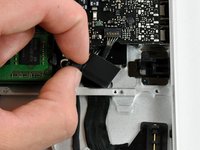
주요 콘텐츠로 건너뛰기

MacBook Unibody Model A1278 Battery Connector Replacement

필요한 것

  1. MacBook Unibody Model A1278 Battery Connector Replacement, Access Door: 1 단계, 이미지 1/1
    • With the case closed, place the Unibody top-side down on a flat surface.

    • Depress the grooved side of the access door release latch enough to grab the free end. Lift the release latch until it is vertical.

  2. MacBook Unibody Model A1278 Battery Connector Replacement: 2 단계, 이미지 1/1
    • The access door should now be raised enough to lift it up and out of the Unibody.

  3. MacBook Unibody Model A1278 Battery Connector Replacement, Battery: 3 단계, 이미지 1/1
    • Be sure the access door release latch is vertical before proceeding.

    • Grab the white plastic tab and pull the battery up and out of the Unibody.

  4. MacBook Unibody Model A1278 Battery Connector Replacement, Lower Case: 4 단계, 이미지 1/1
    • Remove the following eight screws securing the lower case to the chassis:

    • One 3 mm Phillips screw.

    • Three 13.5 mm Phillips screws.

    • Four 3.5 mm Phillips screws.

  5. MacBook Unibody Model A1278 Battery Connector Replacement: 5 단계, 이미지 1/1
    • Using both hands, lift and remove the lower case off the upper case.

  6. MacBook Unibody Model A1278 Battery Connector Replacement, Mid Wall: 6 단계, 이미지 1/1
    • Remove the four 10.3 mm Phillips screws securing the mid wall to the upper case.

  7. MacBook Unibody Model A1278 Battery Connector Replacement: 7 단계, 이미지 1/1
    • Lift the mid wall out of the upper case.

  8. MacBook Unibody Model A1278 Battery Connector Replacement, Battery Connector: 8 단계, 이미지 1/1
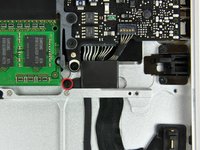
    • Remove the following screws securing the battery connector cover to the upper case:

    • One 2.5 mm Phillips screw.

    • Two 1.5 mm Phillips screws.

  9. MacBook Unibody Model A1278 Battery Connector Replacement: 9 단계, 이미지 1/1
    • Lift the battery connector cover out of the upper case.

  10. MacBook Unibody Model A1278 Battery Connector Replacement: 10 단계, 이미지 1/2 MacBook Unibody Model A1278 Battery Connector Replacement: 10 단계, 이미지 2/2
    • Remove the single 2.7 mm Phillips screw securing the battery cable cover to the upper case.

    • Lift the battery cable cover out of the upper case.

  11. MacBook Unibody Model A1278 Battery Connector Replacement: 11 단계, 이미지 1/1
    • Using a spudger, pry the battery level indicator cable connector straight up off the logic board.

  12. MacBook Unibody Model A1278 Battery Connector Replacement: 12 단계, 이미지 1/1
    • Peel the battery connector cable off the adhesive securing it to the upper case.

  13. MacBook Unibody Model A1278 Battery Connector Replacement: 13 단계, 이미지 1/1
    • Pull the battery connector cable slightly toward the logic board to give yourself enough slack to grab the cable with your fingers.

    • Disconnect the cable by pulling it straight away from the logic board.

  14. MacBook Unibody Model A1278 Battery Connector Replacement: 14 단계, 이미지 1/1
    • De-route the battery connector cable through the gap in the upper case and remove it from the computer.

결론

To reassemble your device, follow these instructions in reverse order.

다른 13명이 해당 안내서를 완성하였습니다.

Walter Galan

693,920 평판

안내서 1,203개 작성하였습니다

댓글 한 개

When reinstalling the battery connector/cable, placement of the connector is critical. If the connector isn't positioned accurately, contact with the battery terminals won't be completed. The battery connector cover will help you align the connector, but there will still be a little leeway as you screw the cover down. Position the battery first, to adjust the connector's position; then remove the battery and tighten the cover screws down. You may even want to try plugging the computer into the AC charger before completing the cover attachment, to ensure that battery is charging and the connector is correctly positioned.

adlerpe - 답글

댓글 쓰기

조회 통계:

24 시간 전: 2

7일 전: 8

30일 전: 33

전체 시간: 33,340