이 버전에는 잘못된 편집 사항이 있을 수 있습니다. 최신 확인된 스냅샷으로 전환하십시오.
필요한 것
-
이 단계는 번역되지 않았습니다. 번역을 도와주십시오
-
Remove the eight 4 mm Phillips screws securing the lower case to the MacBook.
-
-
이 단계는 번역되지 않았습니다. 번역을 도와주십시오
-
Slightly lift the lower case near the vent opening.
-
Continue running your fingers between the lower and upper cases until the upper case pops off its retaining clips.
-
-
이 단계는 번역되지 않았습니다. 번역을 도와주십시오
-
Use the flat end of a spudger to lift the battery connector up out of its socket on the logic board.
-
-
이 단계는 번역되지 않았습니다. 번역을 도와주십시오
-
Remove the following screws from the optical drive side of the rear vent:
-
Two 10 mm T8 Torx
-
Two 5.2 mm Phillips
-
-
이 단계는 번역되지 않았습니다. 번역을 도와주십시오
-
Remove the following screws from the port side of rear vent:
-
Two 10 mm T8 Torx
-
Two 5.2 mm Phillips
-
-
-
이 단계는 번역되지 않았습니다. 번역을 도와주십시오
-
Use the flat end of a spudger to pry the AirPort/Bluetooth cable connector up off the logic board.
-
-
이 단계는 번역되지 않았습니다. 번역을 도와주십시오
-
Remove the following screws securing the right speaker assembly to the upper case:
-
One 12 mm Phillips screw.
-
One 3 mm Phillips screw.
-
-
이 단계는 번역되지 않았습니다. 번역을 도와주십시오
-
Remove the single 2.2 mm Phillips screw inserted horizontally into the side of the optical drive.
-
-
이 단계는 번역되지 않았습니다. 번역을 도와주십시오
-
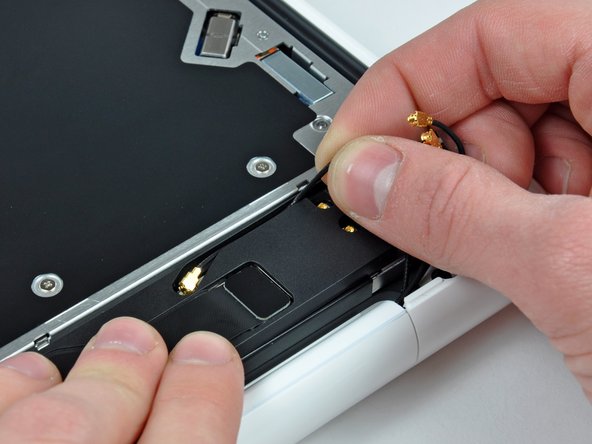
Pry the AirPort and Bluetooth antenna connectors (3 total) up off the AirPort/Bluetooth card.
-
De-route the long antenna from its channel in the rear speaker housing.
-
-
이 단계는 번역되지 않았습니다. 번역을 도와주십시오
-
Use the flat end of a spudger to pry the rear speaker cable connector up off the logic board.
-
-
이 단계는 번역되지 않았습니다. 번역을 도와주십시오
-
Carefully peel the AirPort/Bluetooth cable from its channel within the rear speaker assembly.
-
Use the flat end of a spudger to pry the AirPort/Bluetooth cable up off the rear speaker.
-
-
이 단계는 번역되지 않았습니다. 번역을 도와주십시오
-
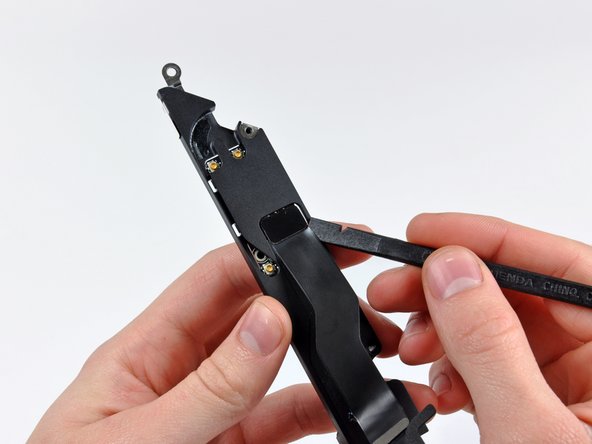
Remove three 3 mm Phillips screws securing the AirPort/Bluetooth board to the rear speaker assembly.
-


다른 24명이 해당 안내서를 완성하였습니다.

댓글 4개
Nice tuto ! Helped me so fine.
hi everyone! iʻm about to replace the rear speaker on my late 2009 A1342, but i also need to replace both the left and right speakers as well. would someone please help me out? i hope i donʻt have to pull the logic board (i already did that on my mid 2012 A1284, and it was, ok, but i have more gray hairs now . . .).