주요 콘텐츠로 건너뛰기

MacBook Unibody Model A1342 iSight Camera Board Replacement

필요한 것

  1. MacBook Unibody Model A1342 iSight Camera Board Replacement, Front Display Bezel: 1 단계, 이미지 1/3 MacBook Unibody Model A1342 iSight Camera Board Replacement, Front Display Bezel: 1 단계, 이미지 2/3 MacBook Unibody Model A1342 iSight Camera Board Replacement, Front Display Bezel: 1 단계, 이미지 3/3
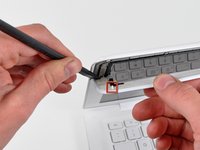
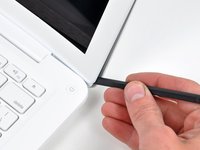
    • Insert the flat end of a spudger between the thin rubber strip surrounding the front display bezel and the rear display bezel.

    • Do not try to insert the spudger between the thin rubber strip and the plastic face of the front display bezel.

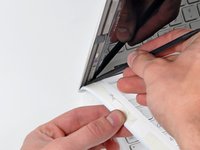
    • Use the flat end of your spudger to carefully pry the front display bezel away from the adhesive securing it to the rear display bezel.

    • Do not pry against the fragile glass LCD panel. Also, do not excessively bend the plastic, as it may permanently deform.

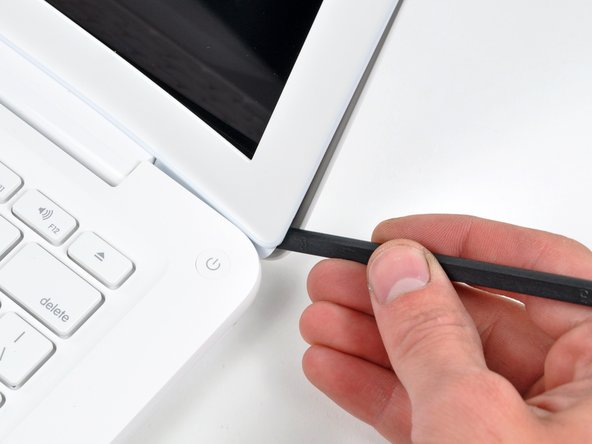
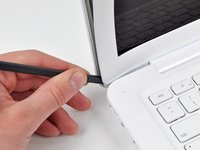
    • Continue prying until the front display bezel is free along the right side of the display and behind the right clutch hinge.

  2. MacBook Unibody Model A1342 iSight Camera Board Replacement: 2 단계, 이미지 1/2 MacBook Unibody Model A1342 iSight Camera Board Replacement: 2 단계, 이미지 2/2
    • Use the flat end of a spudger to pry the front display bezel off the top edge of the display assembly.

    • It may be helpful to insert and twist the flat end of your spudger to enlarge the gap between the front & rear display bezels as you work your way around the edge of the display.

    • Continue separating until the top edge of the front display bezel is free from the display assembly.

    • Be careful when prying near the iSight camera board, as it has exposed circuitry and is delicate.

  3. MacBook Unibody Model A1342 iSight Camera Board Replacement: 3 단계, 이미지 1/2 MacBook Unibody Model A1342 iSight Camera Board Replacement: 3 단계, 이미지 2/2
    • Use your spudger to pry the left side of the front display bezel away from the display assembly.

    • During reassembly, be sure the small plastic pegs on the front display bezel (shown in red) mate up with the holes in the rear display bezel. Failure to do so will prevent the front display bezel from sitting flush against the rear bezel.

  4. MacBook Unibody Model A1342 iSight Camera Board Replacement: 4 단계, 이미지 1/2 MacBook Unibody Model A1342 iSight Camera Board Replacement: 4 단계, 이미지 2/2
    • Carefully pry up the front display bezel where it is stuck to the display assembly near the clutch hinges.

  5. MacBook Unibody Model A1342 iSight Camera Board Replacement: 5 단계, 이미지 1/1
    • Slowly work your way across the lower edge of the front display bezel until it is free from the display assembly.

    • Be sure to pry up as far away from the LCD as possible, as it extends below the edge of the front display bezel.

    • When you get about half way across, pry up from the other side of the front display bezel's lower edge to ease the process.

    • Remove the front display bezel from the display assembly.

    • To help the adhesive avoid losing is tackiness, do not excessively handle the adhesive and be sure to keep it clean until you are ready for installation.

  6. MacBook Unibody Model A1342 iSight Camera Board Replacement, iSight Camera Board: 6 단계, 이미지 1/2 MacBook Unibody Model A1342 iSight Camera Board Replacement, iSight Camera Board: 6 단계, 이미지 2/2
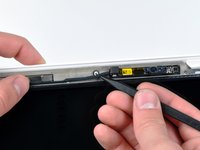
    • Use the pointed tip of a spudger to pry the camera board off the display assembly.

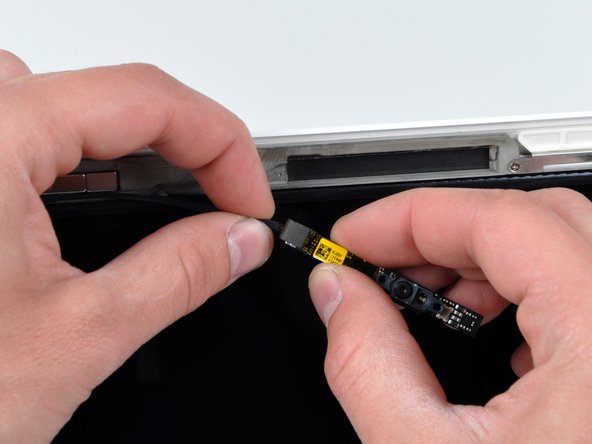
    • Disconnect the camera cable by pulling its connector away from the socket on the camera board.

결론

To reassemble your device, follow these instructions in reverse order.

다른 8명이 해당 안내서를 완성하였습니다.

Walter Galan

694,627 평판

안내서 1,203개 작성하였습니다

댓글 0개

댓글 쓰기

조회 통계:

24 시간 전: 0

7일 전: 6

30일 전: 11

전체 시간: 9,829