주요 콘텐츠로 건너뛰기

Magellan RoadMate 5236T-LM Motherboard Replacement

필요한 것

  1. Magellan RoadMate 5236T-LM Motherboard Replacement, Back Cover: 1 단계, 이미지 1/3 Magellan RoadMate 5236T-LM Motherboard Replacement, Back Cover: 1 단계, 이미지 2/3 Magellan RoadMate 5236T-LM Motherboard Replacement, Back Cover: 1 단계, 이미지 3/3
    • Place the device face down on a flat surface.

    • Remove the four 5mm screws at each corner using a #000 Phillips head screwdriver.

  2. Magellan RoadMate 5236T-LM Motherboard Replacement: 2 단계, 이미지 1/3 Magellan RoadMate 5236T-LM Motherboard Replacement: 2 단계, 이미지 2/3 Magellan RoadMate 5236T-LM Motherboard Replacement: 2 단계, 이미지 3/3
    • Gently wedge a plastic opening tool into the seam along the side of the device.

    • Slide the tool along the seam to pry apart the front and back covers.

  3. Magellan RoadMate 5236T-LM Motherboard Replacement: 3 단계, 이미지 1/2 Magellan RoadMate 5236T-LM Motherboard Replacement: 3 단계, 이미지 2/2
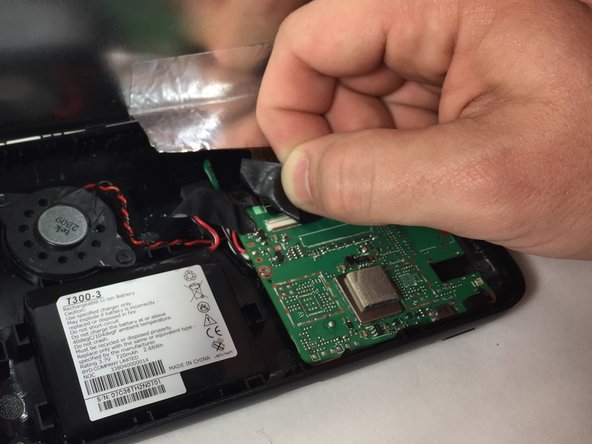
    • A ribbon cable attaches the display screen and the motherboard via a ZIF connector. Remove the tape covering where the ZIF connector connects to the mother board.

    • Use tweezers to disconnect the ZIF connector from the motherboard.

    • The ZIF connector may disconnect itself from the motherboard when removing the tape.

  4. Magellan RoadMate 5236T-LM Motherboard Replacement, Battery: 4 단계, 이미지 1/2 Magellan RoadMate 5236T-LM Motherboard Replacement, Battery: 4 단계, 이미지 2/2
    • Lay the back panel on a flat surface with the battery, motherboard, and speaker facing up.

    • Use a plastic opening tool to gently pull the battery away from the back panel in order to remove the adhesive that helps the battery stick to the panel.

  5. Magellan RoadMate 5236T-LM Motherboard Replacement: 5 단계, 이미지 1/1
    • Unscrew the two 5mm screws using a Phillips #000 screwdriver.

  6. Magellan RoadMate 5236T-LM Motherboard Replacement: 6 단계, 이미지 1/3 Magellan RoadMate 5236T-LM Motherboard Replacement: 6 단계, 이미지 2/3 Magellan RoadMate 5236T-LM Motherboard Replacement: 6 단계, 이미지 3/3
    • Use a Phillips #000 screwdriver to remove three 5mm screws that hold the motherboard down to the the back panel.

    • Remove the battery, speaker and motherboard. Place them on a flat surface upside down.

  7. Magellan RoadMate 5236T-LM Motherboard Replacement: 7 단계, 이미지 1/1
  8. Magellan RoadMate 5236T-LM Motherboard Replacement, Motherboard: 8 단계, 이미지 1/1
    • Using the soldering iron, carefully desolder the two wires connected to the speaker.

    • The motherboard should now be separated from both the battery and the speaker.

결론

To reassemble your device, follow these instructions in reverse order.

다른 한 분이 해당 안내서를 완성하였습니다.

Jared Fadding

회원 가입일: 10/18/16

161 평판

안내서 1개 작성함

UMass Dartmouth, Team 4-7, Catania Fall 2016 UMass Dartmouth, Team 4-7, Catania Fall 2016 회원

UMASSD-CATANIA-F16S4G7

3 회원들

안내서 5개 작성하였습니다

댓글 한 개

Is the hard drive solded to the motherboard as a chip? Do someone have the pinout/things-in-the-diagram of the mother board?

@mscribner @jfadd3

Kind-hearted, spirited Man - 답글

댓글 쓰기

조회 통계:

24 시간 전: 0

7일 전: 1

30일 전: 3

전체 시간: 470