이 버전에는 잘못된 편집 사항이 있을 수 있습니다. 최신 확인된 스냅샷으로 전환하십시오.
필요한 것
-
이 단계는 번역되지 않았습니다. 번역을 도와주십시오
-
Remove the volume, tone and power knobs by pulling them straight away from the front of the device. If they do not come off easily use the wedge tool to pry them up.
-
-
이 단계는 번역되지 않았습니다. 번역을 도와주십시오
-
Use a 10mm socket to remove the nuts from the volume and tone potentiometers.
-
Use a 11mm socket on the power switch nuts.
-
Use a 9/16" socket to remove the nut from the input jack.
-
-
이 단계는 번역되지 않았습니다. 번역을 도와주십시오
-
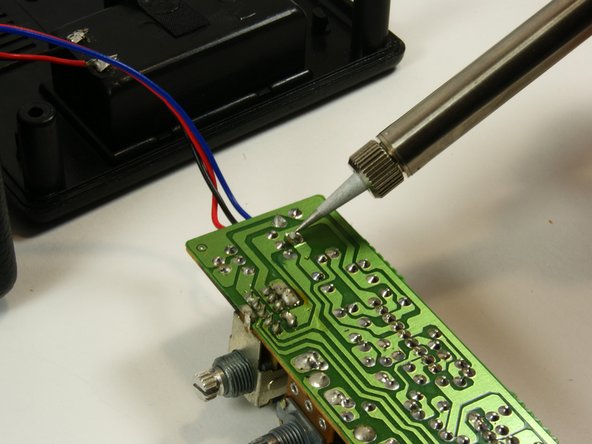
Now you must remove the LED from the circuit board.
-
To do this you will need to use a soldering iron to detach to two pins of the LED from the board. They are the two pins in the lowest leftmost corner of the board.
-
Once detached, pull the board straight up to remove.
-
-
-
이 단계는 번역되지 않았습니다. 번역을 도와주십시오
-
Use a 9/16" socket to remove the nut around the headphone jack. Be careful to not lose the washer.
-
-
이 단계는 번역되지 않았습니다. 번역을 도와주십시오
-
Grab the headphone jack from inside the case and pull it toward the speaker until you can fully remove it from the device.
-
-
이 단계는 번역되지 않았습니다. 번역을 도와주십시오
-
First do a visual check. Looked for cracked solder or damaged components.
-
The image on this page shows a wire who's solder has completely detached from the board.
-
To fixed cracked or detached solder, use the soldering iron to heat the solder already there until it flows and becomes completely attached to the board.
-
To replace damaged components use the iron to remove and replace them.
-
-
이 단계는 번역되지 않았습니다. 번역을 도와주십시오
-
To check for breaks in the wires, set the multimeter to the mode where you can check for a closed circuit.
-
Put one pin on each end of them wire.
-
If the meter doesn't say that there is a closed circuit replace the wire.
-
-
이 단계는 번역되지 않았습니다. 번역을 도와주십시오
-
Use a multimeter to test the potential difference across the components. You will have to reinstall the batter and turn the device on to do this.
-
Put one of the pins on each side of the component. Read the value on the meter.
-
Each resistor has a predefined value that can be found using this page. Compare the results to the expected values.
-
The capacitors have there properly functioning values printed on them.
-
If any values vary replace the component.
-


다른 한 분이 해당 안내서를 완성하였습니다.
팀

University of Maryland, Team 1-1, Shastany Fall 2013 University of Maryland, Team 1-1, Shastany Fall 2013 회원
UMD-SHASTANY-F13S1G1
3 회원들
안내서 5개 작성하였습니다
댓글 한 개
HOla, hace años tengo uno y por cosas de la vida, un amigo que quiero matar, jejeje... le puso un adaptador de corriente de 12V, y sabemos que funciona con 9... asi que me gustaria saber que pudo haberse dañado para poder repararlo... por cierto, el led funciona normal al conectar.. pero no emite sonido alguno.. saludos