주요 콘텐츠로 건너뛰기

이 안내서에는 최근 변경 사항이 더 있습니다. 최신 비검증 버전으로 전환하십시오.

Microsoft Surface Pro 5 Heat Sink Replacement

필요한 것

  1. Microsoft Surface Pro 5 Heat Sink Replacement, Disconnect the display board: 1 단계, 이미지 1/3 Microsoft Surface Pro 5 Heat Sink Replacement, Disconnect the display board: 1 단계, 이미지 2/3 Microsoft Surface Pro 5 Heat Sink Replacement, Disconnect the display board: 1 단계, 이미지 3/3
    • Use a spudger to flip up the small locking flaps on the display cable ZIF connectors.

  2. Microsoft Surface Pro 5 Heat Sink Replacement: 2 단계, 이미지 1/3 Microsoft Surface Pro 5 Heat Sink Replacement: 2 단계, 이미지 2/3 Microsoft Surface Pro 5 Heat Sink Replacement: 2 단계, 이미지 3/3
    이 단계에 사용된 도구:
    Tweezers
    $4.99
    구매
    • Use tweezers to slide the display cables straight out of their sockets on the display board.

  3. Microsoft Surface Pro 5 Heat Sink Replacement, Remove the display board: 3 단계, 이미지 1/3 Microsoft Surface Pro 5 Heat Sink Replacement, Remove the display board: 3 단계, 이미지 2/3 Microsoft Surface Pro 5 Heat Sink Replacement, Remove the display board: 3 단계, 이미지 3/3
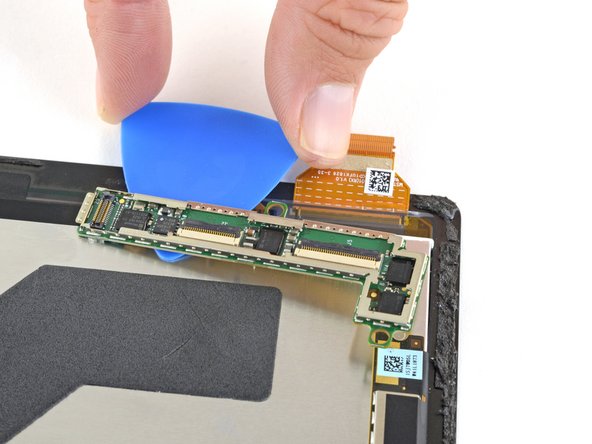
    • Slide an opening pick under the display board to separate the adhesive holding it onto the back of the screen.

  4. Microsoft Surface Pro 5 Heat Sink Replacement: 4 단계, 이미지 1/1
    이 단계에 사용된 도구:
    Tesa 61395 Tape
    $5.99
    구매
    • Remove the display board.

    • During reassembly, use a strong double-sided tape or a precut adhesive card to secure the display board. Clean off the old adhesive before applying new adhesive.

    • To ensure correct positioning, plug in both display connectors before adhering the board to the display.

  5. Microsoft Surface Pro 5 Heat Sink Replacement: 5 단계, 이미지 1/1
    • Only the screen remains.

  6. Microsoft Surface Pro 5 Heat Sink Replacement, Heat Sink: 6 단계, 이미지 1/1
    • Pry off the protective metal shield covering the main processor using either the nylon spudger or the plastic opening tool.

  7. Microsoft Surface Pro 5 Heat Sink Replacement: 7 단계, 이미지 1/1
    • Remove the four silver Torx T5 x 3mm screws holding the heat sink onto the main processor.

  8. Microsoft Surface Pro 5 Heat Sink Replacement: 8 단계, 이미지 1/2 Microsoft Surface Pro 5 Heat Sink Replacement: 8 단계, 이미지 2/2
    • Remove the remaining five black Torx T4 x 3mm screws holding down the heat sink assembly.

  9. Microsoft Surface Pro 5 Heat Sink Replacement: 9 단계, 이미지 1/1
    • Remove the heat sink from the device by grabbing one of the copper bars with your fingers and lifting straight up.

    • Avoid touching the thermal paste that is on the back of the heat sink and on the front of the CPU. If you get thermal paste on your hands, wash it off with mild soap and water.

결론

To reassemble your device, follow these instructions in reverse order.

다른 2명이 해당 안내서를 완성하였습니다.

Paul Manzer

회원 가입일: 10/02/17

746 평판

안내서 4개 작성하였습니다

Cal Poly, Team S15-G3, Livingston Fall 2017 Cal Poly, Team S15-G3, Livingston Fall 2017 회원

CPSU-LIVINGSTON-F17S15G3

3 회원들

안내서 17개 작성하였습니다

댓글 0개

댓글 쓰기

조회 통계:

24 시간 전: 5

7일 전: 8

30일 전: 58

전체 시간: 3,406