주요 콘텐츠로 건너뛰기
Microsoft Zune HD Lower Rear Panel Replacement

Microsoft Zune HD Lower Rear Panel Replacement

Walter Galan

Walter Galan4 다른 기여자

최종 수정일 July 31, 2013

예상시간 없음
조정

Replace your Zune HD's lower rear panel.

필요한 것

도구

  1. Microsoft Zune HD Lower Rear Panel Replacement, Upper Rear Panel: 1 단계, 이미지 1개 중 1개
    • Remove the four Tri-Wing screws securing the upper rear panel to the inner chassis.

  2. Microsoft Zune HD Lower Rear Panel Replacement: 2 단계, 이미지 2개 중 1개 Microsoft Zune HD Lower Rear Panel Replacement: 2 단계, 이미지 2개 중 2개
    • Slightly rotate the top edge of the upper rear panel away from the Zune.

    • Lift the upper rear panel straight up off the black plastic lower rear panel.

  3. Microsoft Zune HD Lower Rear Panel Replacement, Lower Rear Panel: 3 단계, 이미지 2개 중 1개 Microsoft Zune HD Lower Rear Panel Replacement, Lower Rear Panel: 3 단계, 이미지 2개 중 2개
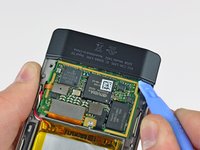
    • Insert a small Zune opening tool into the gap between the logic board and one side of the black plastic lower rear panel.

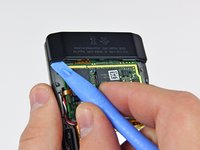
    • Carefully twist the Zune opening tool to pop the lower rear panel off the clips attaching it to the Zune.

    • Repeat this process for the other side of the lower rear panel.

  4. Microsoft Zune HD Lower Rear Panel Replacement: 4 단계, 이미지 1개 중 1개
    • Carefully slide the lower rear panel away from the Zune.

결론

To reassemble your device, follow these instructions in reverse order.

다른 한 분이 해당 안내서를 완성하였습니다.

작성자

4다른 기여자 명과 함께

Walter Galan

701,237 평판

안내서 1,203개를 작성함

댓글 한 개

I followed these instructions and now that lower cover will not snap back in place 😒

Robert Rank - 답글

댓글 쓰기

조회 통계:

지난 24시간: 0

지난 7일: 0

지난 30일: 6

전체 시간: 3,183