주요 콘텐츠로 건너뛰기

Moto G4 Back Cover Replacement

필요한 것

  1. Moto G4 Back Cover Replacement, Back Cover: 1 단계, 이미지 1/3 Moto G4 Back Cover Replacement, Back Cover: 1 단계, 이미지 2/3 Moto G4 Back Cover Replacement, Back Cover: 1 단계, 이미지 3/3
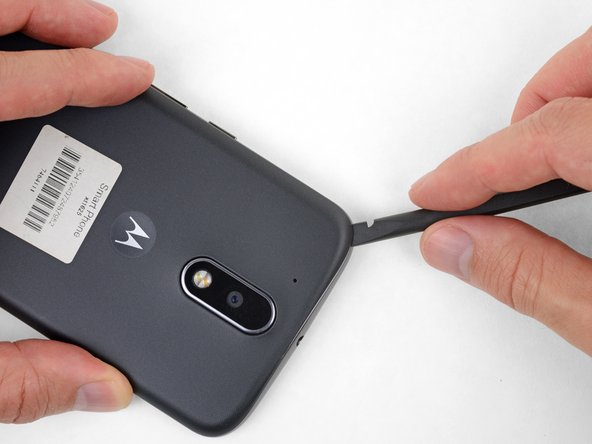
    • Insert a fingernail or a spudger into the notch on the bottom edge of the phone, near the charge port.

    • Gently twist or pry to open a small gap between the back cover and the body of the phone.

    • While keeping your tool (or fingernail) inserted into the gap between the back cover and the body of the phone, slide it around the corner to begin loosening the plastic clips holding the cover in place.

  2. Moto G4 Back Cover Replacement: 2 단계, 이미지 1/2 Moto G4 Back Cover Replacement: 2 단계, 이미지 2/2
    • Slide your tool all along the side of the phone to separate more of the clips securing the back cover.

  3. Moto G4 Back Cover Replacement: 3 단계, 이미지 1/3 Moto G4 Back Cover Replacement: 3 단계, 이미지 2/3 Moto G4 Back Cover Replacement: 3 단계, 이미지 3/3
    • Keep your tool inserted slightly under the back cover, and slide it around the top corner.

    • If necessary, continue prying around the remaining edges of the phone until the back cover comes free.

  4. Moto G4 Back Cover Replacement: 4 단계, 이미지 1/2 Moto G4 Back Cover Replacement: 4 단계, 이미지 2/2
    • Remove the back cover.

    • To install the back cover, carefully position it over the phone and then press gently all around the edges until you feel the clips snap into place.

결론

To reassemble your device, follow these instructions in reverse order.

다른 2명이 해당 안내서를 완성하였습니다.

Jeff Suovanen

회원 가입일: 08/06/13

428,107 평판

안내서 259개 작성하였습니다

iFixit iFixit 회원

Staff

135 회원들

안내서 16,817개 작성하였습니다

댓글 0개

댓글 쓰기

조회 통계:

24 시간 전: 0

7일 전: 1

30일 전: 9

전체 시간: 1,135