주요 콘텐츠로 건너뛰기

Motorola Droid Turbo 2 Earpiece Speaker Replacement

필요한 것

  1. Motorola Droid Turbo 2 Earpiece Speaker Replacement, Midframe: 1 단계, 이미지 1/3 Motorola Droid Turbo 2 Earpiece Speaker Replacement, Midframe: 1 단계, 이미지 2/3 Motorola Droid Turbo 2 Earpiece Speaker Replacement, Midframe: 1 단계, 이미지 3/3
    • Power off your phone before you begin working.

    • Insert a SIM eject tool, SIM eject bit, or a straightened paperclip into the small hole in the SIM card tray.

    • Press to eject the tray.

    • Remove the SIM card tray assembly from the phone.

  2. Motorola Droid Turbo 2 Earpiece Speaker Replacement: 2 단계, 이미지 1/1
    • Heat an iOpener and apply it to the top edge of the phone for a minute.

    • A hair dryer, heat gun, or hot plate may also be used, but be careful not to overheat the phone—the display and internal battery are both susceptible to heat damage.

  3. Motorola Droid Turbo 2 Earpiece Speaker Replacement: 3 단계, 이미지 1/2 Motorola Droid Turbo 2 Earpiece Speaker Replacement: 3 단계, 이미지 2/2
    • Angle an opening pick and firmly press so that it slips under the back cover.

    • Depending on the age of the phone, this can be difficult. Additional heating with the iOpener may help. You can pry carefully with a metal spudger to create a gap for the opening pick.

  4. Motorola Droid Turbo 2 Earpiece Speaker Replacement: 4 단계, 이미지 1/3 Motorola Droid Turbo 2 Earpiece Speaker Replacement: 4 단계, 이미지 2/3 Motorola Droid Turbo 2 Earpiece Speaker Replacement: 4 단계, 이미지 3/3
    • Slide the opening pick along the top edge of the phone to break up the adhesive.

    • Use the pick to release the deeper areas but avoid slicing through the camera bezel area.

  5. Motorola Droid Turbo 2 Earpiece Speaker Replacement: 5 단계, 이미지 1/3 Motorola Droid Turbo 2 Earpiece Speaker Replacement: 5 단계, 이미지 2/3 Motorola Droid Turbo 2 Earpiece Speaker Replacement: 5 단계, 이미지 3/3
    • Repeat the iOpener heating and slicing procedures for the remaining three sides.

    • Make sure to cut into the deeper areas as the back cover is held on by a large adhesive surface.

  6. Motorola Droid Turbo 2 Earpiece Speaker Replacement: 6 단계, 이미지 1/3 Motorola Droid Turbo 2 Earpiece Speaker Replacement: 6 단계, 이미지 2/3 Motorola Droid Turbo 2 Earpiece Speaker Replacement: 6 단계, 이미지 3/3
    • Once you have cut through the adhesive, slowly peel the back cover away from the frame.

    • Remove the back cover.

    • During reassembly, follow this rear cover adhesive guide to properly apply the pre-cut adhesive strip.

  7. Motorola Droid Turbo 2 Earpiece Speaker Replacement: 7 단계, 이미지 1/3 Motorola Droid Turbo 2 Earpiece Speaker Replacement: 7 단계, 이미지 2/3 Motorola Droid Turbo 2 Earpiece Speaker Replacement: 7 단계, 이미지 3/3
    • Insert an opening pick under the flash connector rubber cover and pry forward to remove it.

    • To reinstall the cover, align the cover and use your finger to push it forward into place.

  8. Motorola Droid Turbo 2 Earpiece Speaker Replacement: 8 단계, 이미지 1/3 Motorola Droid Turbo 2 Earpiece Speaker Replacement: 8 단계, 이미지 2/3 Motorola Droid Turbo 2 Earpiece Speaker Replacement: 8 단계, 이미지 3/3
    • Use the point of a spudger to pry up and remove the coil connector rubber cover.

    • To reinstall the cover, align the cover and use your finger to push it forward into place.

  9. Motorola Droid Turbo 2 Earpiece Speaker Replacement: 9 단계, 이미지 1/2 Motorola Droid Turbo 2 Earpiece Speaker Replacement: 9 단계, 이미지 2/2
    • Use the point of a spudger to pry up and disconnect the flash connector.

    • To re-attach press connectors like this one, carefully align and press down on one side until it clicks into place, then repeat on the other side. Do not press down on the middle. If the connector is misaligned, the pins can bend, causing permanent damage.

  10. Motorola Droid Turbo 2 Earpiece Speaker Replacement: 10 단계, 이미지 1/2 Motorola Droid Turbo 2 Earpiece Speaker Replacement: 10 단계, 이미지 2/2
    • Use the point of a spudger to pry up and disconnect the wireless charging coil connector.

  11. Motorola Droid Turbo 2 Earpiece Speaker Replacement: 11 단계, 이미지 1/1
    • Remove the following T3 screws securing the midframe:

    • Thirteen 3.1 mm black screws

    • Four 4.3 mm silver screws

    • Due to screw and bit variance, you may have better luck with a T4 driver. The proper bit should seat fully in the screwhead and feel slightly loose. The bit should not feel like it's stuck in the screwhead.

  12. Motorola Droid Turbo 2 Earpiece Speaker Replacement: 12 단계, 이미지 1/2 Motorola Droid Turbo 2 Earpiece Speaker Replacement: 12 단계, 이미지 2/2
    • Insert an opening pick along the frame seam and twist slightly to release the midframe from the phone.

  13. Motorola Droid Turbo 2 Earpiece Speaker Replacement: 13 단계, 이미지 1/2 Motorola Droid Turbo 2 Earpiece Speaker Replacement: 13 단계, 이미지 2/2
    • Remove the midframe from the phone.

    • You can tape over the side buttons to prevent them from falling out during your repair.

    • If the buttons fall out of the midframe, reinsert them in the orientation as shown before you reinstall the midframe.

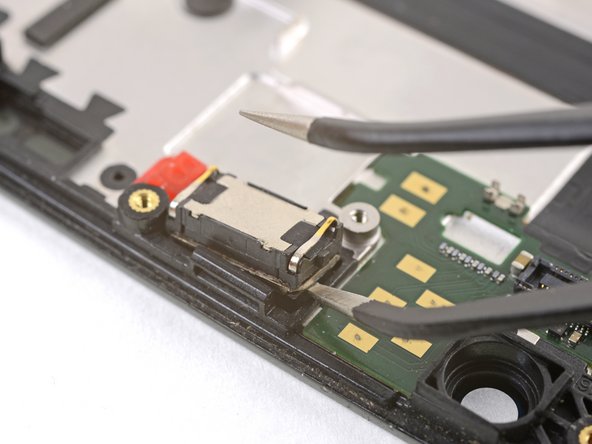
  14. Motorola Droid Turbo 2 Earpiece Speaker Replacement, Earpiece Speaker: 14 단계, 이미지 1/2 Motorola Droid Turbo 2 Earpiece Speaker Replacement, Earpiece Speaker: 14 단계, 이미지 2/2
    • The earpiece speaker module is very delicate and prone to breaking. Be gentle when handling the module.

    • Insert a pointed end of a pair of tweezers into a corner as far down as possible.

    • Pry very slightly to help loosen the earpiece speaker module.

    • Repeat the process in the remaining corners.

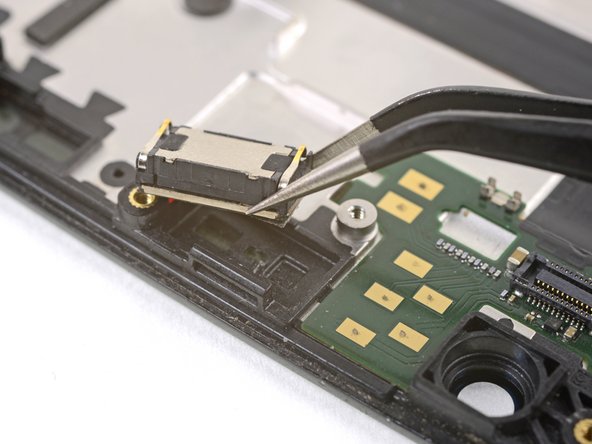
  15. Motorola Droid Turbo 2 Earpiece Speaker Replacement: 15 단계, 이미지 1/3 Motorola Droid Turbo 2 Earpiece Speaker Replacement: 15 단계, 이미지 2/3 Motorola Droid Turbo 2 Earpiece Speaker Replacement: 15 단계, 이미지 3/3
    • Continue to pry with the point of a pair of tweezers until the earpiece module feels loose.

    • Remove the earpiece module.

결론

To reassemble your device, follow these instructions in reverse order.

Take your e-waste to an R2 or e-Stewards certified recycler.

Repair didn’t go as planned? Check out our Motorola Moto Droid Turbo 2 Answers community for troubleshooting help.

다른 3명이 해당 안내서를 완성하였습니다.

Arthur Shi

회원 가입일: 01/03/18

248,412 평판

안내서 503개 작성하였습니다

iFixit iFixit 회원

Staff

136 회원들

안내서 16,560개 작성하였습니다

댓글 한 개

I replaced my earpiece speaker but the volume is still extremely low. My headphones jack output is also very low when I plug it into and external speaker. Before this happened, This all started after I accidentally got some water on my phone but not enough to drench it. My speaker first sounded distorted when making a phone call and now the volume is so low that I can just barely hear it. Definitely too low to converse with someone. Is the fault in my motherboard? I've cleaned up all the obvious grounding points in my phone. Not sure what else I can check. Thinking about completely disassembling, replacing the ear speaker again doing a hard reset and if all those fail replace the phone. Any thoughts?

jeffrey - 답글

댓글 쓰기

조회 통계:

24 시간 전: 0

7일 전: 0

30일 전: 4

전체 시간: 4,416