주요 콘텐츠로 건너뛰기

Motorola Moto G 3rd Generation SIM/SD Card PCB Replacement

필요한 것

  1. Motorola Moto G 3rd Generation SIM/SD Card PCB Replacement, Display: 1 단계, 이미지 1/2 Motorola Moto G 3rd Generation SIM/SD Card PCB Replacement, Display: 1 단계, 이미지 2/2
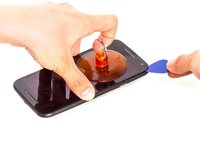
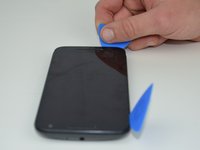
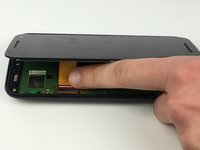
    • Use your fingernail to pry under the notch on the bottom of the phone and remove the back cover.

    • Make sure to fully power off the phone before you begin disassembly.

  2. Motorola Moto G 3rd Generation SIM/SD Card PCB Replacement: 2 단계, 이미지 1/2 Motorola Moto G 3rd Generation SIM/SD Card PCB Replacement: 2 단계, 이미지 2/2
    • Use a heat gun or an iOpener as a heating tool. This guide explains how to use the iOpener.

    • Evenly apply heat to the edges of the touchscreen to loosen the adhesive. Continue to Step 3 once the edge of the screen is warm to the touch.

    • Do not let the iOpener/heat gun remain on one spot for too long. Excess heat can damage the phone.

    • When reassembling the phone, use the iOpener/heat gun to help the adhesive fuse to the new screen. Heat the screen edges, apply pressure to the screen, and hold the screen in place until it is secure.

  3. Motorola Moto G 3rd Generation SIM/SD Card PCB Replacement: 3 단계, 이미지 1/3 Motorola Moto G 3rd Generation SIM/SD Card PCB Replacement: 3 단계, 이미지 2/3 Motorola Moto G 3rd Generation SIM/SD Card PCB Replacement: 3 단계, 이미지 3/3
    • As the adhesive loosens, pry up an edge of the screen with a plastic opening tool or an opening pick. A suction cup may also be useful here.

    • Use an opening pick to hold that edge in place and continue this process around the entire screen, applying more heat as necessary.

    • Avoid damaging the LCD screen connector while prying along the screen edges. It is located on the left edge of the phone, across from the volume controls.

    • During reassembly, new adhesive may need to be applied over the old adhesive to properly secure the screen.

  4. Motorola Moto G 3rd Generation SIM/SD Card PCB Replacement: 4 단계, 이미지 1/3 Motorola Moto G 3rd Generation SIM/SD Card PCB Replacement: 4 단계, 이미지 2/3 Motorola Moto G 3rd Generation SIM/SD Card PCB Replacement: 4 단계, 이미지 3/3
    이 단계에 사용된 도구:
    Tesa 61395 Tape
    $5.99
    구매
    • Use a plastic opening tool to flip up the lock on the display cable ZIF connector.

    • Pull the display cable from its socket on the motherboard.

    • When installing a new display, carefully remove all remaining adhesive from the phone, and clean the adhered areas with isopropyl alcohol (90% or greater) and a lint-free cloth. Install the display using pre-cut adhesive or a strong double-sided tape such as Tesa 61395. Turn your phone on and test your repair before sealing the display in place.

  5. Motorola Moto G 3rd Generation SIM/SD Card PCB Replacement, Motherboard: 5 단계, 이미지 1/1
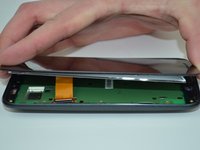
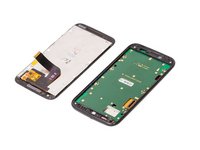
    • Remove the ten 2.4 mm T4 screws from the sides of the motherboard.

    • Remove the four 4.5 mm T4 screws from the top and bottom of the motherboard.

  6. Motorola Moto G 3rd Generation SIM/SD Card PCB Replacement: 6 단계, 이미지 1/1
    • If adhesive residue is holding the motherboard in place, use a Jimmy to cut the adhesive between the motherboard and the back of the phone.

    • Carefully lift the right edge of the motherboard from the phone.

    • Avoid pulling on the battery wires, which connect the left underside of the motherboard to the battery.

  7. Motorola Moto G 3rd Generation SIM/SD Card PCB Replacement: 7 단계, 이미지 1/1
    • Use a plastic opening tool to disconnect the battery wires from the motherboard.

  8. Motorola Moto G 3rd Generation SIM/SD Card PCB Replacement, SIM/SD Card Reader PCB: 8 단계, 이미지 1/1
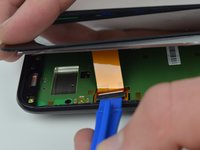
    • Remove the three 2.4 mm T4 screws from the right side and bottom of the SIM/SD card panel.

  9. Motorola Moto G 3rd Generation SIM/SD Card PCB Replacement: 9 단계, 이미지 1/1
    • Pry off the SIM/SD card panel using a plastic opening tool.

    • There may be adhesive securing the SIM/SD card panel to the motherboard. Exercise caution when prying it off.

    • Replace the adhesive when inserting a new card panel.

결론

To reassemble your device, follow these instructions in reverse order.

다른 25명이 해당 안내서를 완성하였습니다.

James Copeland

회원 가입일: 02/10/16

4,022 평판

안내서 5개 작성하였습니다

USF Tampa, Team 1-3, Nance Spring 2016 USF Tampa, Team 1-3, Nance Spring 2016 회원

USFT-NANCE-S16S1G3

4 회원들

안내서 21개 작성하였습니다

댓글 6개

I replace with new SIM card reader gotten from China, but not working.

Woleola Akala - 답글

bhai china ka mal to aisa hi milega

Insane boy Kushal -

Any further solution to this.

Woleola Akala - 답글

Ha abhi le ke aata hu

Insane boy Kushal -

Guide worked like a charm, thanks!

mkonings - 답글

댓글 쓰기

조회 통계:

24 시간 전: 0

7일 전: 8

30일 전: 22

전체 시간: 25,856