주요 콘텐츠로 건너뛰기

Motorola Moto G Stylus 5G (2022) Motherboard Cover Replacement

필요한 것

  1. Motorola Moto G Stylus 5G (2022) Motherboard Cover Replacement, Heat the edge: 1 단계, 이미지 1개 중 1개
    • Discharge your battery to 25% or lower and power off your phone before you begin.

    • Heat an iOpener and apply it to the edge of the back cover with the SIM card slot for two minutes.

    • A hair dryer or heat gun may also be used, but be careful not to overheat the phone—the display and internal battery are both susceptible to heat damage.

  2. Motorola Moto G Stylus 5G (2022) Motherboard Cover Replacement, Insert an opening pick: 2 단계, 이미지 3개 중 1개 Motorola Moto G Stylus 5G (2022) Motherboard Cover Replacement, Insert an opening pick: 2 단계, 이미지 3개 중 2개 Motorola Moto G Stylus 5G (2022) Motherboard Cover Replacement, Insert an opening pick: 2 단계, 이미지 3개 중 3개
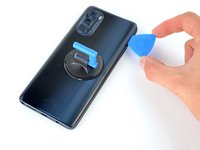
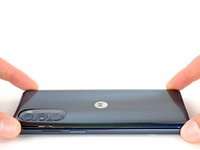
    • Apply a suction cup to the back cover, as close to the center of the right edge as possible.

    • Pull up on the suction cup with strong, steady force to create a gap between the cover and the frame.

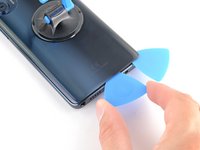
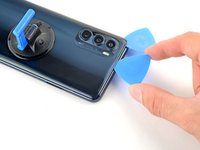
    • Insert an opening pick into the gap.

  3. Motorola Moto G Stylus 5G (2022) Motherboard Cover Replacement, Slice the right adhesive: 3 단계, 이미지 3개 중 1개 Motorola Moto G Stylus 5G (2022) Motherboard Cover Replacement, Slice the right adhesive: 3 단계, 이미지 3개 중 2개 Motorola Moto G Stylus 5G (2022) Motherboard Cover Replacement, Slice the right adhesive: 3 단계, 이미지 3개 중 3개
    • Slide your opening pick back and forth along the right edge to slice through the adhesive.

    • Leave the pick in at the bottom right corner to prevent the adhesive from resealing.

  4. Motorola Moto G Stylus 5G (2022) Motherboard Cover Replacement, Slice the bottom adhesive: 4 단계, 이미지 2개 중 1개 Motorola Moto G Stylus 5G (2022) Motherboard Cover Replacement, Slice the bottom adhesive: 4 단계, 이미지 2개 중 2개
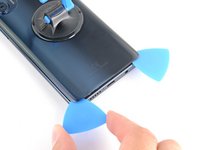
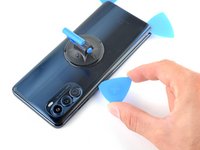
    • Insert a second opening pick into the bottom right corner.

    • Slide this opening pick along the bottom edge to the bottom left corner to slice through the adhesive.

    • Leave the pick inserted to prevent the bottom edge from resealing.

  5. Motorola Moto G Stylus 5G (2022) Motherboard Cover Replacement, Slice the left adhesive: 5 단계, 이미지 3개 중 1개 Motorola Moto G Stylus 5G (2022) Motherboard Cover Replacement, Slice the left adhesive: 5 단계, 이미지 3개 중 2개 Motorola Moto G Stylus 5G (2022) Motherboard Cover Replacement, Slice the left adhesive: 5 단계, 이미지 3개 중 3개
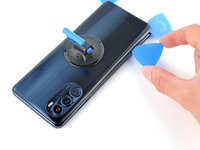
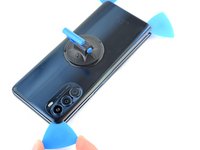
    • Insert a third opening pick into the bottom right corner.

    • Slide this opening pick along the left edge to slice the adhesive.

    • Don't worry about slicing under the camera bezel. It's separate from the back cover and will be removed later.

    • Leave the pick inserted in the top left corner to prevent the left edge from resealing.

  6. Motorola Moto G Stylus 5G (2022) Motherboard Cover Replacement, Slice the top adhesive: 6 단계, 이미지 2개 중 1개 Motorola Moto G Stylus 5G (2022) Motherboard Cover Replacement, Slice the top adhesive: 6 단계, 이미지 2개 중 2개
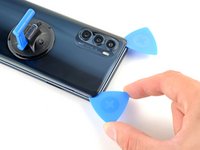
    • Insert a fourth pick into the top left corner.

    • Slide the pick to the top right corner to slice the top adhesive.

  7. Motorola Moto G Stylus 5G (2022) Motherboard Cover Replacement, Slice around the camera bezel: 7 단계, 이미지 1개 중 1개
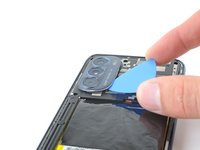
    • Slide an opening pick between the camera bezel and the back cover.

    • The back cover's adhesive is particularly strong around the camera bezel.

    • Slide the opening pick around the camera bezel to separate the back cover from the frame.

  8. Motorola Moto G Stylus 5G (2022) Motherboard Cover Replacement, Remove the back cover: 8 단계, 이미지 3개 중 1개 Motorola Moto G Stylus 5G (2022) Motherboard Cover Replacement, Remove the back cover: 8 단계, 이미지 3개 중 2개 Motorola Moto G Stylus 5G (2022) Motherboard Cover Replacement, Remove the back cover: 8 단계, 이미지 3개 중 3개
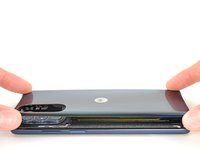
    • Grab and remove the back cover by lifting it away from the phone.

    • If your back cover is still sticking to the frame, slide the pick around the edges of the phone to slice through any remaining adhesive.

    • Reassembly notes:

    • To adhere the back cover with custom-cut adhesives, follow this guide.

    • To adhere the back cover with tape, follow this guide.

  9. Motorola Moto G Stylus 5G (2022) Motherboard Cover Replacement, Heat the camera bezel: 9 단계, 이미지 1개 중 1개
    • Heat an iOpener and apply it to the camera bezel for two minutes.

    • A hair dryer or heat gun may also be used, but be careful not to overheat the phone—the display and internal battery are both susceptible to heat damage.

  10. Motorola Moto G Stylus 5G (2022) Motherboard Cover Replacement, Slice the adhesive: 10 단계, 이미지 3개 중 1개 Motorola Moto G Stylus 5G (2022) Motherboard Cover Replacement, Slice the adhesive: 10 단계, 이미지 3개 중 2개 Motorola Moto G Stylus 5G (2022) Motherboard Cover Replacement, Slice the adhesive: 10 단계, 이미지 3개 중 3개
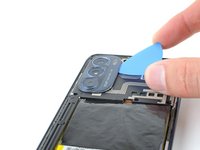
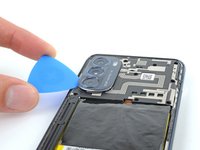
    • Insert an opening pick under the camera bezel.

    • Slide the pick around the perimeter of the bezel to slice the adhesive.

    • If it feels stuck, apply more heat to further loosen the adhesive.

  11. Motorola Moto G Stylus 5G (2022) Motherboard Cover Replacement, Remove the camera bezel: 11 단계, 이미지 3개 중 1개 Motorola Moto G Stylus 5G (2022) Motherboard Cover Replacement, Remove the camera bezel: 11 단계, 이미지 3개 중 2개 Motorola Moto G Stylus 5G (2022) Motherboard Cover Replacement, Remove the camera bezel: 11 단계, 이미지 3개 중 3개
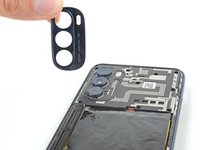
    • Grab and remove the camera bezel.

    • Reassembly notes:

    • This is a good point to test your phone before sealing it up. Follow this guide to perform a hardware test. Be sure to power your phone back down completely before you continue working.

    • To adhere the camera bezel with custom-cut adhesives, follow this guide.

    • To adhere the camera bezel with tape, follow this guide.

  12. Motorola Moto G Stylus 5G (2022) Motherboard Cover Replacement, Unfasten the motherboard cover: 12 단계, 이미지 1개 중 1개
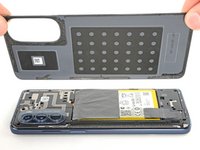
    • Use a Phillips screwdriver to remove the eleven 4.1 mm-long screws securing the motherboard cover.

    • If you can't find all the screws, check under any leftover adhesive residue.

  13. Motorola Moto G Stylus 5G (2022) Motherboard Cover Replacement, Unclip the right edge: 13 단계, 이미지 3개 중 1개 Motorola Moto G Stylus 5G (2022) Motherboard Cover Replacement, Unclip the right edge: 13 단계, 이미지 3개 중 2개 Motorola Moto G Stylus 5G (2022) Motherboard Cover Replacement, Unclip the right edge: 13 단계, 이미지 3개 중 3개
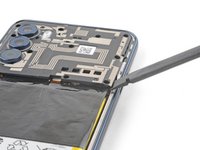
    • Insert a spudger between the bottom right corner of the cover and the frame.

    • Pry up to release the clips securing the cover.

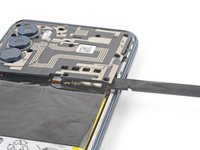
    • Slide the spudger toward the top of the cover and pry to release the right edge.

  14. Motorola Moto G Stylus 5G (2022) Motherboard Cover Replacement, Remove the motherboard cover: 14 단계, 이미지 2개 중 1개 Motorola Moto G Stylus 5G (2022) Motherboard Cover Replacement, Remove the motherboard cover: 14 단계, 이미지 2개 중 2개
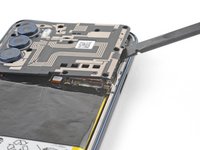
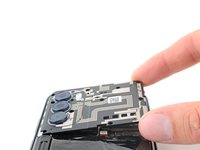
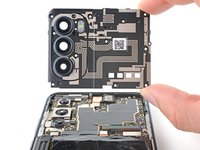
    • Grip the right edge of the cover and pull it off the motherboard.

결론

To reassemble your device, follow these instructions in reverse order.

Take your e-waste to an R2 or e-Stewards certified recycler.

Repair didn’t go as planned? Try some basic troubleshooting, or ask our Answers community for help.

작성자

2다른 기여자 명과 함께

Clay Eickemeyer

회원 가입일: 09/19/22

96,090 평판

안내서 466개를 작성함

1가이드 댓글

AHA, so that part is the one with the camera lens covers, not the blue back case itself! THANKS!

J D - 답글

댓글 쓰기

조회 통계:

지난 24시간: 0

지난 7일: 7

지난 30일: 35

전체 시간: 617