주요 콘텐츠로 건너뛰기

Motorola Moto X Pure Edition LCD and Digitizer Assembly Replacement

필요한 것

  1. Motorola Moto X Pure Edition LCD and Digitizer Assembly Replacement, SIM Tray: 1 단계, 이미지 1/2 Motorola Moto X Pure Edition LCD and Digitizer Assembly Replacement, SIM Tray: 1 단계, 이미지 2/2
    • Insert a SIM card eject tool, bit, or a straightened paperclip into the small hole in the SIM card tray.

    • Press to eject the tray.

    • This may require a significant amount of force.

  2. Motorola Moto X Pure Edition LCD and Digitizer Assembly Replacement: 2 단계, 이미지 1/1
    • Remove the SIM card tray from the phone.

    • The SIM card will fall out of the tray easily.

    • When reinserting the SIM card, ensure that it is in the proper orientation relative to the tray.

  3. Motorola Moto X Pure Edition LCD and Digitizer Assembly Replacement, Opening Procedure: 3 단계, 이미지 1/1
    • Prepare an iOpener and heat the back of the phone along its right edge for about five minutes. This will help soften the adhesive securing the back cover.

    • You may need to reheat and reapply the iOpener several times to get the phone warm enough. Follow the iOpener instructions to avoid overheating.

    • A hair dryer, heat gun, or hot plate may also be used, but be careful not to overheat the phone—the LCD display and internal battery are both susceptible to heat damage.

  4. Motorola Moto X Pure Edition LCD and Digitizer Assembly Replacement: 4 단계, 이미지 1/3 Motorola Moto X Pure Edition LCD and Digitizer Assembly Replacement: 4 단계, 이미지 2/3 Motorola Moto X Pure Edition LCD and Digitizer Assembly Replacement: 4 단계, 이미지 3/3
    • In the following steps, you'll be cutting through the adhesive securing the back cover.

    • The adhesive is laid out as seen in the first image, which shows the inside of the cover.

    • Avoid slicing in this area to avoid damaging delicate ribbon cables.

  5. Motorola Moto X Pure Edition LCD and Digitizer Assembly Replacement: 5 단계, 이미지 1/3 Motorola Moto X Pure Edition LCD and Digitizer Assembly Replacement: 5 단계, 이미지 2/3 Motorola Moto X Pure Edition LCD and Digitizer Assembly Replacement: 5 단계, 이미지 3/3
    • Hold a pair of pointed tweezers closed, and insert them into the small hole on the edge of the back cover near the SIM card slot.

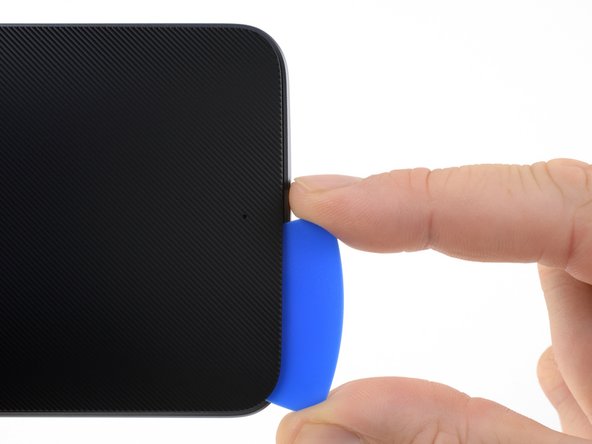
    • Use the tweezers to lift the cover up slightly, and slide an opening pick into the gap between the cover and the frame.

  6. Motorola Moto X Pure Edition LCD and Digitizer Assembly Replacement: 6 단계, 이미지 1/3 Motorola Moto X Pure Edition LCD and Digitizer Assembly Replacement: 6 단계, 이미지 2/3 Motorola Moto X Pure Edition LCD and Digitizer Assembly Replacement: 6 단계, 이미지 3/3
    • Slide the opening pick along the edge of the phone to slice through the back cover adhesive.

    • Try to insert the pick as far as you can underneath the cover, toward the center of the cover. There's thick adhesive on the middle of the cover that must be separated.

    • Leave the pick in place as you proceed to the next step. Leaving the pick inserted can help prevent the glue you just separated from re-adhering.

  7. Motorola Moto X Pure Edition LCD and Digitizer Assembly Replacement: 7 단계, 이미지 1/1
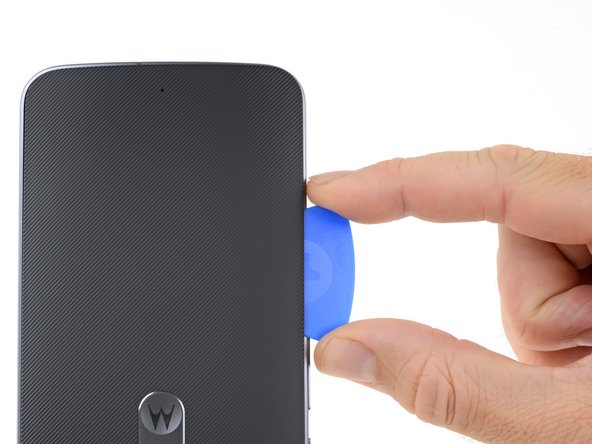
    • Prepare an iOpener and heat the back of the phone along its left edge for about five minutes. This will help soften the adhesive securing the rest of the back cover.

    • You may need to reheat and reapply the iOpener several times to get the phone warm enough. Follow the iOpener instructions to avoid overheating.

  8. Motorola Moto X Pure Edition LCD and Digitizer Assembly Replacement: 8 단계, 이미지 1/2 Motorola Moto X Pure Edition LCD and Digitizer Assembly Replacement: 8 단계, 이미지 2/2
    • Slice through the adhesive along the bottom edge of the phone.

    • Re-heat the back cover as needed to prevent the glue from cooling and hardening.

  9. Motorola Moto X Pure Edition LCD and Digitizer Assembly Replacement: 9 단계, 이미지 1/2 Motorola Moto X Pure Edition LCD and Digitizer Assembly Replacement: 9 단계, 이미지 2/2
    • Slice through the adhesive along the left side of the phone.

    • Try to insert the pick as far as you can underneath the cover, toward the center of the cover. There's thick adhesive on the middle of the cover that must be separated.

    • Stop cutting when you get to the edge of the volume buttons. Cutting past this point may damage the ribbon cables underneath the cover.

  10. Motorola Moto X Pure Edition LCD and Digitizer Assembly Replacement: 10 단계, 이미지 1/3 Motorola Moto X Pure Edition LCD and Digitizer Assembly Replacement: 10 단계, 이미지 2/3 Motorola Moto X Pure Edition LCD and Digitizer Assembly Replacement: 10 단계, 이미지 3/3
    • Slice through the adhesive along the top edge of the phone, pulling the pick out slightly to guide it around the rear-facing camera.

  11. Motorola Moto X Pure Edition LCD and Digitizer Assembly Replacement: 11 단계, 이미지 1/3 Motorola Moto X Pure Edition LCD and Digitizer Assembly Replacement: 11 단계, 이미지 2/3 Motorola Moto X Pure Edition LCD and Digitizer Assembly Replacement: 11 단계, 이미지 3/3
    이 단계에 사용된 도구:
    Tesa 61395 Tape
    $5.99
    구매
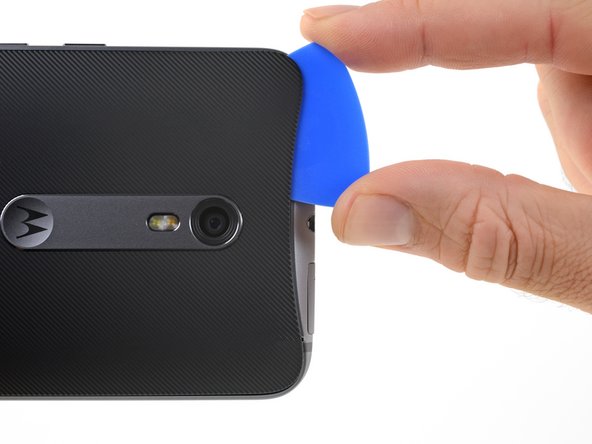
    • Carefully pry the cover away from the phone.

    • This may take a lot of force if the adhesive in the middle is still attached. As you lift the cover, you may need to use an opening pick to slice through any remaining adhesive.

    • To reinstall the back cover:

    • First use tweezers and a spudger to peel and scrape away any remaining adhesive from both the back cover and the phone's chassis.

    • Then, clean the adhesion areas with high concentration isopropyl alcohol (at least 90%) and a lint-free cloth. Swipe in one direction only, not back and forth. This will help prep the surface for the new adhesive.

    • Replacement adhesive comes in a pre-cut sheet to match the exact contours of the back cover. If that's not available, you can use a high-bond double-sided tape, such as Tesa 61395. Before installing the precut adhesive on the back cover, remove the metal insert. Install the adhesive, then replace the insert.

    • After installing the back cover, apply strong, steady pressure to your phone for several minutes to help the adhesive form a good bond.

    • If desired, you may reinstall the back cover without replacing the adhesive. Remove any large chunks of adhesive that might prevent the back cover from sitting down flush. After installation, heat the back cover and apply pressure to secure it.

  12. Motorola Moto X Pure Edition LCD and Digitizer Assembly Replacement: 12 단계, 이미지 1/3 Motorola Moto X Pure Edition LCD and Digitizer Assembly Replacement: 12 단계, 이미지 2/3 Motorola Moto X Pure Edition LCD and Digitizer Assembly Replacement: 12 단계, 이미지 3/3
    • Use the point of a spudger to pry up the rubber cover over the battery connector.

    • Remove the rubber cover.

  13. Motorola Moto X Pure Edition LCD and Digitizer Assembly Replacement: 13 단계, 이미지 1/2 Motorola Moto X Pure Edition LCD and Digitizer Assembly Replacement: 13 단계, 이미지 2/2
    • Use the flat end of a spudger to pry the battery connector straight up and out of its socket.

    • Only pry the small tab on the end of the connector opposite the ribbon cable. Do not push against the connector too hard or you risk damaging the plug on the motherboard.

  14. Motorola Moto X Pure Edition LCD and Digitizer Assembly Replacement: 14 단계, 이미지 1/2 Motorola Moto X Pure Edition LCD and Digitizer Assembly Replacement: 14 단계, 이미지 2/2
    • Use tweezers to lift away the rubber cover over the flash connector.

  15. Motorola Moto X Pure Edition LCD and Digitizer Assembly Replacement: 15 단계, 이미지 1/2 Motorola Moto X Pure Edition LCD and Digitizer Assembly Replacement: 15 단계, 이미지 2/2
    • Use the tip of a spudger against the corner of the flash connector to pry the connecter straight up and out of its socket.

  16. Motorola Moto X Pure Edition LCD and Digitizer Assembly Replacement: 16 단계, 이미지 1/1
    • Use a T3 Torx driver to remove twenty 2.4 mm screws.

  17. Motorola Moto X Pure Edition LCD and Digitizer Assembly Replacement: 17 단계, 이미지 1/2 Motorola Moto X Pure Edition LCD and Digitizer Assembly Replacement: 17 단계, 이미지 2/2
    • Use the point of a spudger to push the small clip securing the left side of the midframe toward the edge of the phone, releasing the clip.

  18. Motorola Moto X Pure Edition LCD and Digitizer Assembly Replacement: 18 단계, 이미지 1/1
    • Repeat the previous step to release the right side midframe clip.

  19. Motorola Moto X Pure Edition LCD and Digitizer Assembly Replacement: 19 단계, 이미지 1/3 Motorola Moto X Pure Edition LCD and Digitizer Assembly Replacement: 19 단계, 이미지 2/3 Motorola Moto X Pure Edition LCD and Digitizer Assembly Replacement: 19 단계, 이미지 3/3
    • Holding the display by the edges, gently lift the midframe away from the display.

    • Remove the midframe from the display.

  20. Motorola Moto X Pure Edition LCD and Digitizer Assembly Replacement, LCD and Digitizer Assembly: 20 단계, 이미지 1/1
    • Remove the tape covering the display cable connector.

  21. Motorola Moto X Pure Edition LCD and Digitizer Assembly Replacement: 21 단계, 이미지 1/3 Motorola Moto X Pure Edition LCD and Digitizer Assembly Replacement: 21 단계, 이미지 2/3 Motorola Moto X Pure Edition LCD and Digitizer Assembly Replacement: 21 단계, 이미지 3/3
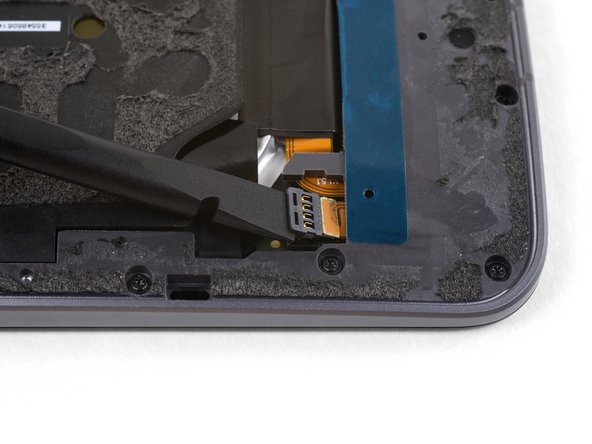
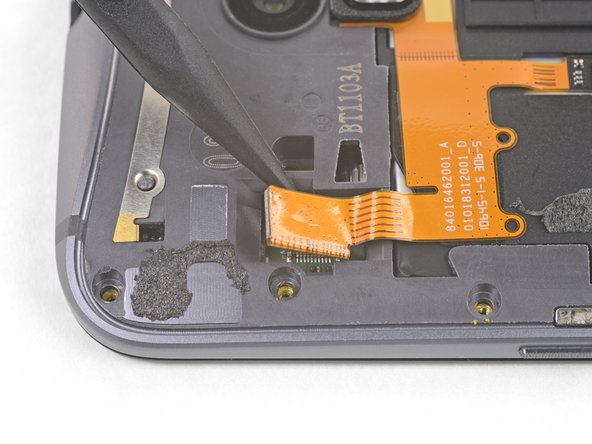
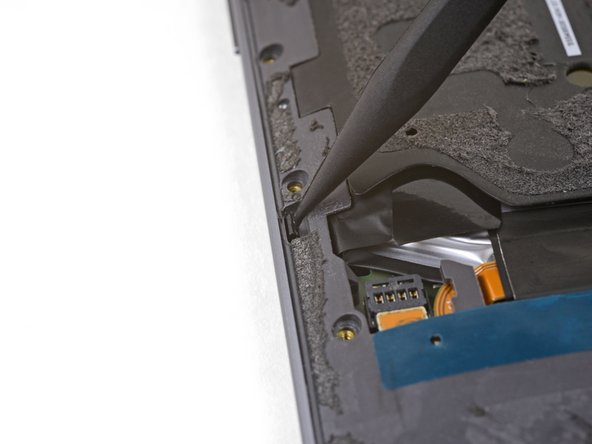
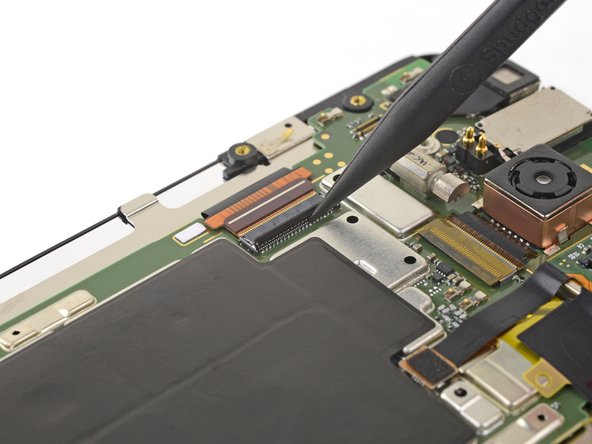
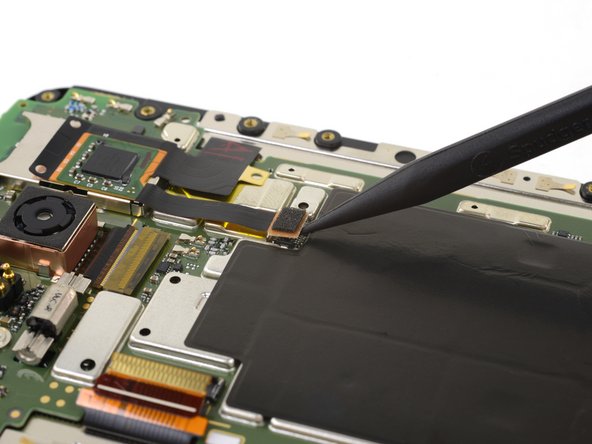
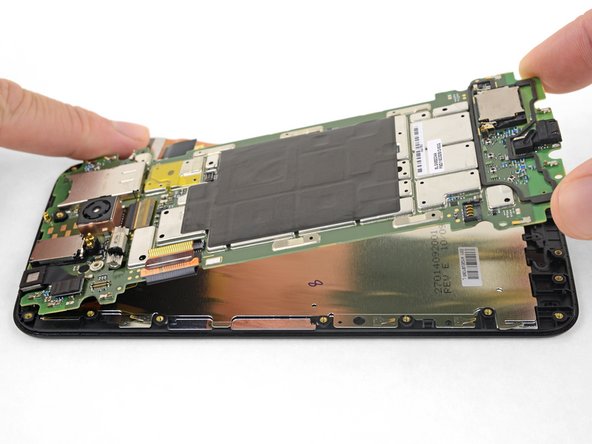
    • Use the tip of a spudger to flip open the locking flap on the display cable's ZIF connector.

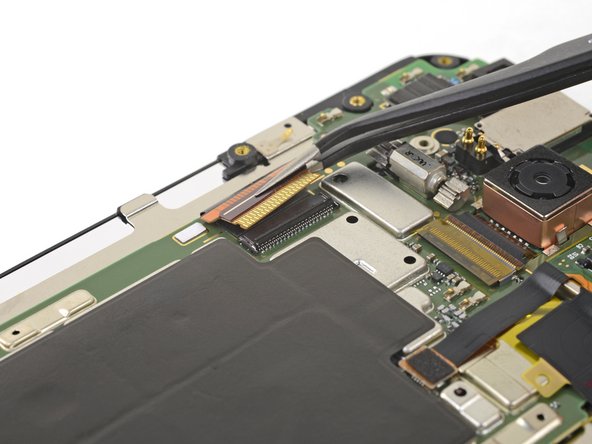
    • Pull the display ribbon cable out of its socket. The cable should slide parallel to the board surface.

  22. Motorola Moto X Pure Edition LCD and Digitizer Assembly Replacement: 22 단계, 이미지 1/2 Motorola Moto X Pure Edition LCD and Digitizer Assembly Replacement: 22 단계, 이미지 2/2
    • Use the point of a spudger to lift the second display connector straight up and out of its socket.

  23. Motorola Moto X Pure Edition LCD and Digitizer Assembly Replacement: 23 단계, 이미지 1/1
    • Prepare an iOpener and apply it to the small PCB adhered to the top of the SIM card slot.

  24. Motorola Moto X Pure Edition LCD and Digitizer Assembly Replacement: 24 단계, 이미지 1/2 Motorola Moto X Pure Edition LCD and Digitizer Assembly Replacement: 24 단계, 이미지 2/2
    • Slide an opening pick under the PCB to slice through its adhesive and separate it from the SIM card slot.

  25. Motorola Moto X Pure Edition LCD and Digitizer Assembly Replacement: 25 단계, 이미지 1/1
    • Use a T3 Torx driver to remove one 2.4 mm screw from the bottom of the motherboard.

  26. Motorola Moto X Pure Edition LCD and Digitizer Assembly Replacement: 26 단계, 이미지 1/3 Motorola Moto X Pure Edition LCD and Digitizer Assembly Replacement: 26 단계, 이미지 2/3 Motorola Moto X Pure Edition LCD and Digitizer Assembly Replacement: 26 단계, 이미지 3/3
    • Starting at the bottom, lift the motherboard away from the display assembly.

    • Remove the motherboard.

  27. Motorola Moto X Pure Edition LCD and Digitizer Assembly Replacement: 27 단계, 이미지 1/1
    이 단계에 사용된 도구:
    Tesa 61395 Tape
    $5.99
    구매
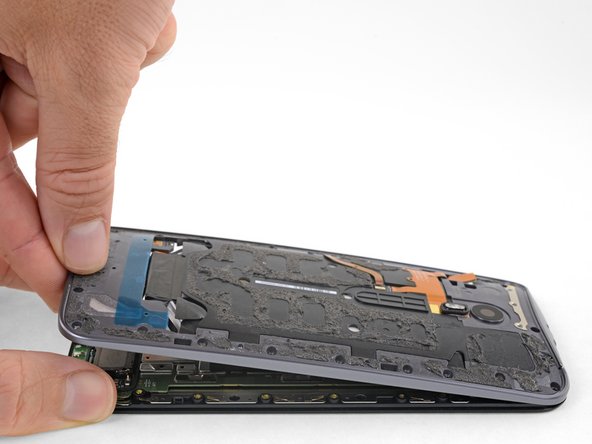
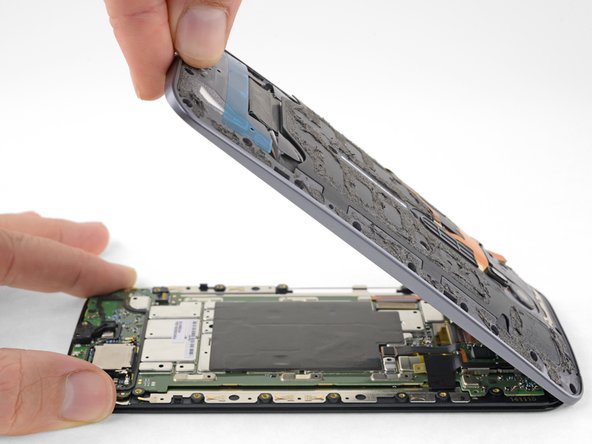
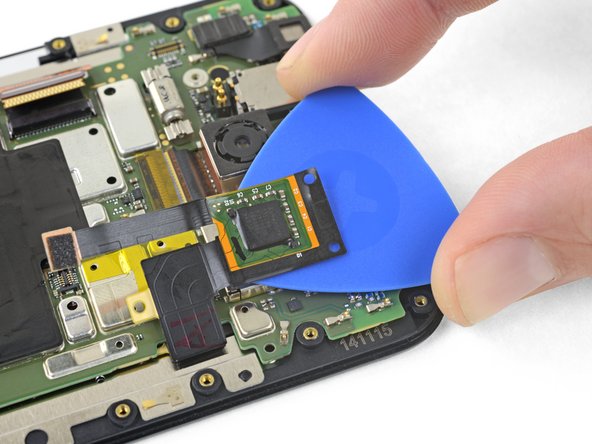
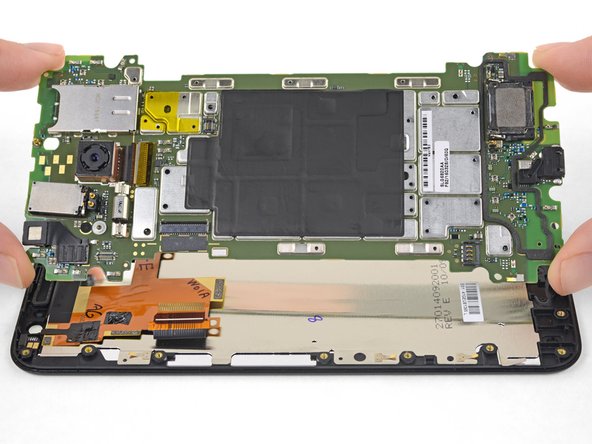
    • Only the LCD screen and digitizer assembly (with frame) remains.

    • Check carefully to make sure your replacement part matches, and that you've removed all the necessary parts from the old frame for installation in the new one.

    • When reassembling your phone replace old adhesive with double-sided tape or pre-cut adhesive strips.

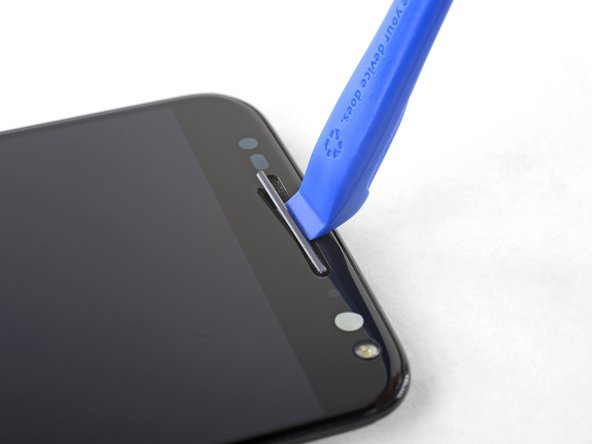
    • Your new display may not come with the small metal speaker guards installed over the front-facing speaker grills. If this is the case, continue to the next step. If your display comes with these installed, you may stop here.

  28. Motorola Moto X Pure Edition LCD and Digitizer Assembly Replacement: 28 단계, 이미지 1/3 Motorola Moto X Pure Edition LCD and Digitizer Assembly Replacement: 28 단계, 이미지 2/3 Motorola Moto X Pure Edition LCD and Digitizer Assembly Replacement: 28 단계, 이미지 3/3
    • Use an opening tool to carefully pry the upper speaker guard straight up and out of the speaker grill.

    • Remove the speaker guard.

  29. Motorola Moto X Pure Edition LCD and Digitizer Assembly Replacement: 29 단계, 이미지 1/1
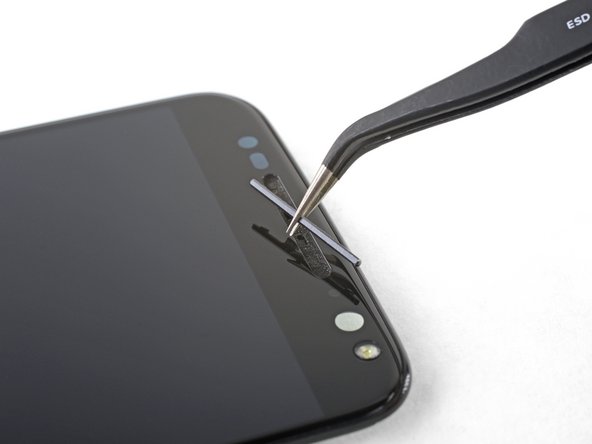
    • Repeat the previous step to remove the lower speaker guard.

    • To reinstall the guard, line up the small tabs on the guard with the holes in the grill, and press the guard straight down into the grill.

결론

Compare your new replacement part to the original part—you may need to transfer remaining components or remove adhesive backings from the new part before installing.

To reassemble your device, follow the above steps in reverse order.

Take your e-waste to an R2 or e-Stewards certified recycler.

Repair didn’t go as planned? Check out our Answers community for troubleshooting help.

다른 18명이 해당 안내서를 완성하였습니다.

Adam O'Camb

회원 가입일: 04/11/15

195,345 평판

안내서 416개 작성하였습니다

댓글 3개

what i needed to know how to replace speaker covers

kenneth clark - 답글

I have Motorola moto x pure edition that the LCD screen went bad/ blacked out. I found a replacement screen. Now the left half of the screen works perfectly but the right half is scrambled. What causes this? Is there a bad component that I can replace to fix this? Has anyone else experienced this? Is it a bad motherboard?

jovast - 답글

I have 2 of these phones, but really needed to replace the screen on the latest one to get data off it. I thought I’d get the walnut back off the first phone, but I found it wasn’t as easy as the rubber backing, perhaps heat transfer issues, and super hard to get it started, I have a small crack at that point.

David Kavanagh - 답글

댓글 쓰기

조회 통계:

24 시간 전: 0

7일 전: 1

30일 전: 10

전체 시간: 5,757