주요 콘텐츠로 건너뛰기

Nest Cam IQ Mounting Stand Replacement

필요한 것

  1. Nest Cam IQ Mounting Stand Replacement, Mounting Stand: 1 단계, 이미지 1/1
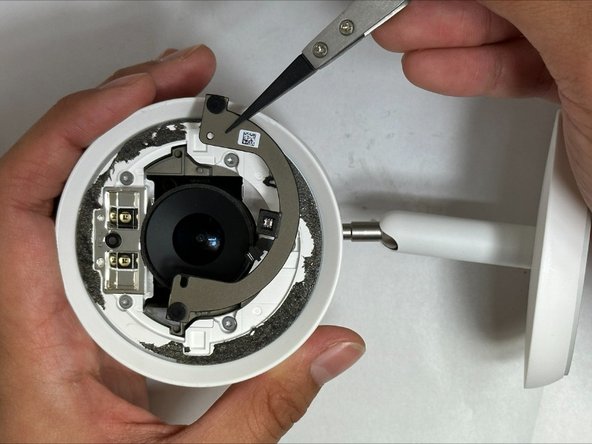
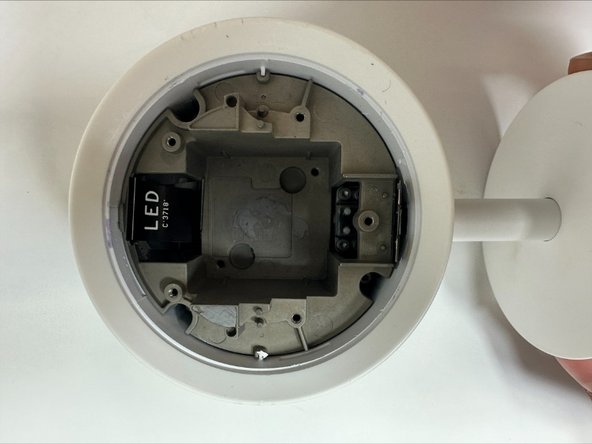
    • To soften the adhesive holding the camera together, heat up the edges of the glass lens using a heated iOpener on the device. Alternatively, you can use a heat gun to loosen the adhesive.

    • Leave the Opener on the glass lens for two minutes.

    • Be careful not to burn yourself while handling the hot iOpener. For more information on the Opener, use the iOpener Instructions Guide.

  2. Nest Cam IQ Mounting Stand Replacement: 2 단계, 이미지 1/1
    • Use an opening tool to split apart the glass lens from the body.

    • Be careful to not break the glass when prying from the body.

  3. Nest Cam IQ Mounting Stand Replacement: 3 단계, 이미지 1/1
    • Place a suction cup on the glass lens that you heated up with the iOpener.

    • Press down on the suction cup to create a seal, and pull up with force to create a separation between the glass lens and the body.

    • Pull off the glass lens using the suction cup.

  4. Nest Cam IQ Mounting Stand Replacement: 4 단계, 이미지 1/2 Nest Cam IQ Mounting Stand Replacement: 4 단계, 이미지 2/2
    • Carefully disconnect the flat black ribbon cable connecting the metal plate to the LED.

    • Remove the metal plate.

  5. Nest Cam IQ Mounting Stand Replacement: 5 단계, 이미지 1/2 Nest Cam IQ Mounting Stand Replacement: 5 단계, 이미지 2/2
    • Remove the five 9mm TR6 Torx screws from the LED cover.

    • Pull off the LED cover.

    • As you remove the LED cover, be careful not to tear the flat black ribbon connecting the LED to the motherboard.

  6. Nest Cam IQ Mounting Stand Replacement: 6 단계, 이미지 1/3 Nest Cam IQ Mounting Stand Replacement: 6 단계, 이미지 2/3 Nest Cam IQ Mounting Stand Replacement: 6 단계, 이미지 3/3
    • Carefully disconnect the flat black ribbon cable connecting the LED to the motherboard.

    • Remove the LED cover.

  7. Nest Cam IQ Mounting Stand Replacement: 7 단계, 이미지 1/1
    • Remove the two 7mm TR6 Torx screws securing the camera.

    • Carefully pull out the camera.

    • As you remove the camera, be careful not to tear the flat black ribbon connecting the camera to the motherboard.

  8. Nest Cam IQ Mounting Stand Replacement: 8 단계, 이미지 1/2 Nest Cam IQ Mounting Stand Replacement: 8 단계, 이미지 2/2
    • Carefully disconnect the flat black ribbon cable connecting the camera to the motherboard.

    • Remove the camera.

  9. Nest Cam IQ Mounting Stand Replacement: 9 단계, 이미지 1/3 Nest Cam IQ Mounting Stand Replacement: 9 단계, 이미지 2/3 Nest Cam IQ Mounting Stand Replacement: 9 단계, 이미지 3/3
    • Remove the three 19mm TR6 Torx screws from the camera holder.

    • Carefully lift the tab up and away from the camera holder.

    • Remove the camera holder.

  10. Nest Cam IQ Mounting Stand Replacement: 10 단계, 이미지 1/2 Nest Cam IQ Mounting Stand Replacement: 10 단계, 이미지 2/2
    • Remove the one 4mm TR6 Torx screw from the clear cover.

    • Remove the clear cover.

  11. Nest Cam IQ Mounting Stand Replacement: 11 단계, 이미지 1/3 Nest Cam IQ Mounting Stand Replacement: 11 단계, 이미지 2/3 Nest Cam IQ Mounting Stand Replacement: 11 단계, 이미지 3/3
    • Remove the four 11mm TR6 Torx screws from the clamp securing the mounting stand.

    • Remove the clamp.

    • Carefully pull away the cables connecting the mounting stand to the body.

  12. Nest Cam IQ Mounting Stand Replacement: 12 단계, 이미지 1/1
    • Carefully remove the mounting stand.

결론

To reassemble your device, follow these instructions in reverse order.

다른 한 분이 해당 안내서를 완성하였습니다.

Jas Ownby

회원 가입일: 09/08/23

800 평판

안내서 4개 작성하였습니다

University of New Orleans, Team 5-5, McDonald Fall 2023 University of New Orleans, Team 5-5, McDonald Fall 2023 회원

UNO-MCDONALD-F23S5G5

3 회원들

안내서 4개 작성하였습니다

댓글 0개

댓글 쓰기

조회 통계:

24 시간 전: 0

7일 전: 1

30일 전: 6

전체 시간: 70