주요 콘텐츠로 건너뛰기

Nest x Yale Lock Speaker Replacement

필요한 것

  1. Nest x Yale Lock Speaker Replacement, Speaker: 1 단계, 이미지 1/3 Nest x Yale Lock Speaker Replacement, Speaker: 1 단계, 이미지 2/3 Nest x Yale Lock Speaker Replacement, Speaker: 1 단계, 이미지 3/3
    • Get the lock device and turn it around.

    • Take out the black cover by removing the screws as shown in picture #1 and pull it out gently just so.

    • All 3 screws are 0.25 inches high and are phillip screws.

    • Doing so gains access to the motherboard as shown in picture #3.

  2. Nest x Yale Lock Speaker Replacement: 2 단계, 이미지 1/2 Nest x Yale Lock Speaker Replacement: 2 단계, 이미지 2/2
    이 단계에 사용된 도구:
    Tweezers
    $4.99
    구매
    • On the white connector in picture #1, push down using a pointed tip object and then remove the connection using tweezers.

    • For the wider connection in picture #2, lift up the black switch and remove the connection using tweezers.

  3. Nest x Yale Lock Speaker Replacement: 3 단계, 이미지 1/2 Nest x Yale Lock Speaker Replacement: 3 단계, 이미지 2/2
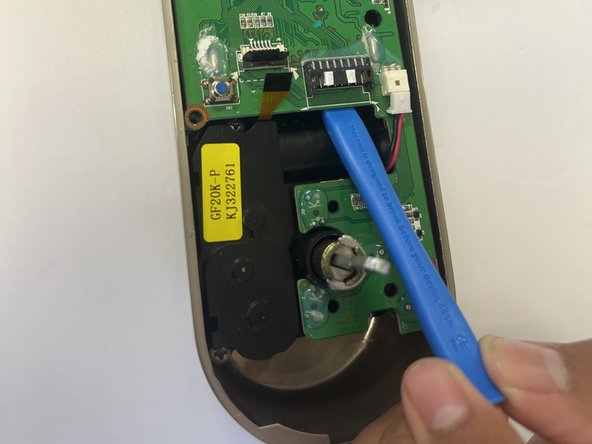
    • Take out the motherboard by unscrewing the screws holding it shown in picture #1.

    • The screws are phillips and are 0.25 inches.

    • After removing the screw on the motherboard, pry the motherboard out using a prying tool shown in picture #2.

  4. Nest x Yale Lock Speaker Replacement: 4 단계, 이미지 1/1
    • The small black part on the down right side of the motherboard is the audio.

결론

To reassemble your device, follow these instructions in reverse order.

Christopher Gonzalez

회원 가입일: 09/26/22

313 평판

안내서 3개 작성하였습니다

CSU Los Angeles, Team 5-3, Adachi Fall 2022 CSU Los Angeles, Team 5-3, Adachi Fall 2022 회원

CSULA-ADACHI-F22S5G3

5 회원들

안내서 5개 작성하였습니다

댓글 0개

댓글 쓰기

조회 통계:

24 시간 전: 0

7일 전: 4

30일 전: 11

전체 시간: 256