주요 콘텐츠로 건너뛰기

New Nintendo 3DS XL 2015 Game Card Reader Replacement

필요한 것

  1. New Nintendo 3DS XL 2015 Game Card Reader Replacement, Battery: 1 단계, 이미지 1개 중 1개
    • Ensure your device is powered off before proceeding. Failure to do so may result in electrical shock or damage to the device.

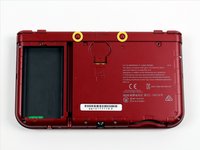
    • Place the 3DS upside down. Remove the game card, headphones, charging cable, stylus, or anything else that may be connected to the device.

  2. New Nintendo 3DS XL 2015 Game Card Reader Replacement: 2 단계, 이미지 1개 중 1개
    • Using a JIS #0 screwdriver, loosen the two black screws on the back.

    • The screws are held in place by captive washers and should not be completely removed.

  3. New Nintendo 3DS XL 2015 Game Card Reader Replacement: 3 단계, 이미지 1개 중 1개
    • Once the screws are loosened, pry open the back cover.

  4. New Nintendo 3DS XL 2015 Game Card Reader Replacement: 4 단계, 이미지 1개 중 1개
    • The battery is located on the left hand side of the 3DS - to remove, use the small gap located at the top-middle and pull up with a non metal pointed tool.

  5. New Nintendo 3DS XL 2015 Game Card Reader Replacement, Motherboard: 5 단계, 이미지 1개 중 1개
    • Using a JIS #00 screwdriver, remove the six 6mm screws around the edges of the secondary cover.

  6. New Nintendo 3DS XL 2015 Game Card Reader Replacement: 6 단계, 이미지 2개 중 1개 New Nintendo 3DS XL 2015 Game Card Reader Replacement: 6 단계, 이미지 2개 중 2개
    이 단계에 사용된 도구:
    Tweezers
    $4.99
    • Using tweezers, carefully pop out the rubber bumpers located at the top side of the 3DS. Removing them will reveal another two 6mm screws. Remove these screws using a JIS #000 as well.

  7. New Nintendo 3DS XL 2015 Game Card Reader Replacement: 7 단계, 이미지 3개 중 1개 New Nintendo 3DS XL 2015 Game Card Reader Replacement: 7 단계, 이미지 3개 중 2개 New Nintendo 3DS XL 2015 Game Card Reader Replacement: 7 단계, 이미지 3개 중 3개
    • To separate the cover, carefully lift it up and away from the hinges (in order to clear the headphone port), then pivot it towards the hinges to expose the circuit boards.

    • Don't fully remove the cover yet, or you may damage the delicate ribbon cable that still connects it to the motherboard.

  8. New Nintendo 3DS XL 2015 Game Card Reader Replacement: 8 단계, 이미지 1개 중 1개
    • Use a pair of tweezers to lift away the two plugs that latch the L/R/ZL/ZR button ribbons to the motherboard. You can now remove the back cover completely and set it aside.

  9. New Nintendo 3DS XL 2015 Game Card Reader Replacement: 9 단계, 이미지 1개 중 1개
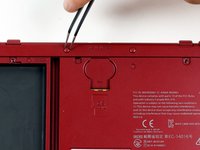
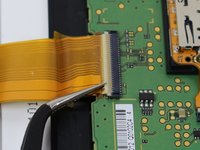
    • Use tweezers to flip up the small, hinged locking flap in order to unlock the ZIF connector securing the Circle Pad ribbon.

    • The cable folds over itself and enters the ZIF connector from the left side, but the connector's locking flap flips up from the right side. A common error here is to try pulling up on the same side as the cable is on, when that could break the connector.

    • Slide the ribbon out of the ZIF connector.

    • It may be easier to unscrew and remove the Circle Pad first, then try disconnecting the cable. Similarly, when reinstalling the Circle Pad, you can reconnect the cable first and then put the unit back into place.

  10. New Nintendo 3DS XL 2015 Game Card Reader Replacement: 10 단계, 이미지 1개 중 1개
    • Using a JIS #000 screwdriver, remove the two 8 mm screws securing the circle pad.

  11. New Nintendo 3DS XL 2015 Game Card Reader Replacement: 11 단계, 이미지 1개 중 1개
    • Lift the circle pad casing upward to remove it. There will be some friction, but it should not require excessive force.

  12. New Nintendo 3DS XL 2015 Game Card Reader Replacement: 12 단계, 이미지 1개 중 1개
    • Locate the gold terminal plug with a red cable at the top left of the motherboard. Using your fingers, carefully pull the plug straight upward to remove.

    • Use a pair of tweezers to disconnect the single ribbon connector.

    • Don't do what we did -- be very careful not to pull on the red cable.

  13. New Nintendo 3DS XL 2015 Game Card Reader Replacement: 13 단계, 이미지 3개 중 1개 New Nintendo 3DS XL 2015 Game Card Reader Replacement: 13 단계, 이미지 3개 중 2개 New Nintendo 3DS XL 2015 Game Card Reader Replacement: 13 단계, 이미지 3개 중 3개
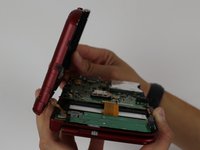
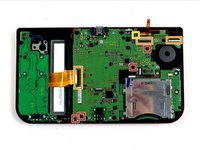
    • Using tweezers, gently pull the four marked ribbons out of the ZIF connectors along the sides of the motherboard.

    • These ZIF connectors are held in place by friction and do not have locks—lifting the flaps on these connectors will break them!

    • Three of the ribbon connectors have plastic clamping flaps that cover the ribbon to prevent slippage. Use the tweezers to flip them up before ribbon removal.

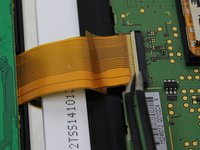
    • This one ribbon connector may also have a plastic clamping flap, but it's not like the others, rather it's similar to the one used for the Circle Pad. Gently flip up the flap on the side opposite the ribbon cable to remove the cable.

    • This connector was previously listed among the ones that do not have locks, however on most if not all systems, it actually does have one. Trying to remove or reinsert this cable without unlocking it will damage the cable, requiring a replacement of the Touch Screen's digitizer. Fortunately, the LCD uses other ZIF connectors, so that should still be fine.

    • If, on your system, this connector does not have a lock after all, do not pull up on the flap! It should come up easily; if it doesn't, it probably isn't meant to lock, but instead just hold the cable in with friction. In that case, try gently pulling the cable out of the connector.

    • When reassembling the device, be sure to flip the ZIF clamps back down.

    • While the SD card reader is shown as removed in this photo, it is optional for the removal of the motherboard.

  14. New Nintendo 3DS XL 2015 Game Card Reader Replacement: 14 단계, 이미지 1개 중 1개
    • Using a JIS #000 screwdriver, remove six 4mm screws along the edges of the motherboard.

  15. New Nintendo 3DS XL 2015 Game Card Reader Replacement: 15 단계, 이미지 2개 중 1개 New Nintendo 3DS XL 2015 Game Card Reader Replacement: 15 단계, 이미지 2개 중 2개
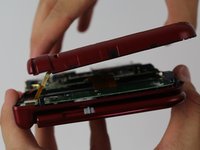
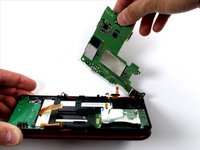
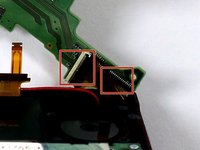
    • Carefully pivot the motherboard 90 degrees toward the hinges to reveal two more ZIF connectors on the underside of the motherboard.

    • Both have latches that must be flipped up. The left, longer latch is black; the right, shorter one is white. Flip up the flaps, slide the ribbons out and remove the motherboard.

    • Note which way the ribbons slide into their connectors carefully, as they are different.

  16. New Nintendo 3DS XL 2015 Game Card Reader Replacement, Game Card Reader: 16 단계, 이미지 1개 중 1개
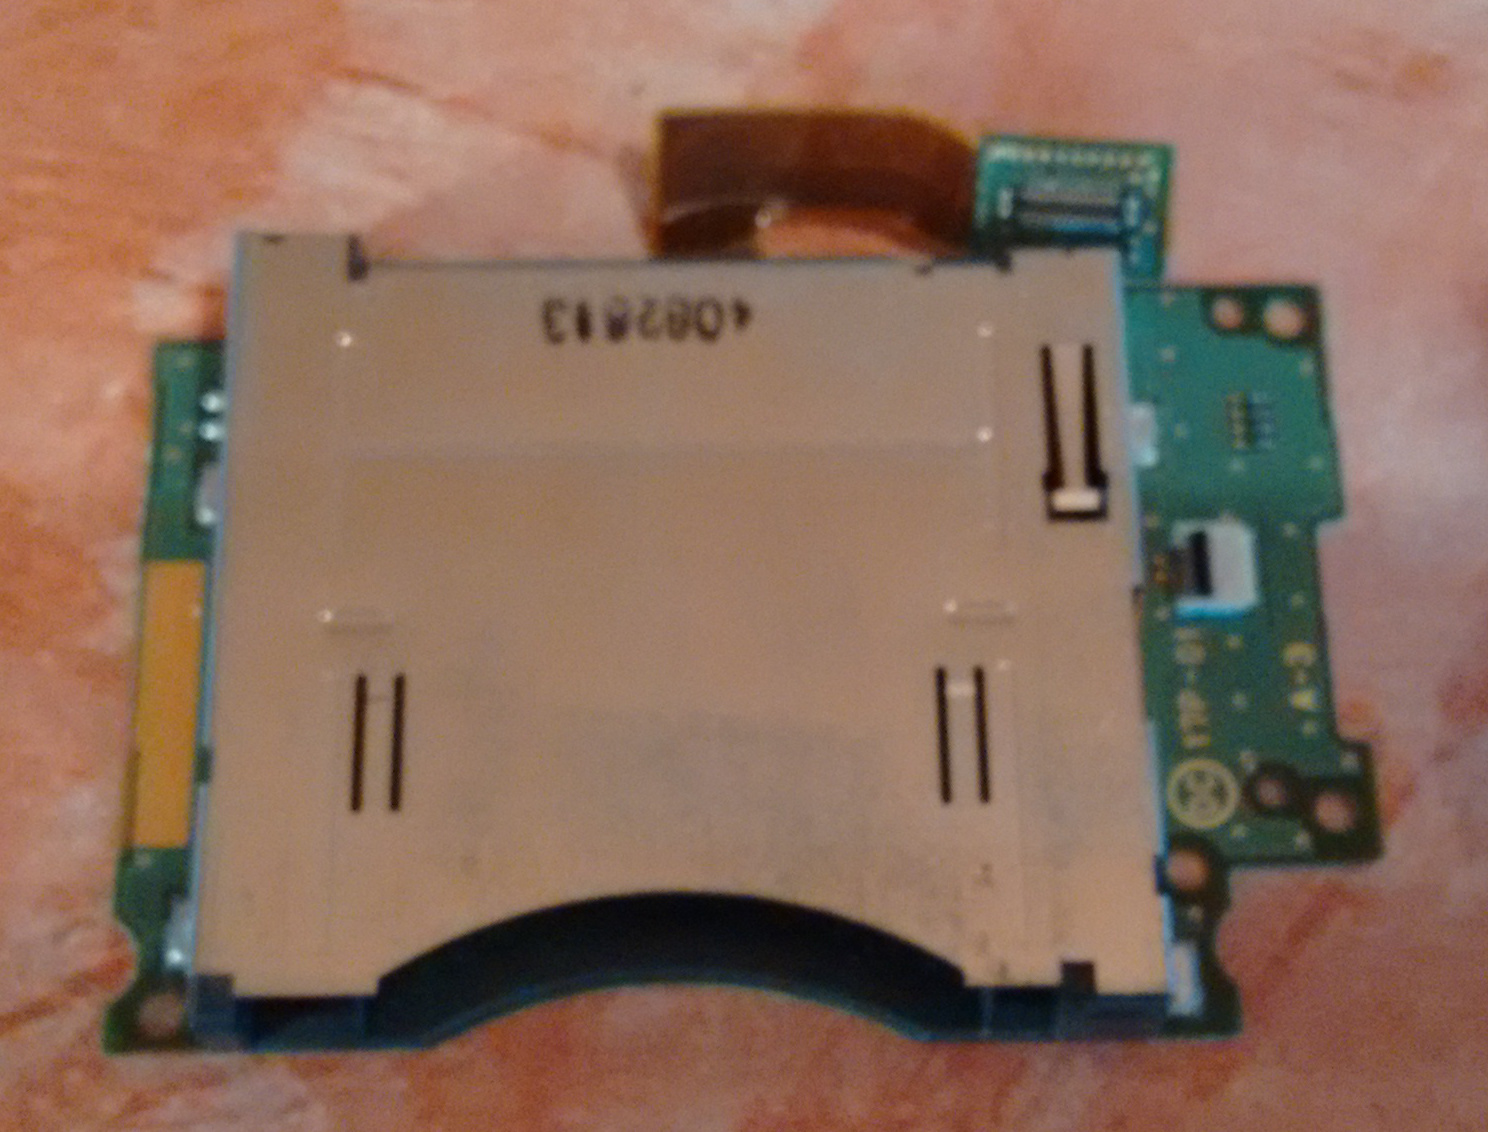
    • Remove five 5mm screws from the game card reader panel using a JIS #000 screwdriver.

    • The game card reader can now be removed and replaced.

결론

To reassemble your device, follow these instructions in reverse order.

다른 17명이 해당 안내서를 완성하였습니다.

작성자

5다른 기여자 명과 함께

Jacky Loh

회원 가입일: 04/02/15

383 평판

안내서 1개를 작성함

Cal Poly, Team 24-4, Lancaster Spring 2015 Cal Poly, Team 24-4, Lancaster Spring 2015 회원

CPSU-LANCASTER-S15S24G4

4 회원들

안내서 30개를 작성함

댓글 10개

I bought a replacement card slot and it has the small flat cable connector not on the top right like on your photos (and in my New 3DS XL) but on the right oriented to the right, see https://abload.de/img/cardslot_sintech_2....

Does anyone have any insight on different revisions of the card slot? Where can I buy a card slot like the one in the photos here? Thanks in advance.

Uwe - 답글

Will I be able to complete this process with a PH00? I don’t have have a PH000 or any JIS screwdrivers.

Luke - 답글

You don't have to take the entire board out to replace this

Skyler Davis - 답글

That is true. I just changed mine easily without removing the whole mainboard..

battlepengu -

댓글 쓰기

조회 통계:

지난 24시간: 24

지난 7일: 135

지난 30일: 543

전체 시간: 41,644