주요 콘텐츠로 건너뛰기

Nextbook NX008HD8G Speaker Replacement

필요한 것

  1. Nextbook NX008HD8G Speaker Replacement, Back Panel: 1 단계, 이미지 1/2 Nextbook NX008HD8G Speaker Replacement, Back Panel: 1 단계, 이미지 2/2
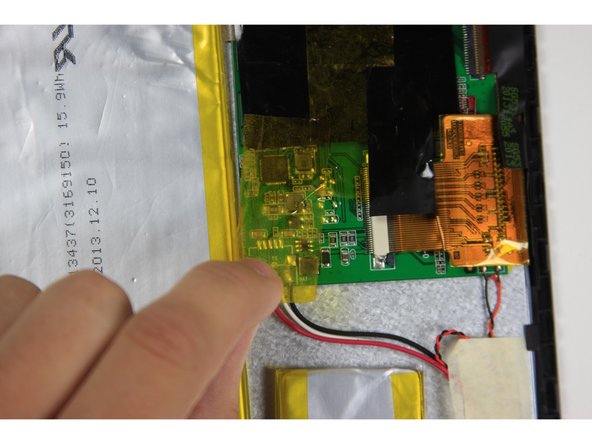
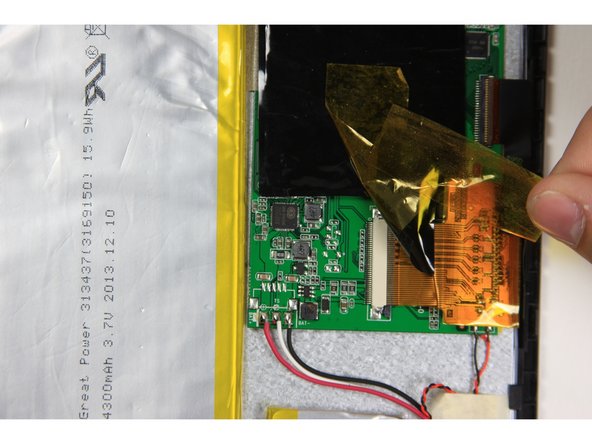
    • Using your finger, open the plastic tab to the right of the rear-facing camera.

    • Wedge your fingernail in between the back panel and the plastic tab and pull the plastic tab towards your body.

  2. Nextbook NX008HD8G Speaker Replacement: 2 단계, 이미지 1/3 Nextbook NX008HD8G Speaker Replacement: 2 단계, 이미지 2/3 Nextbook NX008HD8G Speaker Replacement: 2 단계, 이미지 3/3
    • Using your finger, remove the SD card by pressing down on top of it (toward the bottom of the device) until you hear a clicking sound.

    • Once the card pops out, use your finger to pull the card completely out of the SD card slot.

  3. Nextbook NX008HD8G Speaker Replacement: 3 단계, 이미지 1/3 Nextbook NX008HD8G Speaker Replacement: 3 단계, 이미지 2/3 Nextbook NX008HD8G Speaker Replacement: 3 단계, 이미지 3/3
    • Remove the 5 mm screw using the Phillips PH00 bit in the iFixit metal Screwdriver.

  4. Nextbook NX008HD8G Speaker Replacement: 4 단계, 이미지 1/3 Nextbook NX008HD8G Speaker Replacement: 4 단계, 이미지 2/3 Nextbook NX008HD8G Speaker Replacement: 4 단계, 이미지 3/3
    • Use the plastic opening tool to separate the back panel by carefully sliding the narrow end of the tool between the front glass and back panel.

    • Use a second plastic opening tool to help pry the front glass from the back panel.

    • You will hear some cracking sounds when separating the front glass from the back panel. That is okay! That is the back panel latches releasing the front glass.

  5. Nextbook NX008HD8G Speaker Replacement: 5 단계, 이미지 1/2 Nextbook NX008HD8G Speaker Replacement: 5 단계, 이미지 2/2
    • Use your hands to completely separate the rest of the front glass from the back panel.

    • Do not to pull the device apart with too much force. If you do, you may break or bend the back panel.

  6. Nextbook NX008HD8G Speaker Replacement, Speaker: 6 단계, 이미지 1/3 Nextbook NX008HD8G Speaker Replacement, Speaker: 6 단계, 이미지 2/3 Nextbook NX008HD8G Speaker Replacement, Speaker: 6 단계, 이미지 3/3
    • Remove yellow tape with a black edge that covers the red, white and black wires.

    • The yellow tape with a black edge is safe to remove completely.

  7. Nextbook NX008HD8G Speaker Replacement: 7 단계, 이미지 1/3 Nextbook NX008HD8G Speaker Replacement: 7 단계, 이미지 2/3 Nextbook NX008HD8G Speaker Replacement: 7 단계, 이미지 3/3
    • Using the sharp end of the spudger, release the black latches on both sides of the white ribbon connector by pushing them to the right (out away from the center of the device).

    • Using your finger, disconnect the gold ribbon from the white ribbon connector.

  8. Nextbook NX008HD8G Speaker Replacement: 8 단계, 이미지 1/1
    • Remove the masking tape covering black and red wires that connect the speaker to the right side of the bottom of the motherboard.

  9. Nextbook NX008HD8G Speaker Replacement: 9 단계, 이미지 1/1
    • Desolder the red and black wires on the right side of the motherboard that connect the speaker to the motherboard.

  10. Nextbook NX008HD8G Speaker Replacement: 10 단계, 이미지 1/3 Nextbook NX008HD8G Speaker Replacement: 10 단계, 이미지 2/3 Nextbook NX008HD8G Speaker Replacement: 10 단계, 이미지 3/3
    • Using the flat end of the spudger, remove the speaker from the device by sliding the spudger underneath the speaker.

결론

To reassemble your device, follow these instructions in reverse order.

다른 한 분이 해당 안내서를 완성하였습니다.

Philip Gai

회원 가입일: 09/22/15

777 평판

안내서 3개 작성하였습니다

Baylor, Team 10-15, Williams Fall 2015 Baylor, Team 10-15, Williams Fall 2015 회원

BU-WILLIAMS-F15S10G15

3 회원들

안내서 8개 작성하였습니다

댓글 0개

댓글 쓰기

조회 통계:

24 시간 전: 0

7일 전: 0

30일 전: 0

전체 시간: 319