주요 콘텐츠로 건너뛰기

Nexus 7 Battery Replacement

필요한 것

동영상 개요

  1. Nexus 7 Battery Replacement, Rear Panel: 1 단계, 이미지 1/1
    • In the following steps you will release the clips (highlighted in red) along the perimeter of the Nexus 7's rear panel.

    • Do not use excessive force while prying the clips. They can be easily broken.

  2. Nexus 7 Battery Replacement: 2 단계, 이미지 1/2 Nexus 7 Battery Replacement: 2 단계, 이미지 2/2
    • Gently insert a plastic opening tool near the top of the Nexus 7 between the rear panel and the front panel assembly.

    • Carefully run the plastic opening tool along the top edge to pry the rear panel away from the front panel assembly of the Nexus 7.

  3. Nexus 7 Battery Replacement: 3 단계, 이미지 1/3 Nexus 7 Battery Replacement: 3 단계, 이미지 2/3 Nexus 7 Battery Replacement: 3 단계, 이미지 3/3
    • Insert the plastic opening tool between the rear panel and the front panel assembly near the power button and pry up at several points along the right edge of the Nexus 7.

  4. Nexus 7 Battery Replacement: 4 단계, 이미지 1/3 Nexus 7 Battery Replacement: 4 단계, 이미지 2/3 Nexus 7 Battery Replacement: 4 단계, 이미지 3/3
    • Pry up the rear panel along the left edge using the method described in previous steps.

  5. Nexus 7 Battery Replacement: 5 단계, 이미지 1/2 Nexus 7 Battery Replacement: 5 단계, 이미지 2/2
    • Gently lift and remove the rear panel up off the front panel assembly.

  6. Nexus 7 Battery Replacement, Battery Cable: 6 단계, 이미지 1/2 Nexus 7 Battery Replacement, Battery Cable: 6 단계, 이미지 2/2
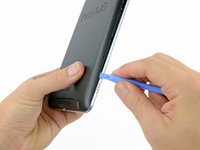
    • Using the tip of a spudger, push first on one side then the other to "walk" the battery cable straight out of its socket on the motherboard.

  7. Nexus 7 Battery Replacement, Battery: 7 단계, 이미지 1/1
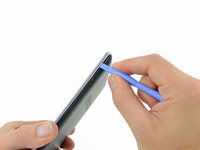
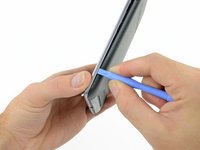
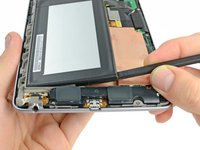
    • Wedge the flat end of a spudger inbetween the battery and the front panel assembly.

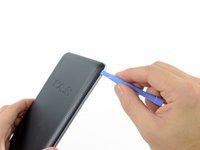
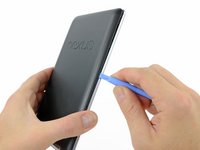
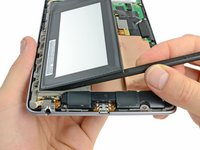
    • Run the flat end of a spudger along the top edge of the battery to separate it from the adhesive securing it to the front panel assembly.

    • Do not excessively bend the battery connector board. Be especially careful when prying up around the top left edge of the battery.

  8. Nexus 7 Battery Replacement: 8 단계, 이미지 1/2 Nexus 7 Battery Replacement: 8 단계, 이미지 2/2
    • Wedge the flat end of a spudger between the bottom right corner of the battery and the front panel assembly.

    • Carefully run the spudger along the bottom edge of the battery while slowly lifting the battery to completely separate it from the adhesive securing it to the front panel assembly.

  9. Nexus 7 Battery Replacement: 9 단계, 이미지 1/1
    • Grasp the lower right corner of the battery and rotate it upwards to remove it from the front panel assembly.

    • If you encounter any resistance from the remaining adhesive, simply use the flat end of a spudger to remove the excess adhesive.

결론

To reassemble your device, follow these instructions in reverse order.

다른 185명이 해당 안내서를 완성하였습니다.

Walter Galan

694,692 평판

안내서 1,203개 작성하였습니다

댓글 24개

Will you guys be making the Nexus 7 battery available through your site?

gabances - 답글

My battery says me3 puj1. Will this kit work to replace that battery?

Crys -

Thank you so much for this! I had dropped my nexus from about 2 feet onto a carpet and knocked the battery cable loose ( a know problem) but your set by step directions encouraged me to fix it myself instead of sending the whole thing back to Google.

Donald McAtee - 답글

is it possible to add qi charging by replacing the stock battery with a different one? if so, which battery?

Mabel - 답글

댓글 쓰기

조회 통계:

24 시간 전: 6

7일 전: 69

30일 전: 253

전체 시간: 404,187