주요 콘텐츠로 건너뛰기

Nikon D3100 LCD Screen Replacement

필요한 것

  1. Nikon D3100 LCD Screen Replacement, LCD Screen: 1 단계, 이미지 1개 중 1개
    • Use a Phillips #00 screwdriver for all of the screws.

    • Remove two of the 4mm screws indicated by the circles on the bottom side of the camera.

  2. Nikon D3100 LCD Screen Replacement: 2 단계, 이미지 2개 중 1개 Nikon D3100 LCD Screen Replacement: 2 단계, 이미지 2개 중 2개
    • Remove four of the 3mm screws around the eye piece located on the top of the back panel, including the screw hidden behind the auto focus label.

    • Remove the 3mm screw behind the rubber grip on the top right of the back panel.

  3. Nikon D3100 LCD Screen Replacement: 3 단계, 이미지 1개 중 1개
    • Peel back the rubber grip on the right side of the camera using a spudger.

    • You may need a heating pad to melt the glue holding the rubber grip to the camera. If using the heating pad, use caution and handle carefully.

    • Remove two of the 5mm screws under the rubber grip.

  4. Nikon D3100 LCD Screen Replacement: 4 단계, 이미지 1개 중 1개
    • Remove two of the 4mm screws on the left side of the camera.

  5. Nikon D3100 LCD Screen Replacement: 5 단계, 이미지 2개 중 1개 Nikon D3100 LCD Screen Replacement: 5 단계, 이미지 2개 중 2개
    이 단계에 사용된 도구:
    Tweezers
    $4.99
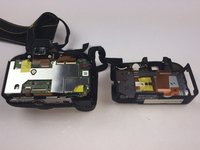
    • Starting from the top, gently lift the back panel of the camera off. Slowly separate the back panel from the main body of the camera.

    • Be careful not to pull the panel out too fast or the ribbon may be damaged.

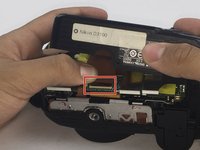
    • Carefully remove the ribbon using a spudger to lift up the connector and then use tweezers to pull out the ribbon.

    • Separate the back panel from the main body of the camera.

  6. Nikon D3100 LCD Screen Replacement: 6 단계, 이미지 1개 중 1개
    • Be careful when separating the metal plate from the back panel because the speaker wire is connected to the metal plate. It can easily be torn if caution is not taken.

    • Remove nine of the 3mm screws connecting the metal plate to the plastic panel.

  7. Nikon D3100 LCD Screen Replacement: 7 단계, 이미지 1개 중 1개
    • Remove the tape covering the ribbons. Be careful not to break the tape.

  8. Nikon D3100 LCD Screen Replacement: 8 단계, 이미지 1개 중 1개
    • Remove the two ribbons connecting the LCD screen to the metal plate using the same method from Step 5.

  9. Nikon D3100 LCD Screen Replacement: 9 단계, 이미지 1개 중 1개
    • Remove the old LCD screen from metal plate.

결론

To reassemble your device, follow these instructions in reverse order.

다른 8명이 해당 안내서를 완성하였습니다.

작성자

9다른 기여자 명과 함께

Jet Mejia

회원 가입일: 09/26/16

662 평판

안내서 3개를 작성함

USF Tampa, Team 14-1, Eyestone Fall 2016 USF Tampa, Team 14-1, Eyestone Fall 2016 회원

USFT-EYESTONE-F16S14G1

3 회원들

안내서 4개를 작성함

5가이드 댓글

Very helpful guide, so happy to have a non-cracked screen again!

Rob Cuthbertson - 답글

now, where can i buy this replacement screen here in the Philippines?

leumas_erbutco - 답글

does anyone have the part number for the replacement screen?

Lee Caterson - 답글

Très bien ce document, seulement l'écran LCD pour Nikon D3100 semble introuvable, et épuisé !!! Avez-vous une adresse valable pour commander?

gtre - 답글

Hello, regarde ici ça devrait correspondre:

https://fra.grandado.com/products/origin...

Lou Lou - 답글

댓글 쓰기

조회 통계:

지난 24시간: 1

지난 7일: 36

지난 30일: 161

전체 시간: 15,140