주요 콘텐츠로 건너뛰기

Nintendo 3DS XL 2015 A,B,X,Y, Start or Select Button Replacement

필요한 것

  1. Nintendo 3DS XL 2015 A,B,X,Y, Start or Select Button Replacement, Battery: 1 단계, 이미지 1/1
    • Ensure your device is powered off before proceeding. Failure to do so may result in electrical shock or damage to the device.

    • Place the 3DS upside down. Remove the game card, headphones, charging cable, stylus, or anything else that may be connected to the device.
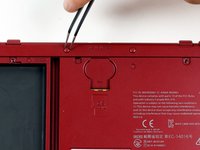
  2. Nintendo 3DS XL 2015 A,B,X,Y, Start or Select Button Replacement: 2 단계, 이미지 1/1
    • Using a JIS #0 screwdriver, loosen the two black screws on the back.

    • The screws are held in place by captive washers and should not be completely removed.

  3. Nintendo 3DS XL 2015 A,B,X,Y, Start or Select Button Replacement: 3 단계, 이미지 1/1
    • Once the screws are loosened, pry open the back cover.

  4. Nintendo 3DS XL 2015 A,B,X,Y, Start or Select Button Replacement: 4 단계, 이미지 1/1
    • The battery is located on the left hand side of the 3DS - to remove, use the small gap located at the top-middle and pull up with a non metal pointed tool.

  5. Nintendo 3DS XL 2015 A,B,X,Y, Start or Select Button Replacement, A,B,X,Y, Start or Select Button: 5 단계, 이미지 1/1
    • Remove six 6mm screws on secondary panel using a JIS #000 screwdriver.

  6. Nintendo 3DS XL 2015 A,B,X,Y, Start or Select Button Replacement: 6 단계, 이미지 1/2 Nintendo 3DS XL 2015 A,B,X,Y, Start or Select Button Replacement: 6 단계, 이미지 2/2
    • Remove two upper rubber bumpers locates on either side of the charging port.

    • Using JIS #00 screwdriver, carefully remove the two 6mm screws that have now been exposed.

  7. Nintendo 3DS XL 2015 A,B,X,Y, Start or Select Button Replacement: 7 단계, 이미지 1/3 Nintendo 3DS XL 2015 A,B,X,Y, Start or Select Button Replacement: 7 단계, 이미지 2/3 Nintendo 3DS XL 2015 A,B,X,Y, Start or Select Button Replacement: 7 단계, 이미지 3/3
    • To pry off the cover, carefully lift it up and away from the hinges (in order to clear the headphone port), then pivot it towards the hinges to expose the circuit boards.

  8. Nintendo 3DS XL 2015 A,B,X,Y, Start or Select Button Replacement: 8 단계, 이미지 1/1
    • Use non-conductive tweezers to disconnect the two ribbon plugs that connect the L/R/ZL/ZR buttons on the cover to the motherboard, then remove it completely.

  9. Nintendo 3DS XL 2015 A,B,X,Y, Start or Select Button Replacement: 9 단계, 이미지 1/3 Nintendo 3DS XL 2015 A,B,X,Y, Start or Select Button Replacement: 9 단계, 이미지 2/3 Nintendo 3DS XL 2015 A,B,X,Y, Start or Select Button Replacement: 9 단계, 이미지 3/3
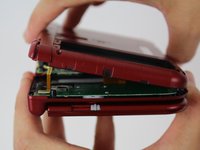
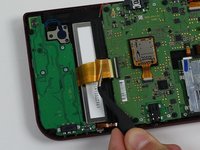
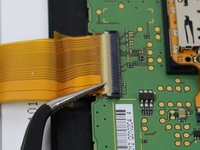
    • Locate the ribbon connector between the motherboard and the left circuit board (it should be the widest) and use a pair of tweezers to pivot up the ZIF clasp upward.

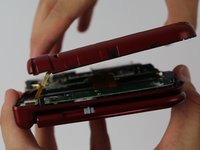
    • The ribbon can be removed using non-conductive tweezers by pulling out parallel with the board.

  10. Nintendo 3DS XL 2015 A,B,X,Y, Start or Select Button Replacement: 10 단계, 이미지 1/1
    • Next, locate the five 3mm screws on the left board and remove them using a JIS #000 screwdriver.

  11. Nintendo 3DS XL 2015 A,B,X,Y, Start or Select Button Replacement: 11 단계, 이미지 1/1
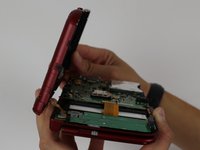
    • Carefully flip the board over and use tweezers to remove the blue-black ribbon located underneath.

  12. Nintendo 3DS XL 2015 A,B,X,Y, Start or Select Button Replacement: 12 단계, 이미지 1/1
    • Remove the gray rubber diamond to reveal the A/B/X/Y buttons and/or the rubber rectangle to reveal the Start/Select button.

    • Remove the buttons using tweezers.

    • When replacing, be sure to check that each button is placed back and is snugly fit into the appropriate hole before reassembling the device.

결론

To reassemble your device, follow these instructions in reverse order.

다른 24명이 해당 안내서를 완성하였습니다.

Kobbe Farwick

회원 가입일: 04/01/15

2,133 평판

안내서 2개 작성하였습니다

Cal Poly, Team 24-4, Lancaster Spring 2015 Cal Poly, Team 24-4, Lancaster Spring 2015 회원

CPSU-LANCASTER-S15S24G4

4 회원들

안내서 25개 작성하였습니다

댓글 10개

do the smaller new 3ds colored buttons work in the new 3ds xl?

itsandy14 - 답글

It will work, since the only difference between them is the size of screen and shell, but size of buttons and other pieces should be of the same.

CheatJoker -

If anyone else comes on this, I can confirm the small 3ds buttons do not quite work right they are slightly smaller and the cut outs that keep the buttons from spinning around are not the same

Mark Damien English -

Can someone provide further information about replacement of the entire C stick?

Or is it just as simple as pull the ribbon carefully, take the old one out and put the new one in?

CheatJoker - 답글

The set of screws on the secondary panel are giving me trouble. I think I might be stripping them... Is it normal for them to be screwed on so tight? I don't want to pay 85 bucks just because I need to press my B button harder to make it work...

Ben Fuqua - 답글

댓글 쓰기

조회 통계:

24 시간 전: 37

7일 전: 221

30일 전: 800

전체 시간: 39,854