이 버전에는 잘못된 편집 사항이 있을 수 있습니다. 최신 확인된 스냅샷으로 전환하십시오.
필요한 것
-
이 단계는 번역되지 않았습니다. 번역을 도와주십시오
-
Starting at the Micro SD Card Slot and using the blue plastic opening tool, begin to maneuver the tool around the edges while applying light pressure to lift the panel upwards.
-
-
이 단계는 번역되지 않았습니다. 번역을 도와주십시오
-
Continue lifting up the panel all the way around the edges of the tablet.
-
Once all of the panel clips are unfastened, gently remove the back panel.
-
-
이 단계는 번역되지 않았습니다. 번역을 도와주십시오
-
Using the blue plastic opening tool, place the lip of the tool underneath the battery as seen in the photo.
-
-
이 단계는 번역되지 않았습니다. 번역을 도와주십시오
-
Once you have the blue plastic opening tool underneath the battery, work the tool around the edges of the battery similar to the technique used for the back panel.
-
-
이 단계는 번역되지 않았습니다. 번역을 도와주십시오
-
When the battery seems loose enough, use the blue plastic opening tool to lift the battery from the device.
-
-
이 단계는 번역되지 않았습니다. 번역을 도와주십시오
-
Using a soldering iron, desolder the four wires from the motherboard.
-
Once the wires are free from the motherboard, your battery should be free to remove from your device.
-
-
이 단계는 번역되지 않았습니다. 번역을 도와주십시오
-
Use the angled tweezers to disconnect the black power cable from the mother board. The Cable should pop up from its slot when pulled.
-
-
-
이 단계는 번역되지 않았습니다. 번역을 도와주십시오
-
Remove the screw adjacent to the WIFI Antenna using the J000 Philips head screw-driver.
-
-
이 단계는 번역되지 않았습니다. 번역을 도와주십시오
-
The black plastic piece of the antenna is attached to a copper colored film which can be pulled up using the tweezers.
-
The antenna should now be free from the device.
-
-
이 단계는 번역되지 않았습니다. 번역을 도와주십시오
-
While using the black plastic spudger tool, slowly lift the tape with your fingers and hold the wires down with the tool.
-
-
이 단계는 번역되지 않았습니다. 번역을 도와주십시오
-
Slowly lift the black foam piece near the WIFI antenna to reveal the audio input film.
-
-
이 단계는 번역되지 않았습니다. 번역을 도와주십시오
-
Carefully remove the audio input films for each speaker from their respective ZIF (zero insertion force) connectors. These are the paper thin ribbons that have orange stripes along them.
-
Pull up the white latch on the ZIF connector, which will release the film and allow you to pull it out with tweezers.
-
Repeat this for both speakers.
-
-
이 단계는 번역되지 않았습니다. 번역을 도와주십시오
-
Remove the power cables connecting the speakers to the battery. These are black wires with gold tips.
-
Again, use the tweezers to carefully pull them up from their places, they should pop right off.
-
-
이 단계는 번역되지 않았습니다. 번역을 도와주십시오
-
Free the speakers by removing their screws. You'll need the J000 Phillips-head screw Driver.
-
-
이 단계는 번역되지 않았습니다. 번역을 도와주십시오
-
Using the tweezers or your fingers lift the remaining black wires from the motherboard.
-
-
이 단계는 번역되지 않았습니다. 번역을 도와주십시오
-
Remove the remaining screws holding the motherboard in place.
-
Screws description: 5 short black screw 20mm length and 30mm diameter.
-
Screws description: 3 long black screw 40 mm length and 20 mm diameter.
-
-
이 단계는 번역되지 않았습니다. 번역을 도와주십시오
-
Using your fingers, grasp the brown ZIF (Zero Insertion Force) tab and pull outward to disconnect.
-
There is an orange chip that is connected to a white ZIF (Zero Insertion Force). Remove this by using either your fingers or the tweezers.
-
-
이 단계는 번역되지 않았습니다. 번역을 도와주십시오
-
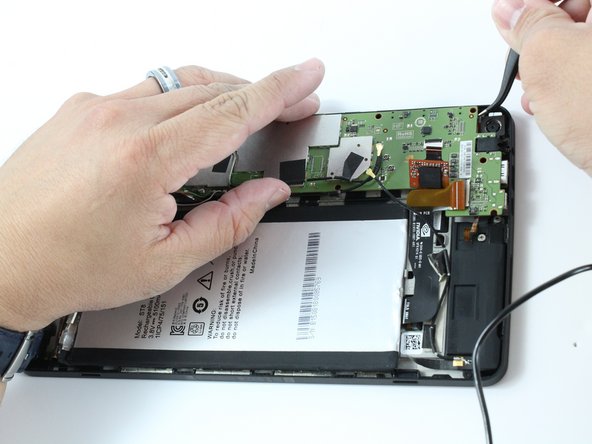
Using your tweezers, lightly lift around the edges to lift the motherboard.
-
Before lifting the motherboard out, use your tweezers to disconnect rear camera's copper cable from the motherboard.
-
-
이 단계는 번역되지 않았습니다. 번역을 도와주십시오
-
Use a soldering iron to desolder the Micro USB Port from the motherboard.
-
Now the Micro USB Port is free from the motherboard.
-


다른 5명이 해당 안내서를 완성하였습니다.

팀

iFixit, Team 1-1, Weber Winter 2016 iFixit, Team 1-1, Weber Winter 2016 회원
FIX-WEBER-W16S1G1
4 회원들
안내서 37개 작성하였습니다
댓글 12개
Where I can find a micro UBS port for Nvidia shield tablet ?
Micro usb -B, Amazon.
it's a standard form factor, just check ebay
It might be cheaper to solder a new one. I would compare prices, and decide if the price is worth soldering. If you want experience in soldering, go the solder route. Refining this skill will help later if you need to solder anything else.