주요 콘텐츠로 건너뛰기

OnePlus 6T Motherboard Replacement

필요한 것

  1. OnePlus 6T Motherboard Replacement, Back Cover: 1 단계, 이미지 1/1
    • Make sure the phone is powered off and placed with the back cover facing towards you on a stable surface.

  2. OnePlus 6T Motherboard Replacement: 2 단계, 이미지 1/1
    • Pop open the SIM card tray by inserting a SIM card removal tool into a small hole on the upper-left side of the phone.

    • Carefully remove the SIM card from its tray.

  3. OnePlus 6T Motherboard Replacement: 3 단계, 이미지 1/1
    • Loosen the binding glue within the phone using a hairdryer or an iOpener.

    • If you choose to use a hairdryer, hold the dryer at least eight inches from the phone and apply heat for two minutes in a circular motion around the edges of the phone.

  4. OnePlus 6T Motherboard Replacement: 4 단계, 이미지 1/3 OnePlus 6T Motherboard Replacement: 4 단계, 이미지 2/3 OnePlus 6T Motherboard Replacement: 4 단계, 이미지 3/3
    이 단계에 사용된 도구:
    Plastic Cards
    $2.99
    구매
    • Insert a Jimmy under one of the heated corners of the phone to lift it slightly.

    • Insert a plastic card underneath the slightly lifted lip on the back cover and gently glide the card under the lifted phone casing.

    • There will be a small amount of tension, but this is normal as the card is removing the adhesive within the phone.

    • Remove the back cover from the phone.

    • Use high concentration (>90%) isopropyl alcohol and a lint-free cloth to remove all adhesive residue from the back cover and the frame.

  5. OnePlus 6T Motherboard Replacement, Front Camera: 5 단계, 이미지 1/2 OnePlus 6T Motherboard Replacement, Front Camera: 5 단계, 이미지 2/2
    • Remove the single 3mm Phillips #00 screws holding the metal battery cover on the phone.

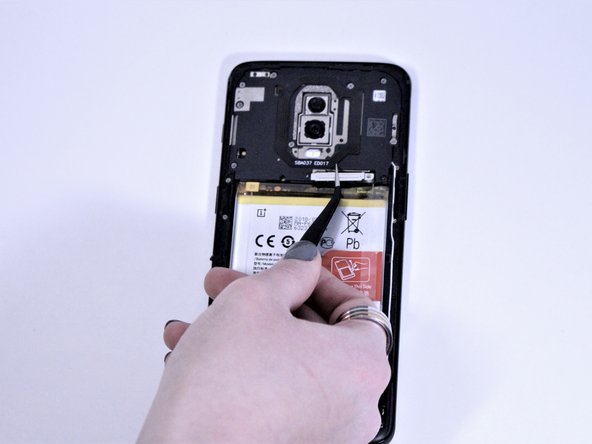
    • Use tweezers to remove the battery cover and place it to the side.

  6. OnePlus 6T Motherboard Replacement: 6 단계, 이미지 1/1
    • Remove eight 3mm Phillips #00 screws that connect the midframe to the phone.

  7. OnePlus 6T Motherboard Replacement: 7 단계, 이미지 1/1
    • Using a spudger, gently remove the midframe and place it to the side.

  8. OnePlus 6T Motherboard Replacement: 8 단계, 이미지 1/1
    • Using a spudger, lift the light brown tab in the middle of phone to disconnect the front camera.

    • Remove the front camera from the phone.

  9. OnePlus 6T Motherboard Replacement, Motherboard: 9 단계, 이미지 1/2 OnePlus 6T Motherboard Replacement, Motherboard: 9 단계, 이미지 2/2
    • Remove the single 3mm Phillips #00 screw to the right of the top rear camera.

  10. OnePlus 6T Motherboard Replacement: 10 단계, 이미지 1/1
    • Using a spudger, disconnect the charging port flex connector, the main flex connector, and the screen flex connector at the bottom of the camera.

  11. OnePlus 6T Motherboard Replacement: 11 단계, 이미지 1/1
    • Use a spudger to disconnect the signal cables on the right side of the motherboard.

  12. OnePlus 6T Motherboard Replacement: 12 단계, 이미지 1/2 OnePlus 6T Motherboard Replacement: 12 단계, 이미지 2/2
    • Disconnect the slider from the top of the phone with a spudger.

    • The slider is extremely delicate, so it is important you do not attempt to remove it from the sides.

    • Gently pull the motherboard from the left side and remove it from the phone.

결론

To reassemble your device, follow these instructions in reverse order.

다른 3명이 해당 안내서를 완성하였습니다.

Kristen Gismondi

회원 가입일: 11/12/14

81,663 평판

안내서 200개 작성하였습니다

iFixit iFixit 회원

Staff

135 회원들

안내서 16,732개 작성하였습니다

댓글 0개

댓글 쓰기

조회 통계:

24 시간 전: 3

7일 전: 7

30일 전: 47

전체 시간: 3,939