주요 콘텐츠로 건너뛰기

Oral-B Black 7000 Motherboard Replacement

필요한 것

  1. Oral-B Black 7000 Motherboard Replacement, Induction Charging Coil: 1 단계, 이미지 1/3 Oral-B Black 7000 Motherboard Replacement, Induction Charging Coil: 1 단계, 이미지 2/3 Oral-B Black 7000 Motherboard Replacement, Induction Charging Coil: 1 단계, 이미지 3/3
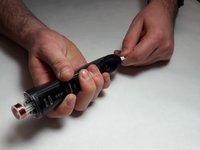
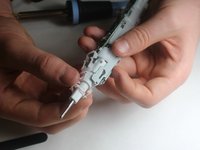
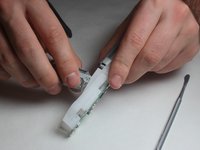
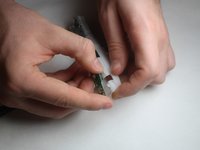
    • Use the charging station to remove the a small plastic plug from the end of the toothbrush by inserting the charging station into the end insert and twisting counter-clockwise by 90 degrees.

  2. Oral-B Black 7000 Motherboard Replacement: 2 단계, 이미지 1/1
    • Remove the end cap from the bottom of the toothbrush by prying it off with a spudger.

  3. Oral-B Black 7000 Motherboard Replacement: 3 단계, 이미지 1/1
    • Remove the top cap by using a spudger to pry the plastic ring off of the toothbrush frame.

  4. Oral-B Black 7000 Motherboard Replacement: 4 단계, 이미지 1/2 Oral-B Black 7000 Motherboard Replacement: 4 단계, 이미지 2/2
    • Use a spudger to loosen the two plastic tabs next to the induction coil that secure the internal assembly to the frame.

    • Push on the rotating head in order to pop the assembly out of the black plastic casing.

    • You can also use a spudger to leverage the assembly out, but this may break the copper wire connected to the induction coil, so be careful.

  5. Oral-B Black 7000 Motherboard Replacement: 5 단계, 이미지 1/1
    • Unwrap the ends of the wires from the white plastic pegs using a pair of tweezers.

    • Each wire end is wrapped around the peg 3-4 times.

  6. Oral-B Black 7000 Motherboard Replacement: 6 단계, 이미지 1/1
    • Melt the solder at the two pads on either side of the top of the motherboard. This will require a high heat soldering iron. Remove the wire from the solder pads using tweezers once the solder melts.

  7. Oral-B Black 7000 Motherboard Replacement: 7 단계, 이미지 1/1
    • Remove the induction coil by pulling the plastic tabs out of their keepers.

    • A spudger can be used to remove the plastic tabs from their keepers if neccessary.

  8. Oral-B Black 7000 Motherboard Replacement, Battery: 8 단계, 이미지 1/1
    • Remove the spring from the housing using a nylon spudger.

  9. Oral-B Black 7000 Motherboard Replacement: 9 단계, 이미지 1/2 Oral-B Black 7000 Motherboard Replacement: 9 단계, 이미지 2/2
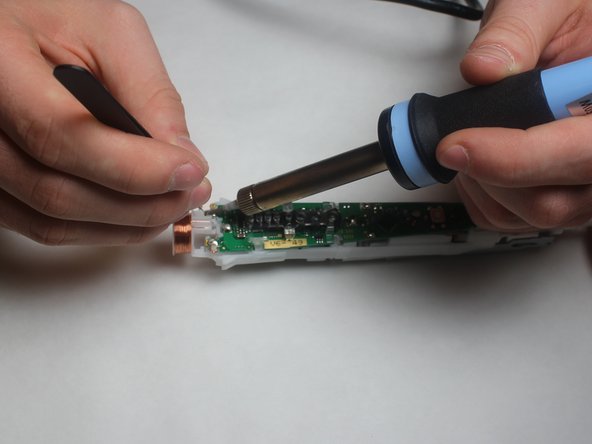
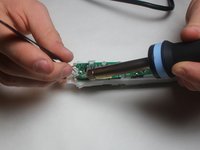
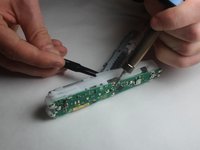
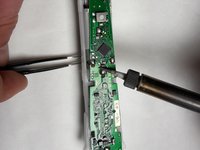
    • Use a soldering iron to melt the solder pad at the top of the motherboard, which attaches a battery electrode to the board. Remove the electrode by pulling it through the plastic housing after it has been desoldered from the board.

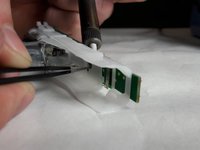
    • Repeat with the two solder pads on either side of the motherboard just above the black diamond-shaped component. The electrode foils can be pulled through the board from the back after the solder is melted.

  10. Oral-B Black 7000 Motherboard Replacement: 10 단계, 이미지 1/1
    • Use a metal spudger to pop the battery out of its casing. The electrodes will remain attached to the battery.

  11. Oral-B Black 7000 Motherboard Replacement, Motor: 11 단계, 이미지 1/1
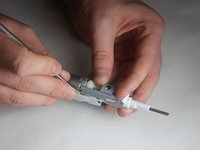
    • Desolder the red LED wires from the solder pads near the rotating head of the device.

    • These wires are quite delicate, so be sure the solder is fully melted before attempting to pull the wire out.

  12. Oral-B Black 7000 Motherboard Replacement: 12 단계, 이미지 1/2 Oral-B Black 7000 Motherboard Replacement: 12 단계, 이미지 2/2
    • Use a pair of tweezers to remove the plastic housing and the LED from the device.

  13. Oral-B Black 7000 Motherboard Replacement: 13 단계, 이미지 1/1
    • Remove the spring from the housing using a nylon spudger.

    • Use a nylon spudger rather than a metal one in order to minimize the risk of puncturing the battery.

  14. Oral-B Black 7000 Motherboard Replacement: 14 단계, 이미지 1/3 Oral-B Black 7000 Motherboard Replacement: 14 단계, 이미지 2/3 Oral-B Black 7000 Motherboard Replacement: 14 단계, 이미지 3/3
    • Remove the motor housing from the plastic casing. This can be accomplished by using the nylon spudger to pry the motor housing out of the supporting structures.

    • The physical parts holding onto the motor are plastic knobs built into the plastic casing. Any manipulation done to the casing to remove the motor should be done within reason so that the casing is able to be reused.

  15. Oral-B Black 7000 Motherboard Replacement: 15 단계, 이미지 1/2 Oral-B Black 7000 Motherboard Replacement: 15 단계, 이미지 2/2
    • Desolder the motor terminals from the motherboard and remove the motor assembly.

  16. Oral-B Black 7000 Motherboard Replacement, Motherboard: 16 단계, 이미지 1/1
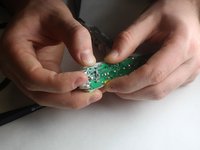
    • Remove the indicator light lenses from the motherboard using your fingers or a spudger.

  17. Oral-B Black 7000 Motherboard Replacement: 17 단계, 이미지 1/3 Oral-B Black 7000 Motherboard Replacement: 17 단계, 이미지 2/3 Oral-B Black 7000 Motherboard Replacement: 17 단계, 이미지 3/3
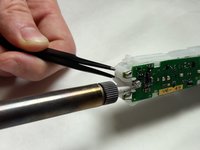
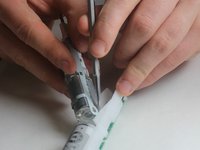
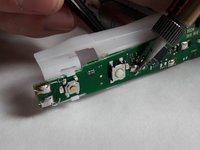
    • Desolder the wire just below the power button on the motherboard. Use a pair of needle nose tweezers to pull the electrode out of the board after the solder is completely melted.

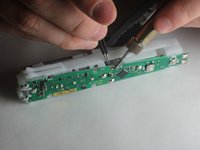
    • Do the same with the solder pad just above the black diamond-shaped component. Remove the electrode with a pair of tweezers.

  18. Oral-B Black 7000 Motherboard Replacement: 18 단계, 이미지 1/2 Oral-B Black 7000 Motherboard Replacement: 18 단계, 이미지 2/2
    • All points of contact between the mother board and the other components should now be de-soldered. Remove the motherboard by gently pushing up on it, pulling it out of the plastic tabs that secure it to the housing.

결론

To reassemble your device, follow these instructions in reverse order.

다른 한 분이 해당 안내서를 완성하였습니다.

Jonathan Bowyer

회원 가입일: 11/06/17

387 평판

안내서 3개 작성하였습니다

IUPUI, Team S1-G1, Harley Fall 2017 IUPUI, Team S1-G1, Harley Fall 2017 회원

IUPUI-HARLEY-F17S1G1

3 회원들

안내서 16개 작성하였습니다

댓글 한 개

Sehr gute Anleitung. Wo bekommt man das Motherboard her?

Simon - 답글

댓글 쓰기

조회 통계:

24 시간 전: 1

7일 전: 18

30일 전: 51

전체 시간: 1,487