주요 콘텐츠로 건너뛰기

필요한 것

해당 분해도는 수리 안내서가 아닙니다. Nokia 3310 수리는 자사의 서비스 설명서를 사용하세요.

  1. Original Nokia 3310 Teardown, Original Nokia 3310 Teardown: 1 단계, 이미지 2개 중 1개 Original Nokia 3310 Teardown, Original Nokia 3310 Teardown: 1 단계, 이미지 2개 중 2개
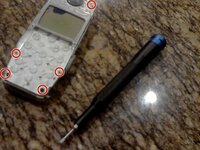
    • This is a teardown of my Nokia 3310.

    • Somehow, I broke the screen.

  2. Original Nokia 3310 Teardown: 2 단계, 이미지 2개 중 1개 Original Nokia 3310 Teardown: 2 단계, 이미지 2개 중 2개
    • Push up like in the first picture.

    • Then, lift up and put the back aside.

    • Follow video instructions for removing the battery and SIM card.

    • Follow instructions for removing the front case and keypad.

  3. Original Nokia 3310 Teardown: 5 단계, 이미지 3개 중 1개 Original Nokia 3310 Teardown: 5 단계, 이미지 3개 중 2개 Original Nokia 3310 Teardown: 5 단계, 이미지 3개 중 3개
    • Remove the circled screws with a Torx T6 driver.

    • Pry the clear plastic piece (not the circuit board) with a Spudger.

    • Now pry out the board.

    • Thank you for reading.

작성자

1다른 기여자 명과 함께

I take things apart

회원 가입일: 03/06/24

673 평판

안내서 6개를 작성함

댓글 0개

댓글 쓰기

조회 통계:

지난 24시간: 9

지난 7일: 95

지난 30일: 100

전체 시간: 100