주요 콘텐츠로 건너뛰기

PlayStation 3 Control Board Replacement

필요한 것

  1. PlayStation 3 Control Board Replacement, Smart Plate: 1 단계, 이미지 1/2 PlayStation 3 Control Board Replacement, Smart Plate: 1 단계, 이미지 2/2
    • Use the tip of a spudger to remove the black rubber screw cover from the side of the PS3.

    • The screw cover may be underneath a warranty sticker. This sticker will change appearance, and show "VOID" after it has been removed.

  2. PlayStation 3 Control Board Replacement: 2 단계, 이미지 1/1
    • Remove the single 8.5 mm T10 Security Torx screw from the smart plate.

  3. PlayStation 3 Control Board Replacement: 3 단계, 이미지 1/3 PlayStation 3 Control Board Replacement: 3 단계, 이미지 2/3 PlayStation 3 Control Board Replacement: 3 단계, 이미지 3/3
    • Pull the smart plate toward the hard drive bay, then lift it off the body of the PS3.

  4. PlayStation 3 Control Board Replacement: 4 단계, 이미지 1/1
    • Be sure to keep track of the small metal bracket loosely held in the top cover, if equipped.

  5. PlayStation 3 Control Board Replacement, Top Cover: 5 단계, 이미지 1/1
    • Remove the following seven screws:

    • Six 52 mm Phillips screws

    • One 30 mm Phillips screw

  6. PlayStation 3 Control Board Replacement: 6 단계, 이미지 1/1
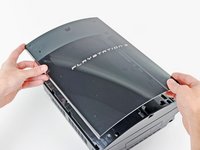
    • Lift the top cover from its rear edge and rotate it toward the front of the PS3.

    • Remove the top cover.

    • There is a plastic hook located in a hole on the top back right hand side corner. Carefully push the plastic hook a bit from the rear of the machine with a spudger to release the rear right of the casing.

  7. PlayStation 3 Control Board Replacement, Control Board: 7 단계, 이미지 1/2 PlayStation 3 Control Board Replacement, Control Board: 7 단계, 이미지 2/2
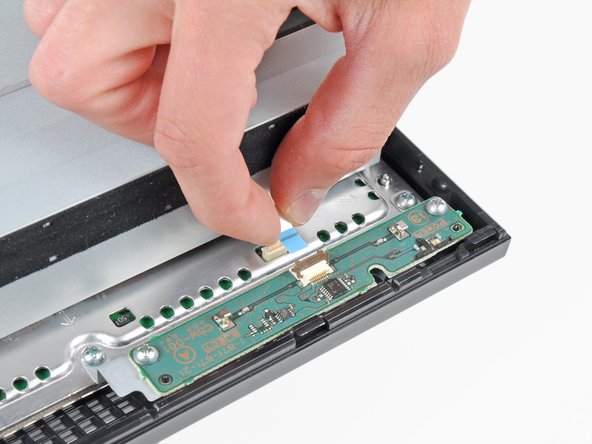
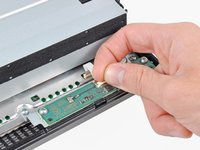
    • Use your fingernail to flip up the retaining flap on the control board ribbon cable socket.

    • Be sure you are prying up on the retaining flap, not the socket itself.

    • Pull the control board ribbon cable out of its socket.

  8. PlayStation 3 Control Board Replacement: 8 단계, 이미지 1/1
    • Remove the two 12 mm Phillips screws securing the control board to the lower case.

  9. PlayStation 3 Control Board Replacement: 9 단계, 이미지 1/1
    • Remove the control board from the lower case.

결론

To reassemble your device, follow these instructions in reverse order.

다른 17명이 해당 안내서를 완성하였습니다.

Walter Galan

694,561 평판

안내서 1,203개 작성하였습니다

댓글 2개

I don't have the same ps3 as in the tutorial and my control board is broken. What can i do now?

McGarvey - 답글

Could anyone tell me if they would have the connection pin of this board, as I would like to fit it into a motherboard.

Allan Fabian Santos Souza - 답글

댓글 쓰기

조회 통계:

24 시간 전: 3

7일 전: 25

30일 전: 114

전체 시간: 49,473