이 번역은 원본 안내서의 최신 업데이트를 반영하지 않을 수 있습니다. 번역 업데이트를 돕거나 아니면 원본 안내서 보기를 참조하세요.
소개
이 안내서는 PS4 내부에 도포된 서멀 페이스트를 재도포하는 방법을 보여줍니다.
서멀 페이스트는 발열이 큰 부품의 열을 기기 내부의 냉각 부품으로 효율적으로 전달하기 위해 도포하는 은색이나 회색을 띄는 점성을 가진 액체입니다. 전자제품의 서멀 페이스트는 시간이 지나면 점점 마르며 굳어가는데, 이때 열 전도 효율이 저하됩니다. 이에 서멀 페이스트는 몇 년이 지나면 재도포해주는 것이 좋습니다.
PS4에서 서멀 페이스트가 도포된 보드는 방열판 바로 아래에 있으며, 방열판은 많은 먼지가 쌓이는 곳입니다. 이에 방열판의 먼지를 청소하고 서멀 페이스트를 재도포해주면 PS4가 새 것같은 성능으로 작동하는데 큰 도움이 될 것입니다.
이 작업은 생각보다 많이 간단하여, 이 작업에 요구되는 유일한 기술적 능력으로는 나사를 풀고 조이는 것입니다. 하지만 이 작업은 매우 쉬운데, 한편으로는 매우 지루하거나 조금은 긴 시간이 소요될 수 있으므로 시간이 한가한 날을 골라 작업을 진행하세요.
필요한 것
-
-
상단 커버의 틈을 따라 양손으로 PS4를 잡으세요.
-
엄지 손가락으로 광택이 있는 상단 커버가 옆으로 튀어나올 때까지 밀어주세요.
-
광택이 있는 상단 커버를 위아래로 들어 올려서 PS4에서 분리하세요.
-
-
-
9.7mm Torx Security TR8 나사 세 개를 풀어주세요.
-
41mm Phillips 나사 두 개를 풀고 브래킷을 분리하세요.
-
-
-
-
손톱으로 광학 드라이브 위 리본 케이블의 금속 잠금 해제 레버를 누르세요.
-
손가락이나 핀셋으로 검정색 탭을 당겨 리본 케이블을 분리하세요.
-
-
-
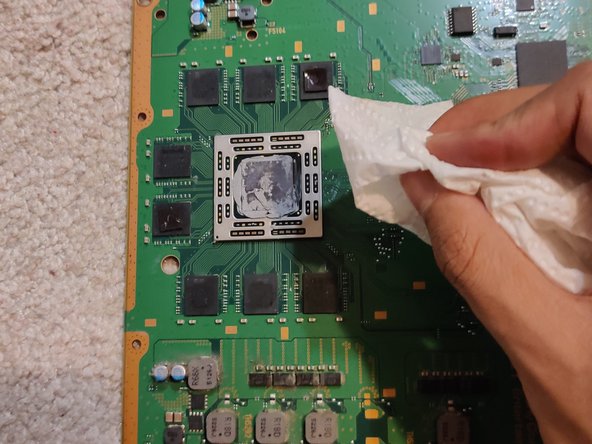
보풀이 날리지 않는 키친타올이나 휴지 등으로 기존에 도포되어 있는 서멀 페이스트를 닦아내세요. 이때 물티슈 사용은 추천하지 않으며, 알코올을 사용했을 경우 완벽히 건조시켜주세요.
-
완벽히 닦아내었고, 알코올 등을 사용한 경우 모두 마른 후, 새로운 서멀 페이스트를 닦아낸 칩셋의 가운데에 소량의 서멀 페이스트를 도포해주세요.
-


기기를 재조립하려면, 이 안내서를 역순으로 수행하세요.
기기를 재조립하려면, 이 안내서를 역순으로 수행하세요.
다른 173명이 해당 안내서를 완성하였습니다.

팀

CSU Los Angeles, Team S12-G1, Harris Fall 2020 CSU Los Angeles, Team S12-G1, Harris Fall 2020 회원
CSULA-HARRIS-F20S12G1
1 회원
안내서 9개를 작성함
댓글 22개
Se me hizo muy buena la guia, sobre todo para no cometer algun error al trabajar en la reparacion, mi PS4 dejo de zumbar el abanico con el cambio de pasta termica y una limpieza general de polvo y pelusa.
I followed this guide step by step, including reversing the order to reassemble my unit.
My PS4 is still loud but not as loud as before, so everything worked well. Thanks for the writeup!
i might be a little late to reply, but i followed this guide aswell BUT after step 31 i took off the extra metal/aluminum plating and saw thats that where the bulk of the dust will be built up, this plate has the vents that go to the cooling fan on the opposite side of it after unscrewing. i bought an original ps4, it sounded like a jet engine taking off. The vents on my ps4 were just about covered in dust almost no airflow was able to get through, after taking the extra step and taking off the 1 extra panel (the one under the motherboard in step 31) and of course after replacing the thermal paste made my ps4 run and sound like new again,
Beau -
I cannot reply to Beau's comment.
I also went the extra step of taking that metal shroud that sits below the motherboard (step 31).
I completely recommend this step. It is then you can get access to the heat sink fins to remove dust. There are 3 screws that hold this metal shroud in place. Easy to get out.
Then you can also now remove the fan - 2 screws for this.
You can then clean out the accumulated dust from the fan and in the plastic shroud, that the fan sits in.
Holy cow, dust factory. :)
Great guide! Just did it and now the console is dead silent during gameplay of super demanding games <3 I just went a step further after Step 31 and removed the plate there so that I could properly take care of the heat sink underneath that had lots of dust on it.