주요 콘텐츠로 건너뛰기

Razer Mamba RC30-001201 Left/Right Micro Switch Replacement

필요한 것

  1. Razer Mamba RC30-001201 Left/Right Micro Switch Replacement, Left/Right Micro Switch: 1 단계, 이미지 1/1
    • Remove the mouse feet using a spudger.

    • Only one is required to be removed, but this might be a good time to replace them all.

  2. Razer Mamba RC30-001201 Left/Right Micro Switch Replacement: 2 단계, 이미지 1/2 Razer Mamba RC30-001201 Left/Right Micro Switch Replacement: 2 단계, 이미지 2/2
    • Remove the thumb/sidepads from the left and right sides.

  3. Razer Mamba RC30-001201 Left/Right Micro Switch Replacement: 3 단계, 이미지 1/2 Razer Mamba RC30-001201 Left/Right Micro Switch Replacement: 3 단계, 이미지 2/2
    • Remove one screw from the bottom of the mouse beneath the mouse foot using a Phillips #00 screwdriver.

    • Remove one screw from the bottom of the mouse in the battery compartment using a Phillips #00 screwdriver.

  4. Razer Mamba RC30-001201 Left/Right Micro Switch Replacement: 4 단계, 이미지 1/2 Razer Mamba RC30-001201 Left/Right Micro Switch Replacement: 4 단계, 이미지 2/2
    • Remove the screws from under the thumb/sidepads using a Phillips #00 screwdriver.

  5. Razer Mamba RC30-001201 Left/Right Micro Switch Replacement: 5 단계, 이미지 1/1
    • Pry the upper mouse case away from lower mouse case using an iFixit opening tool.

  6. Razer Mamba RC30-001201 Left/Right Micro Switch Replacement: 6 단계, 이미지 1/2 Razer Mamba RC30-001201 Left/Right Micro Switch Replacement: 6 단계, 이미지 2/2
    • Remove the screw holding the right side of the board down using a Phillips #00 screwdriver.

    • Remove the screw holding side micro switch using a Phillips #00 screwdriver.

    • Remove the screw holding the front side micro switch using a Phillips #00 screwdriver.

  7. Razer Mamba RC30-001201 Left/Right Micro Switch Replacement: 7 단계, 이미지 1/2 Razer Mamba RC30-001201 Left/Right Micro Switch Replacement: 7 단계, 이미지 2/2
    • Locate two ribbon cables connecting the main board to secondary board.

  8. Razer Mamba RC30-001201 Left/Right Micro Switch Replacement: 8 단계, 이미지 1/3 Razer Mamba RC30-001201 Left/Right Micro Switch Replacement: 8 단계, 이미지 2/3 Razer Mamba RC30-001201 Left/Right Micro Switch Replacement: 8 단계, 이미지 3/3
    • Disconnect the ribbon cables.

    • The second cable must also be routed through the side micro switch housing to get it out.

  9. Razer Mamba RC30-001201 Left/Right Micro Switch Replacement: 9 단계, 이미지 1/1
    • Disconnect the small power cable connected to the circuit board.

  10. Razer Mamba RC30-001201 Left/Right Micro Switch Replacement: 10 단계, 이미지 1/1
    • Remove the mainboard from the lower mouse shell.

  11. Razer Mamba RC30-001201 Left/Right Micro Switch Replacement: 11 단계, 이미지 1/2 Razer Mamba RC30-001201 Left/Right Micro Switch Replacement: 11 단계, 이미지 2/2
  12. Razer Mamba RC30-001201 Left/Right Micro Switch Replacement: 12 단계, 이미지 1/2 Razer Mamba RC30-001201 Left/Right Micro Switch Replacement: 12 단계, 이미지 2/2
  13. Razer Mamba RC30-001201 Left/Right Micro Switch Replacement: 13 단계, 이미지 1/1
    • Place the new switches in place one at a time.

    • Bend the pins outward slightly to help keep the switch in place, or use a tool like a forceps or a clamp to keep the micro switch from moving.

  14. Razer Mamba RC30-001201 Left/Right Micro Switch Replacement: 14 단계, 이미지 1/1
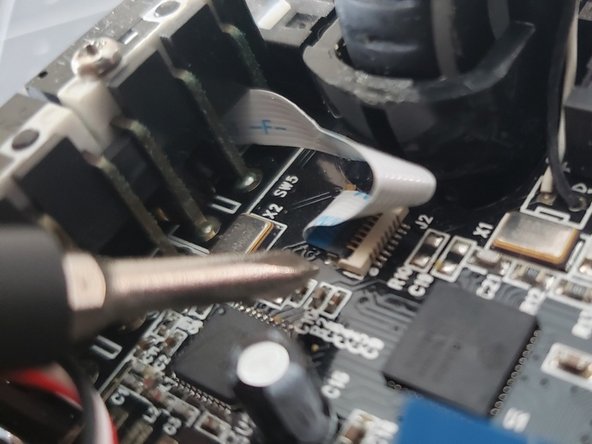
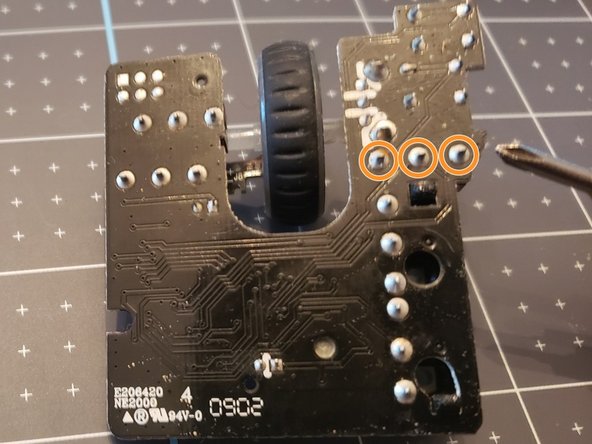
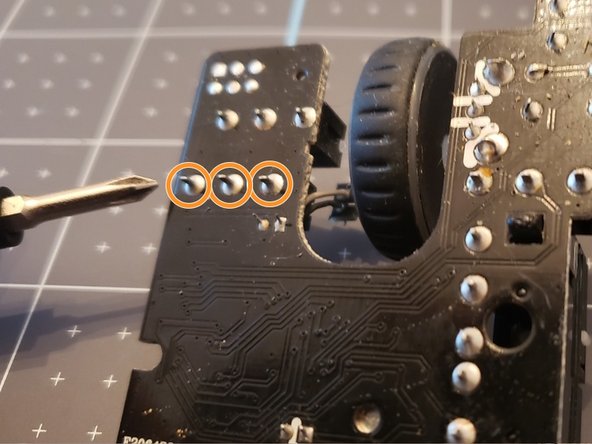
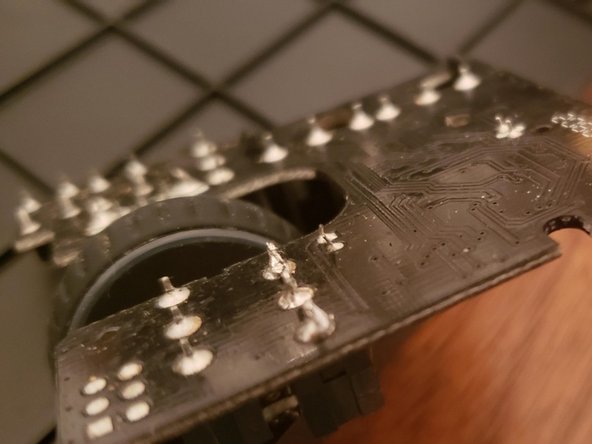
    • Solder the pins for the new micro switch to the board.

    • Get your iron up to temp. 400C degrees.

    • Tin your iron by placing a small amount of solder on the tip of the iron.

    • Heat up the joint by placing the tip of your iron against the intersection of base of the circuit pad, and pin [joint]. After 3-5 seconds it should be sufficiently heated.

    • Continue to hold the soldering iron on the pad, and pin and touch your solder to the joint.

    • A well made joint is smooth and shiny. A cone shape, like a volcano. Repeat process for other pins.

  15. Razer Mamba RC30-001201 Left/Right Micro Switch Replacement: 15 단계, 이미지 1/2 Razer Mamba RC30-001201 Left/Right Micro Switch Replacement: 15 단계, 이미지 2/2
    • One way to judge the quality of a solder joint is the shape it should be a coneish shape extending outward from the base (from the board towards the end of the pins rather than say a ballish shape).

    • Another is luster; a good joint should be shiny. A dusty or more matte looking joint may have been created at the wrong temperature. Does the solder cover the circuit well and is it connected to the pin properly?

  16. Razer Mamba RC30-001201 Left/Right Micro Switch Replacement: 16 단계, 이미지 1/1
    • Solder the remaining switches.

    • It is best to replace both the right click and left click at the same time.

결론

To reassemble your device, follow these instructions in reverse order.

Lrugieri

회원 가입일: 11/14/22

303 평판

안내서 1개 작성함

University of Memphis, Team 9-1, Peters Spring 2023 University of Memphis, Team 9-1, Peters Spring 2023 회원

UM-PETERS-S23S9G1

1 회원

안내서 1개 작성하였습니다

댓글 0개

댓글 쓰기

조회 통계:

24 시간 전: 0

7일 전: 3

30일 전: 41

전체 시간: 593