이 안내서에는 최근 변경 사항이 더 있습니다. 최신 비검증 버전으로 전환하십시오.
소개
If your laptop battery is older or reporting incorrectly, it may be possible to recalibrate the battery. This can correct the reported capacity or battery gauge to extend the life of the battery.
IMPORTANT: Recalibration does not save worn out batteries - it ONLY corrects the capacity. There is no way to recover a worn out battery, but the situation can be temporarily improved.
For help understanding what calibration is, why it’s important, and how to calibrate batteries in other types of devices, check out the Battery Calibration Wiki.
Guide notes
- If your battery exceeds 30-40 °C (86-104 °F), REPLACE THE BATTERY!
- You will likely see a capacity decrease. This is good - not bad.
- Try to avoid using your laptop while it is charging. This may affect calibration accuracy.
- Inconsistent reporting may indicate the battery is EOL. This can be delayed with proper care, but not reversed.
- If your battery is older, consider a ~10% discharge. A full discharge may cause damage.
How to recalibrate the battery
- Charge the laptop to 100%. Use it until it shuts down and no longer turns on.
- See BIOS lockouts and known OEM quirks for HP and Lenovo laptops.
- Immediately recharge the battery. Do not use the laptop if possible.
BIOS lockouts and known OEM quirks
- (BIOS lockout) HP laptops have a 15% BIOS lockout and need to be bypassed for a full discharge. Immediately charge the battery once the laptop shuts off.
- All HP laptops/2010+ Compaq.
- (BIOS lockout) Some Lenovo laptops have a 7% critical capacity lockout (0190).
- Only occurs if the laptop shuts off early. Easily bypassed.
- (Known quirk) Some Dell batteries hold incorrect data once the battery is nearing the end of it’s life. This self corrects with time and a later recalibration. I have seen this on a Dell NX31D (2014/E6440) and a RMJFW(2014/E6220)
필요한 것
-
-
Before recalibrating the battery, charge the battery to 100%. Take a note of the initial data.
-
-
-
Use your laptop while it is discharging. Do this until the computer shuts down.
-
-
-
Every laptop has a different charge indicator. When your laptop is fully discharged, plug it in immediately. Fully charge the laptop.
-
-
-
-
Once you are finished, check the BMS data. The reported data should be corrected.
-
-
-
Run Command Prompt as an administrator. Enter powercfg /batteryreport.
-
When the report is ready, you will receive a message stating where it is located. Check the data for consistency.
-
-
-
Plug the laptop in and turn it on; unplug it once it is on. Press ESC and select System Diagnostics.
-
Open the Component tests submenu. Select Memory or Hard Drive.
-
Select Extensive test. Choose Loop until error.
-
When the laptop shuts off, immediately recharge the battery.
-
-
-
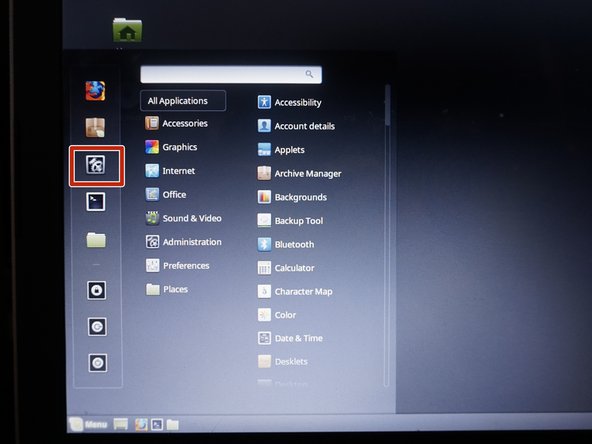
Boot the laptop into a live Linux Mint Cinnamon session. Open Settings and make the following changes:
-
Open Power Management. Change When the battery is critically low to Do nothing.
-
Use the laptop until it shuts down. Everything from this session will be lost.
-
-
-
Plug the power adapter into your laptop. Allow POST to finish before unplugging the laptop.
-
Disconnect the laptop once the laptop is booted. Finish discharging the battery.
-
-
-
Note the date of the recalibration.
-
Note the original charge capacity (Designed capacity).
-
Note the current capacity of the battery (Full charge capacity).
-
다른 14명이 해당 안내서를 완성하였습니다.
댓글 4개
Did not help at all.
I have a Windows tablet, pretty old one - previously it was showing 39% battery wear (it actually was holding for about an hour, battery itself is a bir inflated).
A couple days ago it hard crashed and wear level was reseted to 0%. Now some weird stuff started: turning off when reaching 14% battery charge, screen dimming etc.
Tried this method, and as I said in the beginning - it did not help, still shows 0% wear.
Late response, but some laptops and Windows based tablets (notably HP) always show 0% wear in Batteryinfoview. You need to go into the UEFI diagnostics or use use HP Support Assistant and grab it from the advanced data on HP. If it’s Dell, UEFI SupportAssist (newer systems) or ePSA (legacy).
Nothing to worry about, but another quirk like the EOL capacity reporting response on some Dell batteries. Added a note in the quirks section about this.
Nick -
I’m curious, can we send command through the I2C interface from the laptop itself to the battery and do some calibration from there? is the built-in BMS has the capability to do that?
May battery charging shows 39% and it should be always plug in (windows 11) on Asus laptop.


