주요 콘텐츠로 건너뛰기

Removing the Time Capsule Model A1302 Lower Case

필요한 것

  1. Removing the Time Capsule Model A1302 Lower Case, Remove the rubber base: 1 단계, 이미지 1/2 Removing the Time Capsule Model A1302 Lower Case, Remove the rubber base: 1 단계, 이미지 2/2
    • Place a piece of cloth or a similar soft material on a clean, flat surface. Place the device upside down on top of the fabric.

    • Open the Time Capsule by exposing the screws that hold the device together. The screws are concealed by the rubber base, which is the bottom surface of the device.

    • Use a heat gun or hair dryer to heat the rubber base, which softens the adhesive holding it on.

    • Starting in a corner, carefully lift the rubber base to prevent tearing. You can use a guitar pick or a small, plastic ruler to help separate the rubber from the metal.

    • Take your time to prevent tearing the adhesive. Ensure that you don't overheat the device.

    • If you tear some of the adhesive, don't worry. The existing adhesive is more than enough to allow the rubber base to stick back onto the unit during reassembly.

    • During reassembly, you can apply heat to the rubber base. This will enable the adhesive to flow and form a better bond with the device's metal casing.

  2. Removing the Time Capsule Model A1302 Lower Case, Remove the screws: 2 단계, 이미지 1/2 Removing the Time Capsule Model A1302 Lower Case, Remove the screws: 2 단계, 이미지 2/2
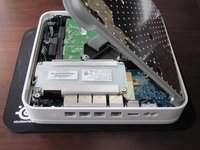
    • Once the rubber base is separated from the device, remove the 8 Phillips PH00 screws that attach the metal bottom of the case to the plastic top of the case.

    • Use the Philiips #00 Screwdriver.

    • Some revisions of the Time Capsule have 10 screws. The A1254 revision has two screws in the upper right and lower left corners, as shown in the second image. In this situation, be sure to remove all 10 screws.

  3. Removing the Time Capsule Model A1302 Lower Case, Open the Time Capsule: 3 단계, 이미지 1/2 Removing the Time Capsule Model A1302 Lower Case, Open the Time Capsule: 3 단계, 이미지 2/2
    • Position the rear side of the device (the side with Ethernet connectors) so that it is facing you.

    • Lift up the left side of the metal plate and slowly flip it over the right edge of the device.

    • To prevent damage, do not lift the metal plate straight up or use force. As shown in the second picture, the fan is attached to the metal plate and connected to the logic board next to the power connector.

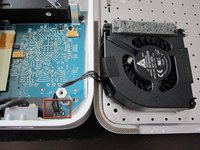
    • Since many people have had serious problems with the fan power connnector breaking, it is advisable to NOT try to disconnect the fan power connector. Be VERY careful with this connector. It is extremely fragile. If you absolutely have to disconnect the fan from the logic board, VERY carefully use a spudger or tweezers to do so.

결론

To reassemble your device, follow these instructions in reverse order.

다른 53명이 해당 안내서를 완성하였습니다.

rousp

회원 가입일: 02/18/10

6,658 평판

안내서 4개 작성하였습니다

댓글 7개

I accidentally edited this page, instead of the fan. Could anyone tell me how to reverse that/reverse it for me? Thanks!

Jamy Mahabier - 답글

Just un-edit the page to what it used to be.

Reid Fleishman -

must I put back on the rubber bottom or can I leave it off for maximum airflow?

Strider - 답글

My thought exactly. I left it off and put small felt pads on each corner for noise reduction AND for better airflow.

Tkappock -

cann anyone tell me what kind of screws the timcapsul has on the bottom, I kind of lost them and need to get replacement screws but io can not find anything under PH0 Screws online…

ginol95 - 답글

댓글 쓰기

조회 통계:

24 시간 전: 2

7일 전: 21

30일 전: 84

전체 시간: 73,015