이 버전에는 잘못된 편집 사항이 있을 수 있습니다. 최신 확인된 스냅샷으로 전환하십시오.
필요한 것
-
이 단계는 번역되지 않았습니다. 번역을 도와주십시오
-
Remove the following eight screws securing the lower case:
-
Two 1.8 mm P5 Pentalobe screws
-
Four 2.9 mm P5 Pentalobe screws
-
Two 6.1 mm P5 Pentalobe screws
-
-
이 단계는 번역되지 않았습니다. 번역을 도와주십시오
-
Wedge your fingers between the upper case and the lower case, starting from the rear of the MacBook between the hinges.
-
Keeping a firm grip, lift steadily until the lower case separates slightly from the upper case.
-
-
이 단계는 번역되지 않았습니다. 번역을 도와주십시오
-
While holding the lower case in place, carefully flip the MacBook over so the Apple logo faces up.
-
-
이 단계는 번역되지 않았습니다. 번역을 도와주십시오
-
Lift the upper case and display together from the front edge and raise it to about a 45˚ angle.
-
-
이 단계는 번역되지 않았습니다. 번역을 도와주십시오
-
Use the flat end of a spudger to press and hold the small gold 'battery disconnect' button.
-
If the power LED is lit up, continue holding the button until the LED goes dark, and then release. This may take up to 10 seconds.
-
If the LED does not light, release the button after 5-10 seconds. Press and hold it again for 5-10 seconds, and release. Finally, press and hold it a third time for 5-10 seconds, and release.
-
-
이 단계는 번역되지 않았습니다. 번역을 도와주십시오
-
Lifting from the front edge, open the lower case to an angle of about 45°.
-
-
이 단계는 번역되지 않았습니다. 번역을 도와주십시오
-
Use tweezers to peel back the tape covering the trackpad cable ZIF connector.
-
-
이 단계는 번역되지 않았습니다. 번역을 도와주십시오
-
Use a spudger to carefully flip up the retaining flap on the trackpad cable ZIF connector.
-
-
이 단계는 번역되지 않았습니다. 번역을 도와주십시오
-
Disconnect the trackpad ribbon cable from the trackpad by pulling it gently through its slot in the frame.
-
-
이 단계는 번역되지 않았습니다. 번역을 도와주십시오
-
Carefully close the MacBook and flip it over once again, so that the Apple logo faces up.
-
Lifting from the front edge, raise the upper case/display assembly to about a 90° angle, and prop it up against something sturdy so you don't have to hold it.
-
Add a piece of tape near the track pad to secure the upper case and prevent accidental movement.
-
-
이 단계는 번역되지 않았습니다. 번역을 도와주십시오
-
Remove the single 2.9 mm T5 Torx screw securing the battery connector to the logic board.
-
-
이 단계는 번역되지 않았습니다. 번역을 도와주십시오
-
As an added precaution, you may physically disconnect the battery by inserting a battery isolation pick between the logic board and the battery connector.
-
-
이 단계는 번역되지 않았습니다. 번역을 도와주십시오
-
Remove the two screws securing the USB-C port cable bracket:
-
1.1 mm Phillips #00 screw
-
3.5 mm T5 Torx screw
-
-
이 단계는 번역되지 않았습니다. 번역을 도와주십시오
-
Use the flat end of a spudger to disconnect the USB-C port cable bracket by prying it straight up from the logic board.
-
-
-
이 단계는 번역되지 않았습니다. 번역을 도와주십시오
-
Use a spudger to flip open the retaining flap on the audio jack board cable ZIF connector.
-
-
이 단계는 번역되지 않았습니다. 번역을 도와주십시오
-
Disconnect the audio jack board ribbon cable by pulling it straight back out of the ZIF connector.
-
-
이 단계는 번역되지 않았습니다. 번역을 도와주십시오
-
Use tweezers to peel back the tape covering the display cable connector.
-
-
이 단계는 번역되지 않았습니다. 번역을 도와주십시오
-
If so, use the flat end of a spudger to hold down the retaining flap while peeling the tape away with the tweezers.
-
-
이 단계는 번역되지 않았습니다. 번역을 도와주십시오
-
Use the flat end of a spudger to flip open the retaining flap on the display cable connector.
-
Try to keep it clear of the tape, or it may re-adhere and make cable removal difficult.
-
-
이 단계는 번역되지 않았습니다. 번역을 도와주십시오
-
Carefully slide the flat end of a spudger underneath the display cable to separate the adhesive holding it to the lower case.
-
-
이 단계는 번역되지 않았습니다. 번역을 도와주십시오
-
Hold the retaining flap open.
-
Disconnect the display cable by gently pulling it straight out of its connector.
-
-
이 단계는 번역되지 않았습니다. 번역을 도와주십시오
-
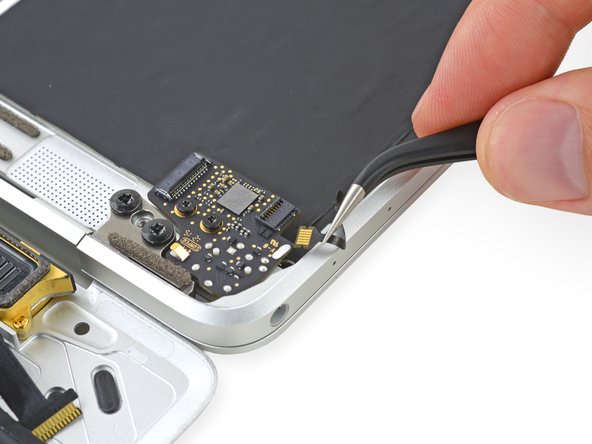
Use a spudger to flip open the ZIF connector retaining flap for the dual microphone assembly ribbon cable.
-
-
이 단계는 번역되지 않았습니다. 번역을 도와주십시오
-
Disconnect the microphone assembly ribbon cable by pulling it straight out of its connector.
-
-
이 단계는 번역되지 않았습니다. 번역을 도와주십시오
-
Remove the two 3.2 mm T5 Torx screws securing the audio jack board to the case.
-
-
이 단계는 번역되지 않았습니다. 번역을 도와주십시오
-
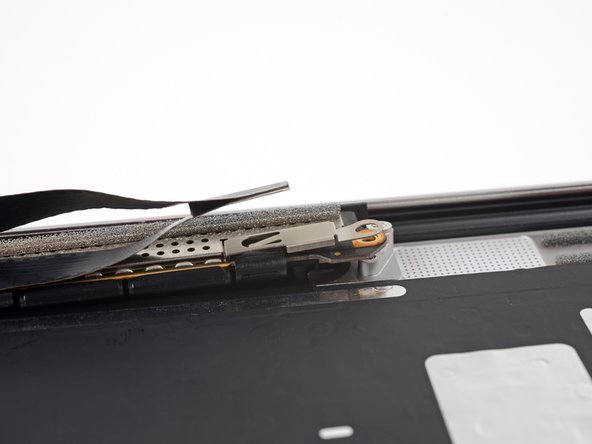
Prepare an iOpener and apply heat to the upper case directly behind the microphone assembly.
-
-
이 단계는 번역되지 않았습니다. 번역을 도와주십시오
-
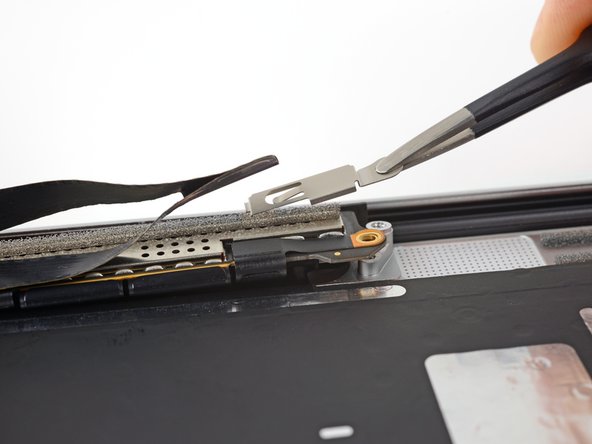
Use a fine-tip probe or pick to gently peel the dual microphone assembly away from the case.
-
-
이 단계는 번역되지 않았습니다. 번역을 도와주십시오
-
Use tweezers to lift the USB-C port just over the hinge screws.
-
Slide the port out and up over the display hinge to remove it.
-
-
이 단계는 번역되지 않았습니다. 번역을 도와주십시오
-
Remove the two 3.3 mm T5 Torx screws securing the display cable assembly.
-
-
이 단계는 번역되지 않았습니다. 번역을 도와주십시오
-
Fully open the display.
-
Set the MacBook down on its right edge with the display facing away from you, as shown.
-
-
이 단계는 번역되지 않았습니다. 번역을 도와주십시오
-
Holding the display assembly with one hand and the upper case with the other, push them together slightly to move the hinges out of their recesses in the the upper case.
-
Push the upper case forward while pulling back gently on the display.
-
Once the two display hinges have cleared the upper case, remove the display and set it aside.
-
-
이 단계는 번역되지 않았습니다. 번역을 도와주십시오
-
Use a pair of tweezers to remove the tape covering the keyboard ribbon cable connector on the trackpad.
-
-
이 단계는 번역되지 않았습니다. 번역을 도와주십시오
-
Using a spudger, flip open the retaining flap on the keyboard ribbon cable ZIF connector.
-
-
이 단계는 번역되지 않았습니다. 번역을 도와주십시오
-
Remove the five 2.5 mm T3 Torx screws securing the trackpad to the case.
-
-
이 단계는 번역되지 않았습니다. 번역을 도와주십시오
-
Use a spudger to flip up the retaining flap on the keyboard ribbon cable ZIF connector.
-
-
이 단계는 번역되지 않았습니다. 번역을 도와주십시오
-
Gently peel the keyboard ribbon cable up from the case, and remove the cable.
-


다른 7명이 해당 안내서를 완성하였습니다.

댓글 4개
Just a warning, but when any repairs are being done on this particular model, its important to discharge the battery before disconnecting ANY cables or connections internally. Not doing so can damage logic board components or more. I was looking into the take aprt for the top case, and there was no mention about discharging the battery before cables were being disconnected so I wanted to put this on your radar. Thank you
On step 22, the retaining flap mentioned isn't opening for me, and I can't tell from the photos which direction it opens (and I don't want to force it). Can someone please advise? @adamocamb are you able to help me out here?