주요 콘텐츠로 건너뛰기

Ricoh Super 8 800z Handle Assembly Replacement

필요한 것

  1. Ricoh Super 8 800z Handle Assembly Replacement, Handle Assembly: 1 단계, 이미지 1/3 Ricoh Super 8 800z Handle Assembly Replacement, Handle Assembly: 1 단계, 이미지 2/3 Ricoh Super 8 800z Handle Assembly Replacement, Handle Assembly: 1 단계, 이미지 3/3
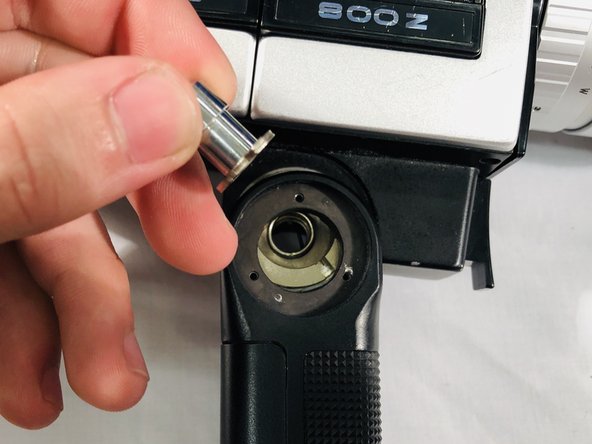
    • Open the handle's battery compartment and remove the batteries from the handle.

  2. Ricoh Super 8 800z Handle Assembly Replacement: 2 단계, 이미지 1/3 Ricoh Super 8 800z Handle Assembly Replacement: 2 단계, 이미지 2/3 Ricoh Super 8 800z Handle Assembly Replacement: 2 단계, 이미지 3/3
    • Using the Phillips #000 screwdriver, remove the three screws on the round plate on the right side of the camera handle. This is the side with the handle lock release button.

  3. Ricoh Super 8 800z Handle Assembly Replacement: 3 단계, 이미지 1/3 Ricoh Super 8 800z Handle Assembly Replacement: 3 단계, 이미지 2/3 Ricoh Super 8 800z Handle Assembly Replacement: 3 단계, 이미지 3/3
    • Remove the round metal plate.

    • Then, shift the handle so you have clearance to pass one of the legs of the button through the opening.

  4. Ricoh Super 8 800z Handle Assembly Replacement: 4 단계, 이미지 1/3 Ricoh Super 8 800z Handle Assembly Replacement: 4 단계, 이미지 2/3 Ricoh Super 8 800z Handle Assembly Replacement: 4 단계, 이미지 3/3
    • Pull the button out at an angle.

    • Remove the spring beneath it with a pair of tweezers.

  5. Ricoh Super 8 800z Handle Assembly Replacement: 5 단계, 이미지 1/3 Ricoh Super 8 800z Handle Assembly Replacement: 5 단계, 이미지 2/3 Ricoh Super 8 800z Handle Assembly Replacement: 5 단계, 이미지 3/3
    • Flip the camera to the other side and remove the screws from the other round metal plate with a Phillips #000 screwdriver.

    • When replacing this plate, make sure the cutout in the plate surrounds the wiring in the handle. You may break the wiring if the plates are not seated well or if placed incorrectly.

  6. Ricoh Super 8 800z Handle Assembly Replacement: 6 단계, 이미지 1/3 Ricoh Super 8 800z Handle Assembly Replacement: 6 단계, 이미지 2/3 Ricoh Super 8 800z Handle Assembly Replacement: 6 단계, 이미지 3/3
    • Pull the handle slowly away from the camera and shift the handle to allow access to the wire connections.

    • Desolder these wires carefully and you can now remove the handle.

    • For a informative guide on how to Solder/Desolder check out this guide.

결론

To reassemble your device, follow these instructions in reverse order.

Nicholas steven Thompson

회원 가입일: 01/26/20

268 평판

안내서 2개 작성하였습니다

댓글 0개

댓글 쓰기

조회 통계:

24 시간 전: 1

7일 전: 3

30일 전: 9

전체 시간: 283