주요 콘텐츠로 건너뛰기

Samsung Galaxy S22 Earpiece Speaker Replacement

필요한 것

  1. Samsung Galaxy S22 Earpiece Speaker Replacement, Heat the bottom edge: 1 단계, 이미지 1/1
    • Let your phone's battery to drain below 25% before starting this repair. A charged lithium-ion battery may catch fire if damaged.

    • Heat an iOpener and apply it to the bottom edge of the back cover for two minutes.

    • A hair dryer, heat gun, or hot plate may also be used, but be careful not to overheat the phone—the display and internal battery are susceptible to heat damage.

  2. Samsung Galaxy S22 Earpiece Speaker Replacement, Adhesive information: 2 단계, 이미지 1/2 Samsung Galaxy S22 Earpiece Speaker Replacement, Adhesive information: 2 단계, 이미지 2/2
    • While you wait for the adhesive to soften, note the following:

    • There's adhesive securing the back cover around the perimeter of the frame.

    • The adhesive is strongest in the bottom right and top left corners.

  3. Samsung Galaxy S22 Earpiece Speaker Replacement, Insert an opening pick: 3 단계, 이미지 1/3 Samsung Galaxy S22 Earpiece Speaker Replacement, Insert an opening pick: 3 단계, 이미지 2/3 Samsung Galaxy S22 Earpiece Speaker Replacement, Insert an opening pick: 3 단계, 이미지 3/3
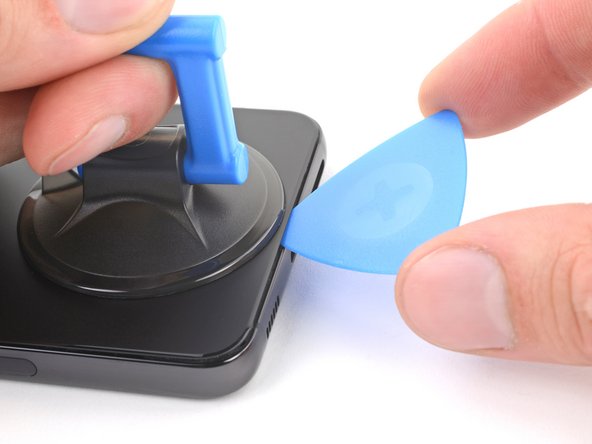
    • Apply a suction handle to the back cover, as close to the bottom edge as possible.

    • Pull up on the suction handle with strong, steady force to create a gap between the cover and the frame.

    • If you have trouble creating a gap, apply more heat to further soften the adhesive. Follow the iOpener instructions to avoid overheating.

    • Insert an opening pick into the gap.

  4. Samsung Galaxy S22 Earpiece Speaker Replacement, Slice the bottom adhesive: 4 단계, 이미지 1/3 Samsung Galaxy S22 Earpiece Speaker Replacement, Slice the bottom adhesive: 4 단계, 이미지 2/3 Samsung Galaxy S22 Earpiece Speaker Replacement, Slice the bottom adhesive: 4 단계, 이미지 3/3
    • Slide the pick back and forth along the bottom edge to slice through the adhesive.

    • Leave the pick inserted in the bottom left corner to prevent the adhesive from resealing.

  5. Samsung Galaxy S22 Earpiece Speaker Replacement, Heat the left edge: 5 단계, 이미지 1/1
    • Apply a heated iOpener to the left edge of the back cover for two minutes.

  6. Samsung Galaxy S22 Earpiece Speaker Replacement, Slice the left adhesive: 6 단계, 이미지 1/3 Samsung Galaxy S22 Earpiece Speaker Replacement, Slice the left adhesive: 6 단계, 이미지 2/3 Samsung Galaxy S22 Earpiece Speaker Replacement, Slice the left adhesive: 6 단계, 이미지 3/3
    • Insert a second opening pick at the bottom left corner.

    • Slide the pick to the bottom of the camera bezel to slice the left adhesive.

    • Only insert the pick up to 5 mm, as you may damage the antenna flex cable or the power button cable.

    • Leave the pick in to prevent the adhesive from resealing.

  7. Samsung Galaxy S22 Earpiece Speaker Replacement, Heat the right edge: 7 단계, 이미지 1/1
    • Heat an iOpener and apply it to the right edge of the back cover for two minutes.

  8. Samsung Galaxy S22 Earpiece Speaker Replacement, Slice the right adhesive: 8 단계, 이미지 1/3 Samsung Galaxy S22 Earpiece Speaker Replacement, Slice the right adhesive: 8 단계, 이미지 2/3 Samsung Galaxy S22 Earpiece Speaker Replacement, Slice the right adhesive: 8 단계, 이미지 3/3
    • Insert a third opening pick at the bottom right corner.

    • If the adhesive has resealed, insert the pick closer to the bottom edge.

    • Slide the pick to the top right corner to slice the adhesive.

    • Leave the pick in the top right corner to prevent the adhesive from resealing.

  9. Samsung Galaxy S22 Earpiece Speaker Replacement, Heat the top edge: 9 단계, 이미지 1/1
    • Heat an iOpener and apply it to the top edge of the back cover for two minutes.

  10. Samsung Galaxy S22 Earpiece Speaker Replacement, Slice the remaining adhesive: 10 단계, 이미지 1/3 Samsung Galaxy S22 Earpiece Speaker Replacement, Slice the remaining adhesive: 10 단계, 이미지 2/3 Samsung Galaxy S22 Earpiece Speaker Replacement, Slice the remaining adhesive: 10 단계, 이미지 3/3
    • Insert an opening pick in the gap at the top right edge.

    • Slide the pick across the top edge and around the top left corner to slice the remaining adhesive.

    • Only insert the pick up to 4 mm, as you may damage the rear cameras or flash.

  11. Samsung Galaxy S22 Earpiece Speaker Replacement, Remove the back cover: 11 단계, 이미지 1/3 Samsung Galaxy S22 Earpiece Speaker Replacement, Remove the back cover: 11 단계, 이미지 2/3 Samsung Galaxy S22 Earpiece Speaker Replacement, Remove the back cover: 11 단계, 이미지 3/3
    이 단계에 사용된 도구:
    Tweezers
    $4.99
    구매
    • Grab and remove the back cover.

    • If your cover is still sticking to the frame, slide an opening pick around the perimeter until the cover completely separates.

    • During reassembly:

    • This is a good point to power on your phone and test all functions before sealing it up. Be sure to power your phone back down completely before you continue working.

    • Remove any adhesive chunks with a pair of tweezers or your fingers. Apply heat if you're having trouble separating the adhesive.

    • To apply new adhesive, follow this guide.

  12. Samsung Galaxy S22 Earpiece Speaker Replacement, Disconnect the wireless charging coil: 12 단계, 이미지 1/2 Samsung Galaxy S22 Earpiece Speaker Replacement, Disconnect the wireless charging coil: 12 단계, 이미지 2/2
    • Use the pointed end of a spudger to pry and disconnect the wireless charging coil from the motherboard.

    • To re-attach press connectors, carefully align and press down on one side until it clicks into place, then repeat on the other side. Don't press down on the middle. If the connector is misaligned, the pins can bend and cause permanent damage.

  13. Samsung Galaxy S22 Earpiece Speaker Replacement, Unfasten the wireless charging coil: 13 단계, 이미지 1/1
    • Use your Phillips screwdriver to remove the six 3.5 mm-long screws securing the wireless charging coil.

  14. Samsung Galaxy S22 Earpiece Speaker Replacement, Unfasten the loudspeaker: 14 단계, 이미지 1/1
    • Use your Phillips screwdriver to remove the seven 3.5 mm screws securing the loudspeaker.

  15. Samsung Galaxy S22 Earpiece Speaker Replacement, Unclip the loudspeaker: 15 단계, 이미지 1/3 Samsung Galaxy S22 Earpiece Speaker Replacement, Unclip the loudspeaker: 15 단계, 이미지 2/3 Samsung Galaxy S22 Earpiece Speaker Replacement, Unclip the loudspeaker: 15 단계, 이미지 3/3
    • Insert the pointed end of your spudger between the upper left corner of the loudspeaker and the frame.

    • Pry up to unclip the loudspeaker from the frame.

    • During reassembly, press around the perimeter of the loudspeaker to engage the clips.

  16. Samsung Galaxy S22 Earpiece Speaker Replacement, Remove the charging coil and loudspeaker assembly: 16 단계, 이미지 1/3 Samsung Galaxy S22 Earpiece Speaker Replacement, Remove the charging coil and loudspeaker assembly: 16 단계, 이미지 2/3 Samsung Galaxy S22 Earpiece Speaker Replacement, Remove the charging coil and loudspeaker assembly: 16 단계, 이미지 3/3
    • Grab and remove the wireless charging coil and loudspeaker from the frame.

    • Do not separate the charging coil from the loudspeaker.

  17. Samsung Galaxy S22 Earpiece Speaker Replacement, Disconnect the battery: 17 단계, 이미지 1/2 Samsung Galaxy S22 Earpiece Speaker Replacement, Disconnect the battery: 17 단계, 이미지 2/2
    • Use the pointed end of your spudger to pry up and disconnect the battery press connector.

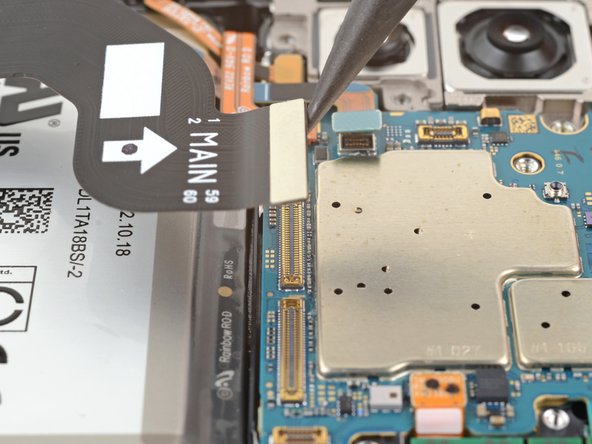
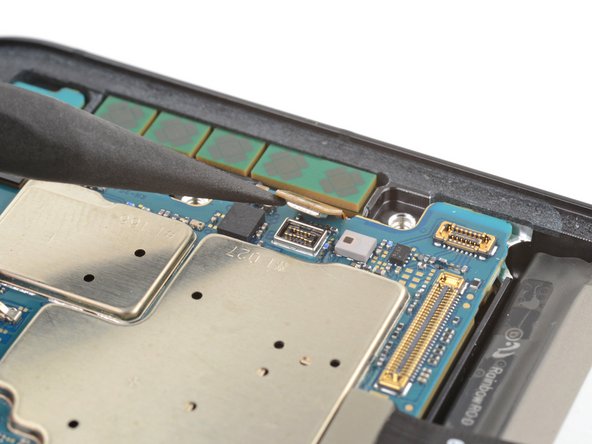
  18. Samsung Galaxy S22 Earpiece Speaker Replacement, Disconnect the interconnect cables: 18 단계, 이미지 1/3 Samsung Galaxy S22 Earpiece Speaker Replacement, Disconnect the interconnect cables: 18 단계, 이미지 2/3 Samsung Galaxy S22 Earpiece Speaker Replacement, Disconnect the interconnect cables: 18 단계, 이미지 3/3
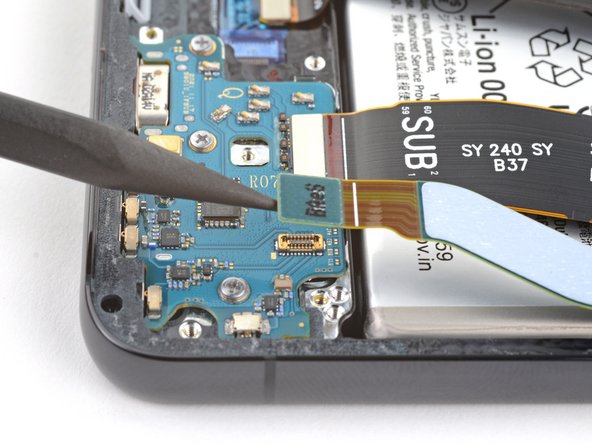
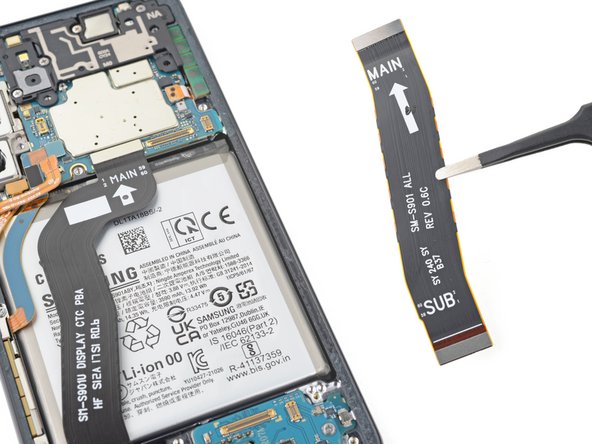
    • Use the pointed end of your spudger to pry up and disconnect both interconnect cables from the motherboard.

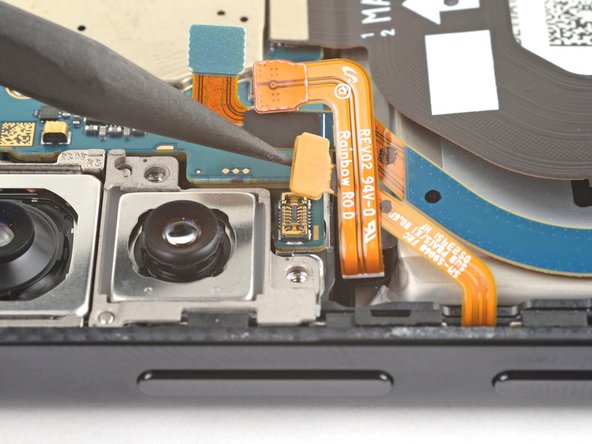
  19. Samsung Galaxy S22 Earpiece Speaker Replacement: 19 단계, 이미지 1/3 Samsung Galaxy S22 Earpiece Speaker Replacement: 19 단계, 이미지 2/3 Samsung Galaxy S22 Earpiece Speaker Replacement: 19 단계, 이미지 3/3
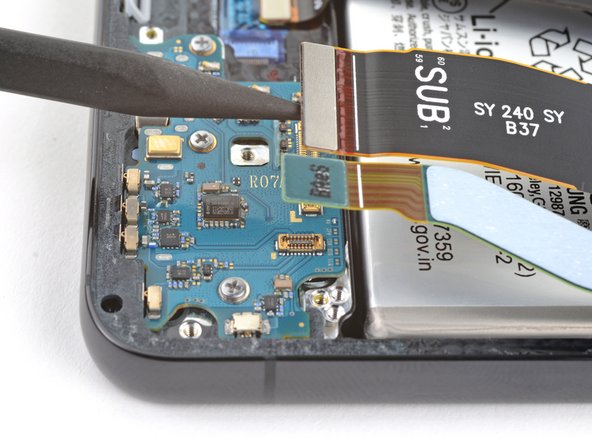
    • Use the pointed end of your spudger to pry up and disconnect both interconnect cables from the charging board.

  20. Samsung Galaxy S22 Earpiece Speaker Replacement, Remove the interconnect cables: 20 단계, 이미지 1/3 Samsung Galaxy S22 Earpiece Speaker Replacement, Remove the interconnect cables: 20 단계, 이미지 2/3 Samsung Galaxy S22 Earpiece Speaker Replacement, Remove the interconnect cables: 20 단계, 이미지 3/3
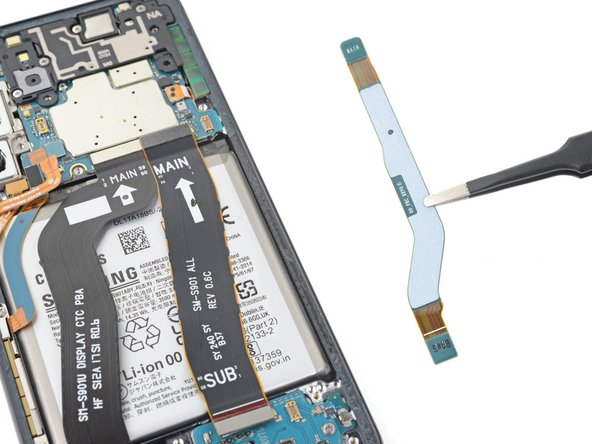
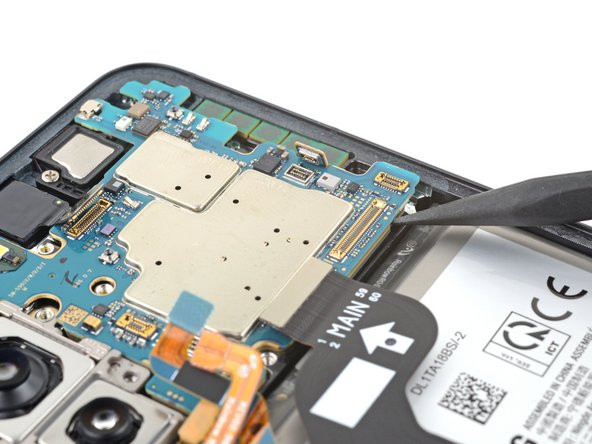
    • Grab and remove the two interconnect cables from the frame.

    • During reassembly, orient the cables so the "main" ends are toward the top of the phone and the "sub" ends are toward the bottom.

  21. Samsung Galaxy S22 Earpiece Speaker Replacement, Unfasten the motherboard cover: 21 단계, 이미지 1/1
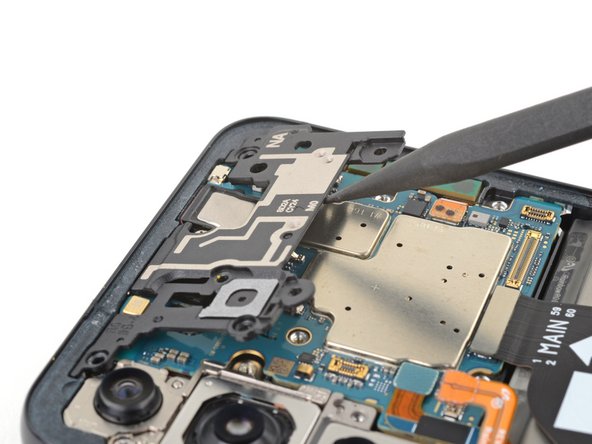
    • Use your Phillips screwdriver to remove the four 3.5 mm-long screws securing the motherboard cover.

  22. Samsung Galaxy S22 Earpiece Speaker Replacement, Unclip the motherboard cover: 22 단계, 이미지 1/2 Samsung Galaxy S22 Earpiece Speaker Replacement, Unclip the motherboard cover: 22 단계, 이미지 2/2
    • Insert the pointed end of your spudger between the bottom of the motherboard cover and the motherboard.

    • Pry up on the cover to unclip it from the frame.

  23. Samsung Galaxy S22 Earpiece Speaker Replacement, Remove the motherboard cover: 23 단계, 이미지 1/2 Samsung Galaxy S22 Earpiece Speaker Replacement, Remove the motherboard cover: 23 단계, 이미지 2/2
    • Grab and remove the motherboard cover.

  24. Samsung Galaxy S22 Earpiece Speaker Replacement, Disconnect the left 5G mmWave antenna: 24 단계, 이미지 1/2 Samsung Galaxy S22 Earpiece Speaker Replacement, Disconnect the left 5G mmWave antenna: 24 단계, 이미지 2/2
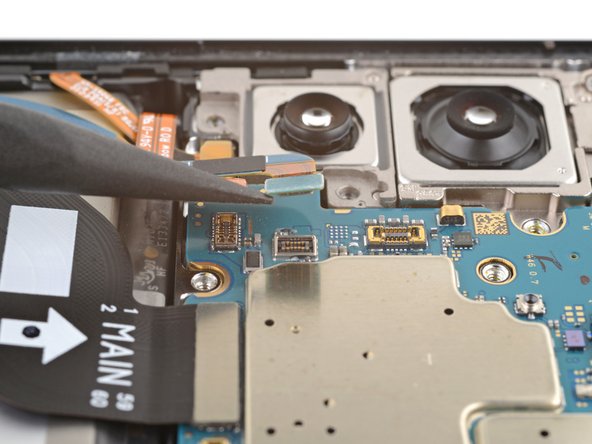
    • Use the pointed end of your spudger to pry up and disconnect the left 5G mmWave antenna press connector.

  25. Samsung Galaxy S22 Earpiece Speaker Replacement, Disconnect the front-facing camera: 25 단계, 이미지 1/2 Samsung Galaxy S22 Earpiece Speaker Replacement, Disconnect the front-facing camera: 25 단계, 이미지 2/2
    • Use the pointed end of your spudger to pry up and disconnect the front-facing camera press connector.

  26. Samsung Galaxy S22 Earpiece Speaker Replacement, Disconnect the screen: 26 단계, 이미지 1/2 Samsung Galaxy S22 Earpiece Speaker Replacement, Disconnect the screen: 26 단계, 이미지 2/2
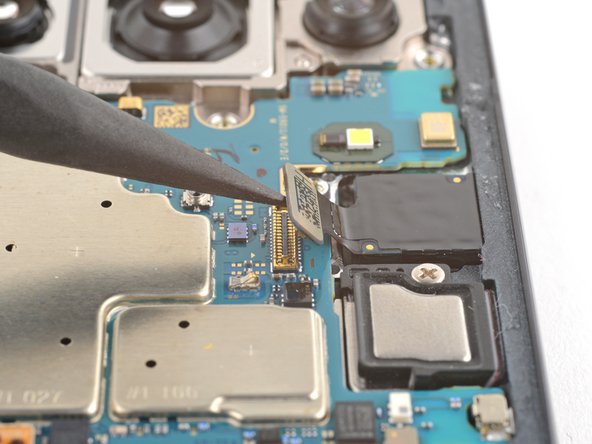
    • Use the pointed end of your spudger to pry up and disconnect the screen press connector.

  27. Samsung Galaxy S22 Earpiece Speaker Replacement, Disconnect the right 5G mmWave antenna: 27 단계, 이미지 1/2 Samsung Galaxy S22 Earpiece Speaker Replacement, Disconnect the right 5G mmWave antenna: 27 단계, 이미지 2/2
    • Use the pointed end of your spudger to pry up and disconnect the right 5G mmWave antenna press connector.

  28. Samsung Galaxy S22 Earpiece Speaker Replacement, Disconnect the power and volume buttons: 28 단계, 이미지 1/2 Samsung Galaxy S22 Earpiece Speaker Replacement, Disconnect the power and volume buttons: 28 단계, 이미지 2/2
    • Use the pointed end of your spudger to pry up and disconnect the power and volume button's press connector.

    • During reassembly, make sure this cable is under the battery cable.

  29. Samsung Galaxy S22 Earpiece Speaker Replacement, Unfasten the motherboard: 29 단계, 이미지 1/1
    • Use your Phillips screwdriver to remove the 3.5 mm-long screw securing the motherboard.

  30. Samsung Galaxy S22 Earpiece Speaker Replacement, Pry the motherboard up: 30 단계, 이미지 1/2 Samsung Galaxy S22 Earpiece Speaker Replacement, Pry the motherboard up: 30 단계, 이미지 2/2
    • Insert the pointed end of your spudger between the bottom right of the motherboard and the frame.

    • Pry the motherboard up until you can grab it with your fingers.

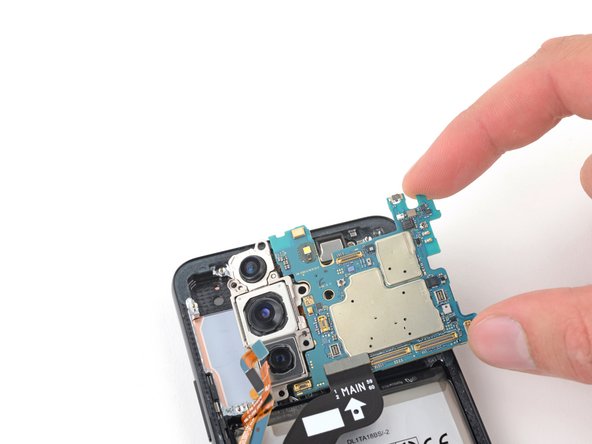
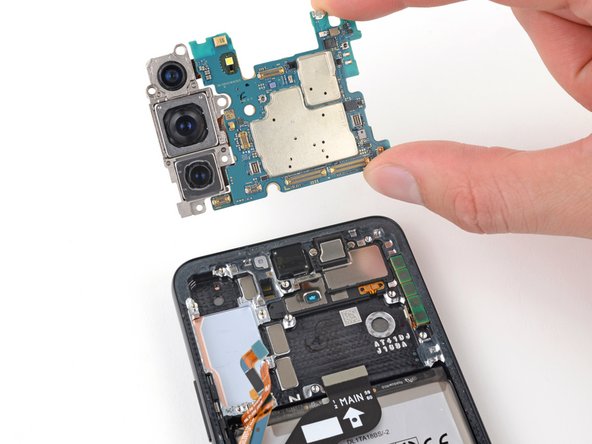
  31. Samsung Galaxy S22 Earpiece Speaker Replacement, Remove the motherboard: 31 단계, 이미지 1/3 Samsung Galaxy S22 Earpiece Speaker Replacement, Remove the motherboard: 31 단계, 이미지 2/3 Samsung Galaxy S22 Earpiece Speaker Replacement, Remove the motherboard: 31 단계, 이미지 3/3
    • Grab the motherboard by the right edge and remove it from the frame.

    • Be careful not to catch the motherboard on any loose cables.

    • During reassembly, be sure the cables are above the motherboard when reinserting it.

  32. Samsung Galaxy S22 Earpiece Speaker Replacement, Unfasten the earpiece speaker: 32 단계, 이미지 1/1
    • Use your Phillips screwdriver to remove the two 2.9 mm-long screws securing the earpiece speaker.

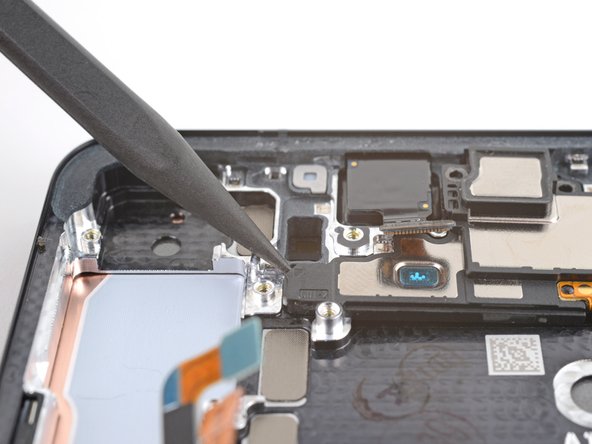
  33. Samsung Galaxy S22 Earpiece Speaker Replacement, Unclip the earpiece speaker: 33 단계, 이미지 1/2 Samsung Galaxy S22 Earpiece Speaker Replacement, Unclip the earpiece speaker: 33 단계, 이미지 2/2
    • Insert the pointed end of your spudger under the left edge of the earpiece speaker.

    • Pry up to unclip the earpiece speaker from the frame.

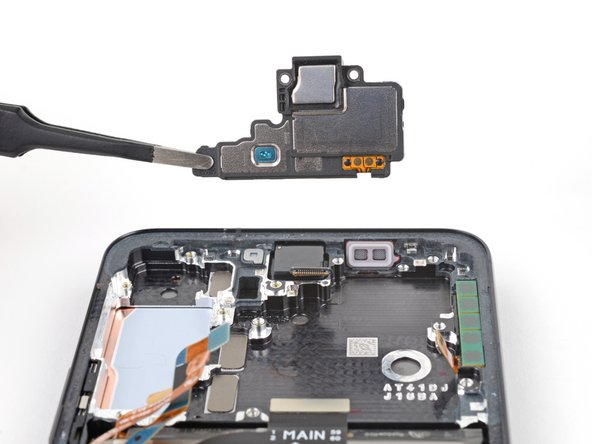
  34. Samsung Galaxy S22 Earpiece Speaker Replacement, Remove the earpiece speaker: 34 단계, 이미지 1/2 Samsung Galaxy S22 Earpiece Speaker Replacement, Remove the earpiece speaker: 34 단계, 이미지 2/2
    • Grab and remove the earpiece speaker.

결론

Compare your new replacement part to the original part—be sure to transfer remaining components and remove adhesive backings from the new part before installing.

To reassemble your device, follow these instructions in reverse order.

Take your e-waste to an R2 or e-Stewards certified recycler.

Repair didn’t go as planned? Check out our Answers community for troubleshooting help.

다른 3명이 해당 안내서를 완성하였습니다.

Clay Eickemeyer

회원 가입일: 09/19/22

70,402 평판

안내서 453개 작성하였습니다

iFixit iFixit 회원

Staff

140 회원들

안내서 18,074개 작성하였습니다

댓글 한 개

Just to help others, this guide incorrectly states the ear piece speaker also contains the vibration motor - it does not. You need to change the lower loud speaker module which contains the vibration motor.

Dwhite - 답글

댓글 쓰기

조회 통계:

24 시간 전: 1

7일 전: 55

30일 전: 328

전체 시간: 3,964