이 버전에는 잘못된 편집 사항이 있을 수 있습니다. 최신 확인된 스냅샷으로 전환하십시오.
필요한 것
-
이 단계는 번역되지 않았습니다. 번역을 도와주십시오
-
Insert a fingernail or plastic opening tool into the divot to the left of the rear-facing camera.
-
Gently pry and twist the flexible rear cover off the back of the phone.
-
-
이 단계는 번역되지 않았습니다. 번역을 도와주십시오
-
Insert a fingernail or plastic opening tool into the recess in the bottom right corner of the battery and lift upward.
-
Remove the battery away from the phone.
-
-
이 단계는 번역되지 않았습니다. 번역을 도와주십시오
-
Using a fingertip, pull the microSD card straight down out of its slot.
-
Remove the microSD card from the phone.
-
-
이 단계는 번역되지 않았습니다. 번역을 도와주십시오
-
Use a plastic opening tool to pry up the plastic midframe connector panel.
-
Remove the connector panel with a pair of tweezers.
-
-
이 단계는 번역되지 않았습니다. 번역을 도와주십시오
-
Use the sharp tip of a spudger to pry the home button cable connector straight up off its socket.
-
-
이 단계는 번역되지 않았습니다. 번역을 도와주십시오
-
Place a heated iOpener on the left side of the phone for at least 90 seconds.
-
Reheat the iOpener and place it on the right half of the phone.
-
-
이 단계는 번역되지 않았습니다. 번역을 도와주십시오
-
Insert the edge of an opening pick underneath the bottom right side of the front glass.
-
-
이 단계는 번역되지 않았습니다. 번역을 도와주십시오
-
Carefully slide the pick around the corner, stopping before the speaker grille at the top of the phone.
-
-
이 단계는 번역되지 않았습니다. 번역을 도와주십시오
-
Slide the opening pick across the top of the phone, being very careful not to insert the pick too deeply.
-
-
-
이 단계는 번역되지 않았습니다. 번역을 도와주십시오
-
Slide the opening pick down along the left half of the phone stopping at the lower left corner.
-
-
이 단계는 번역되지 않았습니다. 번역을 도와주십시오
-
Slide the opening pick all the way to the bottom left corner of the phone, making sure it is securely placed.
-
-
이 단계는 번역되지 않았습니다. 번역을 도와주십시오
-
Place a reheated iOpener over the bottom portion of the display assembly.
-
-
이 단계는 번역되지 않았습니다. 번역을 도와주십시오
-
Slide the very end of the opening pick across the bottom edge of the display to separate the last of the remaining adhesive.
-
-
이 단계는 번역되지 않았습니다. 번역을 도와주십시오
-
Insert an opening pick under the soft button icons on the display and pry the button cables down off the inside of the front panel.
-
-
이 단계는 번역되지 않았습니다. 번역을 도와주십시오
-
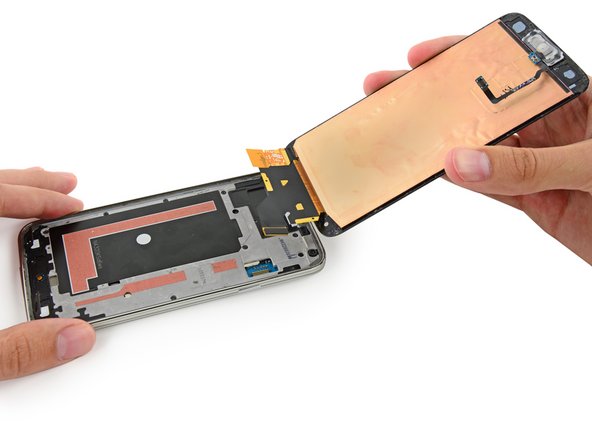
Slightly lift, but do not remove, the home button end of display assembly.
-
-
이 단계는 번역되지 않았습니다. 번역을 도와주십시오
-
Use the sharp tip of a spudger to lift the front panel assembly cable connector straight up off its socket on the motherboard.
-
Safely remove the front panel assembly from phone.
-
-
이 단계는 번역되지 않았습니다. 번역을 도와주십시오
-
Remove the ten 3.4 mm Phillips #000 screws from the display side of the midframe.
-
-
이 단계는 번역되지 않았습니다. 번역을 도와주십시오
-
Two 4.4 mm Phillips #000 screws near the USB port on the battery side of the phone
-
One 4.4 mm Phillips #000 screw
-
-
이 단계는 번역되지 않았습니다. 번역을 도와주십시오
-
Gently run a plastic opening tool down along the left inner side of the interior frame to separate the three white plastic clips.
-
-
이 단계는 번역되지 않았습니다. 번역을 도와주십시오
-
Gently pull the long sides of the silver bezel out away from the phone to separate the two halves of the midframe.
-
-
이 단계는 번역되지 않았습니다. 번역을 도와주십시오
-
Continue on to the right side of the silver bezel, pulling away from the interior section of the midframe to separate the two halves.
-
-
이 단계는 번역되지 않았습니다. 번역을 도와주십시오
-
Use a plastic opening tool to pry any remaining corners out of the silver bezel.
-
-
이 단계는 번역되지 않았습니다. 번역을 도와주십시오
-
Carefully remove the interior midframe/motherboard assembly from the white inner midframe.
-
-
이 단계는 번역되지 않았습니다. 번역을 도와주십시오
-
Carefully wedge the tip of a spudger underneath the antenna cable connector.
-
Delicately lift the spudger directly upwards to disconnect the antenna connector off its socket on the motherboard.
-
-
이 단계는 번역되지 않았습니다. 번역을 도와주십시오
-
Remove the single 3.0 mm Phillips #000 screw securing the motherboard to the midframe.
-
-
이 단계는 번역되지 않았습니다. 번역을 도와주십시오
-
Pull, but do not remove, the camera end of the motherboard up from the midframe to allow access to the connectors on the rear.
-
-
이 단계는 번역되지 않았습니다. 번역을 도와주십시오
-
Use the flat end of a spudger to pry the daughterboard connector straight up off its socket on the motherboard.
-
-
이 단계는 번역되지 않았습니다. 번역을 도와주십시오
-
Use the flat end of a spudger to carefully peel the soft button cables up off the interior midframe.
-
-
이 단계는 번역되지 않았습니다. 번역을 도와주십시오
-
Remove the single 2.5 mm Phillips #000 screw securing the Micro-USB port daughterboard to the midframe.
-
-
이 단계는 번역되지 않았습니다. 번역을 도와주십시오
-
Gently slide the flat end of a spudger in between the daughterboard cable and the interior midframe to begin to separate the adhesive holding it down.
-
-
이 단계는 번역되지 않았습니다. 번역을 도와주십시오
-
Rotate the midframe/motherboard assembly and reinsert the spudger between the daughterboard and interior midframe.
-
Twist the spudger to separate the last of the adhesive between the daughterboard and interior midframe.
-
Remove the daughterboard from the interior midframe.
-


다른 176명이 해당 안내서를 완성하였습니다.


댓글 40개
Since replacing the part I cannot register on the network, Wifi works, cellular says full signal but selected network unavailable. Sim works in another phone and another sim doesn't work in this phone.
Adam -
Make sure you reatach the tiny connector that was taken off in step 28. That is crucial to reception and can easily fail to click into place. It seems very likely that that is the problem.
Adam, did you make sure you replaced with the exact same model?
my apple -