주요 콘텐츠로 건너뛰기

Samsung Galaxy S8 Sensor Array Replacement

필요한 것

  1. Samsung Galaxy S8 Sensor Array Replacement, iOpener Heating: 1 단계, 이미지 1/2 Samsung Galaxy S8 Sensor Array Replacement, iOpener Heating: 1 단계, 이미지 2/2
    • We recommend that you clean your microwave before proceeding, as any nasty gunk on the bottom may end up stuck to the iOpener.

    • Place the iOpener in the center of the microwave.

    • For carousel microwaves: Make sure the plate spins freely. If your iOpener gets stuck, it may overheat and burn.

  2. Samsung Galaxy S8 Sensor Array Replacement: 2 단계, 이미지 1/1
    • Heat the iOpener for thirty seconds.

    • Throughout the repair procedure, as the iOpener cools, reheat it in the microwave for an additional thirty seconds at a time.

    • Be careful not to overheat the iOpener during the repair. Overheating may cause the iOpener to burst. Do not attempt to heat over 100˚C (212˚F).

    • Never touch the iOpener if it appears swollen.

    • If the iOpener is still too hot in the middle to touch, continue using it while waiting for it to cool down some more before reheating. A properly heated iOpener should stay warm for up to 10 minutes.

  3. Samsung Galaxy S8 Sensor Array Replacement: 3 단계, 이미지 1/1
    • Remove the iOpener from the microwave, holding it by one of the two flat ends to avoid the hot center.

    • The iOpener will be very hot, so be careful when handling it. Use an oven mitt if necessary.

  4. Samsung Galaxy S8 Sensor Array Replacement, Alternate iOpener heating method: 4 단계, 이미지 1/2 Samsung Galaxy S8 Sensor Array Replacement, Alternate iOpener heating method: 4 단계, 이미지 2/2
    • If you don't have a microwave, follow this step to heat your iOpener in boiling water.

    • Fill a pot or pan with enough water to fully submerge an iOpener.

    • Heat the water to a boil. Turn off the heat.

    • Place an iOpener into the hot water for 2-3 minutes. Make sure the iOpener is fully submerged in the water.

    • Use tongs to extract the heated iOpener from the hot water.

    • Thoroughly dry the iOpener with a towel.

    • The iOpener will be very hot, so be careful to hold it only by the end tabs.

    • Your iOpener is ready for use! If you need to reheat the iOpener, heat the water to a boil, turn off the heat, and place the iOpener in the water for 2-3 minutes.

  5. Samsung Galaxy S8 Sensor Array Replacement, Back Glass Assembly: 5 단계, 이미지 1/1
    • Opening your phone will compromise its waterproof seals. Have replacement adhesive ready before you proceed, or take care to avoid liquid exposure if you reassemble your phone without replacing the adhesive.

    • Heat an iOpener and apply it to a long edge of the S8 for about 2 minutes.

    • You may need to reheat and reapply the iOpener several times to get the phone warm enough. Follow the iOpener instructions to avoid overheating.

    • A hair dryer, heat gun, or hot plate may also be used, but be careful not to overheat the phone—the OLED display and internal battery are both susceptible to heat damage.

    • As you're waiting for the adhesive to soften, move on and read the following step to get an idea of where to pry.

  6. Samsung Galaxy S8 Sensor Array Replacement: 6 단계, 이미지 1/2 Samsung Galaxy S8 Sensor Array Replacement: 6 단계, 이미지 2/2
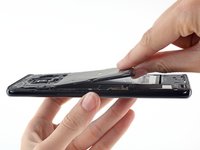
    • In the following steps you will be cutting through the adhesive around the edge of the rear glass panel.

    • The adhesive on the rear case is laid out as seen in the first image.

    • The prying pattern as seen from the outside of the phone is as follows:

    • Thick portions of adhesive

    • Thin areas of adhesive

    • Avoid prying here, to protect the fingerprint sensor.

  7. Samsung Galaxy S8 Sensor Array Replacement: 7 단계, 이미지 1/3 Samsung Galaxy S8 Sensor Array Replacement: 7 단계, 이미지 2/3 Samsung Galaxy S8 Sensor Array Replacement: 7 단계, 이미지 3/3
    • Once the back panel is warm to the touch, apply a suction cup as close to the heated edge of the phone as you can while avoiding the curved edge.

    • The suction cup will not make a good seal on the curved portion of the glass.

    • If the phone's back cover is cracked, the suction cup may not stick. Try lifting it with strong tape, or superglue the suction cup in place and allow it to cure so you can proceed.

    • Lift on the suction cup, and insert an opening pick under the rear glass.

    • Due to the curved glass, you will be pushing up, rather than inserting parallel to the plane of the phone.

  8. Samsung Galaxy S8 Sensor Array Replacement: 8 단계, 이미지 1/1
    • Once you have the tool firmly inserted into the glass, reheat and reapply the iOpener to soften the adhesive.

  9. Samsung Galaxy S8 Sensor Array Replacement: 9 단계, 이미지 1/2 Samsung Galaxy S8 Sensor Array Replacement: 9 단계, 이미지 2/2
    • Slide the opening pick down the side of the phone, separating the adhesive.

    • Go slowly so that the tool doesn't slip out of the seam. If cutting becomes difficult, reheat and reapply the iOpener.

  10. Samsung Galaxy S8 Sensor Array Replacement: 10 단계, 이미지 1/3 Samsung Galaxy S8 Sensor Array Replacement: 10 단계, 이미지 2/3 Samsung Galaxy S8 Sensor Array Replacement: 10 단계, 이미지 3/3
    • Repeat the previous heating and cutting procedure for the remaining three sides of the phone.

    • Leave an opening pick on each side as you continue to the next to prevent the adhesive from resealing.

  11. Samsung Galaxy S8 Sensor Array Replacement: 11 단계, 이미지 1/2 Samsung Galaxy S8 Sensor Array Replacement: 11 단계, 이미지 2/2
    • The fingerprint sensor cable connects the phone to the rear glass near the main camera. The cable is very short and should disconnect as the rear glass is removed.

    • As you lift the glass, peek in to be sure the orange cable with a blue connector has disconnected.

    • Use the opening picks to slice through any remaining adhesive and open the phone slightly.

    • If the fingerprint sensor cable seems snagged or stays taut do not open the phone any further. Disconnect the connector with the point of a spudger before proceeding.

    • During reassembly, in order to reconnect the fingerprint sensor cable, first angle the back cover into position until the cable connector lines up perfectly over its socket. Then, use the flat end of your spudger to gently snap the connector into place by pressing it straight down.

    • Remove the glass from the phone.

  12. Samsung Galaxy S8 Sensor Array Replacement: 12 단계, 이미지 1/1
    • To install a new back cover:

    • Use tweezers to peel away any remaining adhesive from the phone's chassis. Then clean the adhesion areas with high concentration isopropyl alcohol (at least 90%) and a lint-free cloth to prep the surface for the new adhesive.

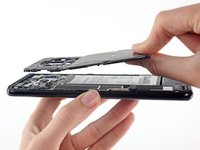
    • Peel the adhesive backing off of the new rear glass, carefully line up one edge of the glass against the phone chassis, and firmly press the glass onto the phone.

    • Follow this guide to reinstall the old back cover, or to install a back cover without pre-installed adhesive.

    • Be sure to turn on your phone and test your repair before installing new adhesive and resealing the phone.

    • If desired, you may reinstall the back cover without replacing the adhesive. Remove any large chunks of adhesive that might prevent the back cover from sitting down flush. After installation, heat the back cover and apply pressure to secure it. It won't be waterproof, but the glue is usually more than strong enough to hold.

    • You may also need to transfer the camera bezel to your new part. If that's the case, follow our camera bezel replacement guide.

  13. Samsung Galaxy S8 Sensor Array Replacement, NFC Antenna and Charging Coil Assembly: 13 단계, 이미지 1/1
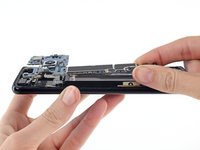
    • Remove eleven 3.7 mm screws using a Phillips #000 screwdriver.

  14. Samsung Galaxy S8 Sensor Array Replacement: 14 단계, 이미지 1/2 Samsung Galaxy S8 Sensor Array Replacement: 14 단계, 이미지 2/2
    • Remove the NFC antenna and charging coil assembly.

  15. Samsung Galaxy S8 Sensor Array Replacement, Loudspeaker Assembly: 15 단계, 이미지 1/1
    • Remove three 3.7 mm Phillips #000 screws.

  16. Samsung Galaxy S8 Sensor Array Replacement: 16 단계, 이미지 1/1
    • Remove the loudspeaker assembly.

  17. Samsung Galaxy S8 Sensor Array Replacement, SIM Card: 17 단계, 이미지 1/3 Samsung Galaxy S8 Sensor Array Replacement, SIM Card: 17 단계, 이미지 2/3 Samsung Galaxy S8 Sensor Array Replacement, SIM Card: 17 단계, 이미지 3/3
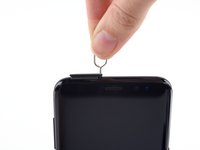
    • Insert a SIM card opening tool into the small hole on the left side of the top edge of the phone.

    • Press to eject the tray.

    • Remove the SIM card tray from the phone.

    • When reinserting the SIM card, ensure that it is in the proper orientation relative to the tray.

  18. Samsung Galaxy S8 Sensor Array Replacement, Battery Connector: 18 단계, 이미지 1/2 Samsung Galaxy S8 Sensor Array Replacement, Battery Connector: 18 단계, 이미지 2/2
    • Use the flat end of a spudger to disconnect the battery connector.

    • Although the battery is not shown in the next steps, there is no need to remove it for this guide. Just disconnect the battery and you're good to go.

  19. Samsung Galaxy S8 Sensor Array Replacement, Motherboard: 19 단계, 이미지 1/2 Samsung Galaxy S8 Sensor Array Replacement, Motherboard: 19 단계, 이미지 2/2
    • Use the flat end of a spudger to disconnect the sensor array connector.

  20. Samsung Galaxy S8 Sensor Array Replacement: 20 단계, 이미지 1/2 Samsung Galaxy S8 Sensor Array Replacement: 20 단계, 이미지 2/2
    • Use the flat end of a spudger to disconnect the front-facing camera connector.

  21. Samsung Galaxy S8 Sensor Array Replacement: 21 단계, 이미지 1/2 Samsung Galaxy S8 Sensor Array Replacement: 21 단계, 이미지 2/2
    • Use the flat end of a spudger to disconnect the display and digitizer connector.

  22. Samsung Galaxy S8 Sensor Array Replacement: 22 단계, 이미지 1/3 Samsung Galaxy S8 Sensor Array Replacement: 22 단계, 이미지 2/3 Samsung Galaxy S8 Sensor Array Replacement: 22 단계, 이미지 3/3
    • Use the point of a spudger to disconnect two antenna cables that connect the motherboard to the daughterboard.

  23. Samsung Galaxy S8 Sensor Array Replacement: 23 단계, 이미지 1/2 Samsung Galaxy S8 Sensor Array Replacement: 23 단계, 이미지 2/2
    • Use the flat end of a spudger to disconnect an antenna ribbon cable that connects the motherboard to the daughterboard.

  24. Samsung Galaxy S8 Sensor Array Replacement: 24 단계, 이미지 1/2 Samsung Galaxy S8 Sensor Array Replacement: 24 단계, 이미지 2/2
    • Use the flat end of a spudger to lift the motherboard and disconnect it from the daughterboard.

  25. Samsung Galaxy S8 Sensor Array Replacement: 25 단계, 이미지 1/2 Samsung Galaxy S8 Sensor Array Replacement: 25 단계, 이미지 2/2
    • Lift the motherboard out of the phone.

    • Careful not to snag the battery connector if you chose not to remove the battery.

  26. Samsung Galaxy S8 Sensor Array Replacement, Sensor Array: 26 단계, 이미지 1/3 Samsung Galaxy S8 Sensor Array Replacement, Sensor Array: 26 단계, 이미지 2/3 Samsung Galaxy S8 Sensor Array Replacement, Sensor Array: 26 단계, 이미지 3/3
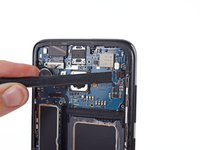
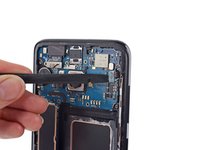
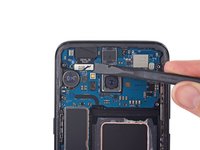
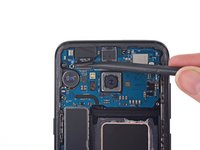
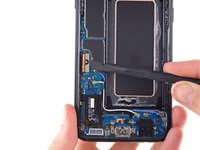
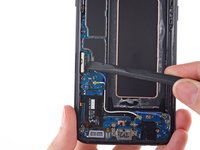
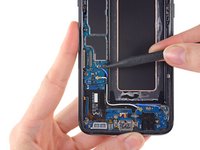
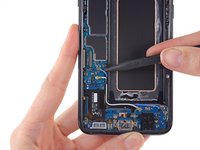
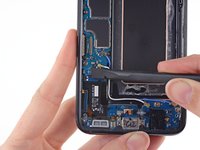
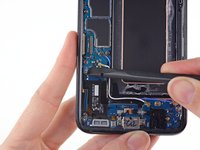
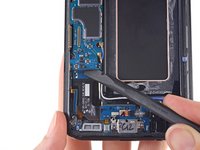
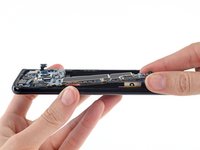
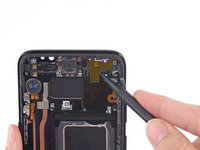
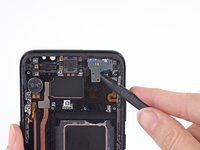
    • Insert the pointed tip of a spudger into the corner of the sensor array, between the case and the array. Pry up the sensor array.

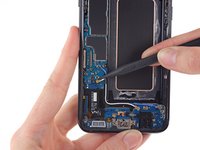
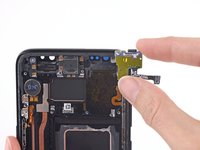
    • Remove the sensor array.

결론

After reapplying adhesive, follow these instructions in reverse order to reassemble your device.

After you've completed the repair, follow this guide to test your repair.

다른 7명이 해당 안내서를 완성하였습니다.

Adam O'Camb

회원 가입일: 04/11/15

194,899 평판

안내서 416개 작성하였습니다

댓글 한 개

My girlfriend’s GPS doesn’t work at all and additionally when she rotates the phone the screen doesn’t rotate at the same time (i.e. when in the gallery, photos don’t go from portrait to landscape). Would that be controlled by this, and would replacing it potentially fix it? (I’ve tried software fixes but they gave me no joy and a Samsung employee suggested it might be a hardware problem).

Pat - 답글

댓글 쓰기

조회 통계:

24 시간 전: 1

7일 전: 8

30일 전: 67

전체 시간: 10,606