이 버전에는 잘못된 편집 사항이 있을 수 있습니다. 최신 확인된 스냅샷으로 전환하십시오.
필요한 것
-
이 단계는 번역되지 않았습니다. 번역을 도와주십시오
-
To soften the adhesive holding the tablet together, heat up the edges of the glass panel using a heated iOpener on the edge of the device. Alternatively you can use a heat gun to loosen the adhesive.
-
Leave the iOpener on edge for two minutes.
-
-
이 단계는 번역되지 않았습니다. 번역을 도와주십시오
-
Place a suction cup near edge that you heated up with the iOpener.
-
Press down on the suction cup to create a seal, and pull up with force to create a separation between the display and the midframe.
-
Use an opening tool to split apart the glass panel from the midframe.
-
-
이 단계는 번역되지 않았습니다. 번역을 도와주십시오
-
As you continue along the edge using the opening tool, use a plastic card to keep the glass separate from the midframe.
-
-
이 단계는 번역되지 않았습니다. 번역을 도와주십시오
-
Pull off the glass panel using the suction cup.
-
Carefully disconnect the ribbon cable connecting the display assembly to the motherboard. You can disconnect this ribbon from either end.
-
-
이 단계는 번역되지 않았습니다. 번역을 도와주십시오
-
Repeat steps 3 through 7 to remove the rear glass panel on the opposite side of the device.
-
-
-
이 단계는 번역되지 않았습니다. 번역을 도와주십시오
-
Use a Phillips #000 screwdriver to unscrew the five screws securing the battery, and the twenty-two screws surrounding the midframe.
-
-
이 단계는 번역되지 않았습니다. 번역을 도와주십시오
-
Locate the ribbon running from the midframe and disconnect it from the motherboard with the flat end of a spudger.
-
-
이 단계는 번역되지 않았습니다. 번역을 도와주십시오
-
Use the flat end of the spudger to pop off the connector between the battery and the motherboard.
-
-
이 단계는 번역되지 않았습니다. 번역을 도와주십시오
-
Flip the midframe over and pop the battery out, making sure to slide it out from underneath the ribbon cables.
-
-
이 단계는 번역되지 않았습니다. 번역을 도와주십시오
-
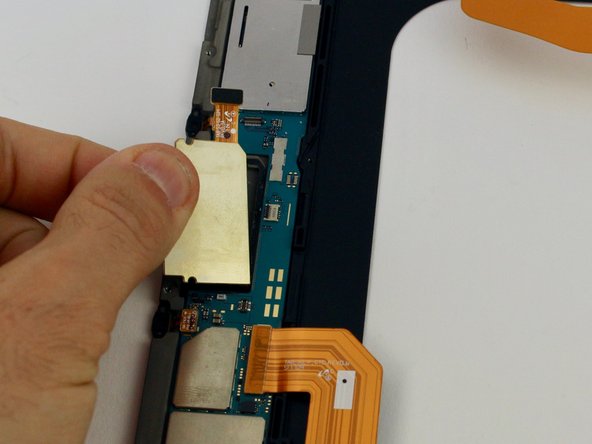
Disconnect the single press fit connector located just above the Micro SD card tray on the left midframe.
-
-
이 단계는 번역되지 않았습니다. 번역을 도와주십시오
-
Next pry the Micro SD card tray up from the midframe on the left with your finger.
-
Remove the Micro SD card reader.
-


다른 2명이 해당 안내서를 완성하였습니다.

