주요 콘텐츠로 건너뛰기

Samsung NX Mini LCD Replacement

필요한 것

  1. Samsung NX Mini LCD Replacement, Battery: 1 단계, 이미지 1/3 Samsung NX Mini LCD Replacement, Battery: 1 단계, 이미지 2/3 Samsung NX Mini LCD Replacement, Battery: 1 단계, 이미지 3/3
    • Orient the camera so the button panel and LCD are facing you.

    • Use a spudger or fingernail to open the battery compartment on the right side of the camera.

  2. Samsung NX Mini LCD Replacement: 2 단계, 이미지 1/2 Samsung NX Mini LCD Replacement: 2 단계, 이미지 2/2
    • Push the blue trapdoor to the left to release the battery, and remove the battery.

    • There is no battery shown in this photo.

  3. Samsung NX Mini LCD Replacement, Front Case: 3 단계, 이미지 1/1
    • Use a Phillips #00 screwdriver to remove the 4 mm screw inside the battery compartment.

  4. Samsung NX Mini LCD Replacement: 4 단계, 이미지 1/1
    • Remove the 4 mm Phillips #00 screw hiding in the external flash port.

  5. Samsung NX Mini LCD Replacement: 5 단계, 이미지 1/1
    • Remove the four 5 mm Phillips #00 screws from the lens assembly.

  6. Samsung NX Mini LCD Replacement: 6 단계, 이미지 1/1
    • Remove the metal lens mount by hand or with tweezers.

    • Be careful not to touch the sensor in the center of the lens assembly.

  7. Samsung NX Mini LCD Replacement: 7 단계, 이미지 1/1
    • Use tweezers to remove the inner metal ring.

  8. Samsung NX Mini LCD Replacement: 8 단계, 이미지 1/1
    • Use a Phillips #00 screwdriver to remove the three 4 mm screws from the bottom of the case.

  9. Samsung NX Mini LCD Replacement: 9 단계, 이미지 1/2 Samsung NX Mini LCD Replacement: 9 단계, 이미지 2/2
    • Use your hands to slowly pull the front casing away from the camera.

    • The case is attached with multiple clips that may make a cracking noise as you pull it away from the camera.

  10. Samsung NX Mini LCD Replacement, Sensor: 10 단계, 이미지 1/3 Samsung NX Mini LCD Replacement, Sensor: 10 단계, 이미지 2/3 Samsung NX Mini LCD Replacement, Sensor: 10 단계, 이미지 3/3
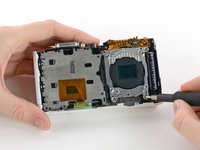
    • Gently flip the sensor cover back to expose the screw attaching the sensor cover to the ribbon cable.

    • Use a Phillips #00 screwdriver to remove the 3 mm screw from the sensor cover.

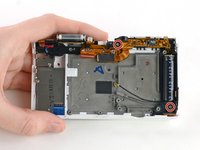
    • Use tweezers to remove the metal contact cover. Be sure to carefully remove the cover so the gold contacts remain in place.

    • The gold lens contacts lying beneath the ribbon cable become loose when the screw and contact cover are removed.

  11. Samsung NX Mini LCD Replacement: 11 단계, 이미지 1/2 Samsung NX Mini LCD Replacement: 11 단계, 이미지 2/2
    • Remove the four 4 mm Phillips #00 screws holding the sensor mount in place.

  12. Samsung NX Mini LCD Replacement: 12 단계, 이미지 1/3 Samsung NX Mini LCD Replacement: 12 단계, 이미지 2/3 Samsung NX Mini LCD Replacement: 12 단계, 이미지 3/3
    • Remove the four 4 mm Phillips #00 screws securing the battery compartment to the mother board.

    • Remove the battery compartment.

  13. Samsung NX Mini LCD Replacement: 13 단계, 이미지 1/2 Samsung NX Mini LCD Replacement: 13 단계, 이미지 2/2
    • Use a spudger to disconnect the ribbon cable connecting the image sensor to the motherboard.

  14. Samsung NX Mini LCD Replacement: 14 단계, 이미지 1/1
    • Gently remove the sensor mount from the camera case.

  15. Samsung NX Mini LCD Replacement, Flash Assembly: 15 단계, 이미지 1/3 Samsung NX Mini LCD Replacement, Flash Assembly: 15 단계, 이미지 2/3 Samsung NX Mini LCD Replacement, Flash Assembly: 15 단계, 이미지 3/3
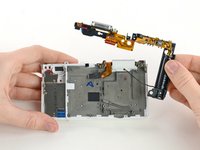
    • Use a Phillips #00 screwdriver to remove the two 5 mm screws holding the flash assembly to the camera case.

  16. Samsung NX Mini LCD Replacement: 16 단계, 이미지 1/2 Samsung NX Mini LCD Replacement: 16 단계, 이미지 2/2
    • Remove the flash assembly by gently pulling it away from the case.

    • You may need to use a spudger to release some of the clips holding the assembly in place.

    • Avoid touching the ends of the capacitor (the large black cylinder on the right). Capacitors that haven't been discharged may cause electric shock. Learn how to discharge a capacitor here.

  17. Samsung NX Mini LCD Replacement, LCD: 17 단계, 이미지 1/1
    • Remove the 5 mm Phillips #00 screw in the top right corner of the LCD assembly.

  18. Samsung NX Mini LCD Replacement: 18 단계, 이미지 1/2 Samsung NX Mini LCD Replacement: 18 단계, 이미지 2/2
    • Tilt and wiggle the LCD to remove it from the case.

결론

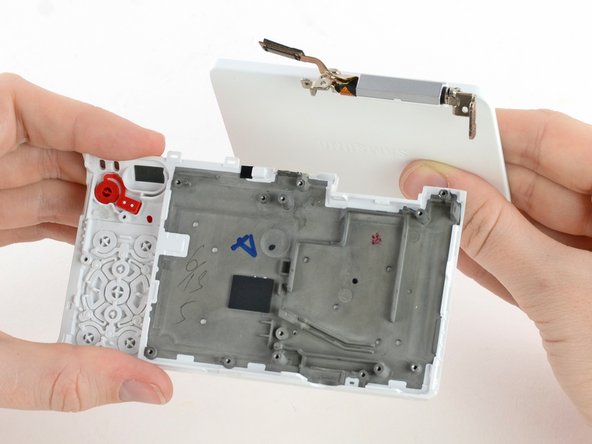
To reassemble your device, follow these instructions in reverse order.

다른 한 분이 해당 안내서를 완성하였습니다.

Kelsea Weber

회원 가입일: 11/12/15

19,864 평판

안내서 32개 작성하였습니다

iFixit iFixit 회원

Staff

135 회원들

안내서 16,767개 작성하였습니다

댓글 0개

댓글 쓰기

조회 통계:

24 시간 전: 1

7일 전: 2

30일 전: 5

전체 시간: 517