주요 콘텐츠로 건너뛰기

Sony Cyber-shot DSC-TX7 Front Sliding Lens Cover Replacement

필요한 것

  1. Sony Cyber-shot DSC-TX7 Front Sliding Lens Cover Replacement, Battery: 1 단계, 이미지 1/2 Sony Cyber-shot DSC-TX7 Front Sliding Lens Cover Replacement, Battery: 1 단계, 이미지 2/2
    • The battery compartment is located on the bottom of camera.

    • Move the slider from the 'lock' position to the 'open' position.

  2. Sony Cyber-shot DSC-TX7 Front Sliding Lens Cover Replacement: 2 단계, 이미지 1/3 Sony Cyber-shot DSC-TX7 Front Sliding Lens Cover Replacement: 2 단계, 이미지 2/3 Sony Cyber-shot DSC-TX7 Front Sliding Lens Cover Replacement: 2 단계, 이미지 3/3
    • Battery not shown.

    • Pull battery from compartment.

    • Insert newly charged battery into compartment, as shown in diagram (located in compartment).

    • Shut compartment door.

    • Move the slider back to the 'lock' position.

  3. Sony Cyber-shot DSC-TX7 Front Sliding Lens Cover Replacement, Front Cover: 3 단계, 이미지 1/1
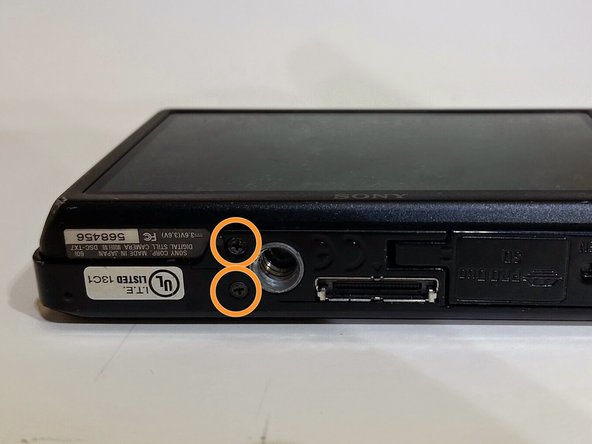
    • Use the Phillips #00 screwdriver to remove the 4mm length screws. There are 6 screws total.

  4. Sony Cyber-shot DSC-TX7 Front Sliding Lens Cover Replacement: 4 단계, 이미지 1/3 Sony Cyber-shot DSC-TX7 Front Sliding Lens Cover Replacement: 4 단계, 이미지 2/3 Sony Cyber-shot DSC-TX7 Front Sliding Lens Cover Replacement: 4 단계, 이미지 3/3
    • The 4 mm length screws are located on each side and on the bottom of the camera.

    • 2 screws on each side (4 total).

    • 2 screws on bottom.

  5. Sony Cyber-shot DSC-TX7 Front Sliding Lens Cover Replacement: 5 단계, 이미지 1/1
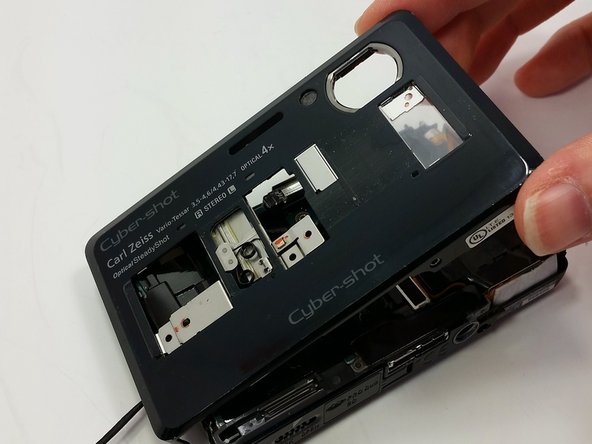
    • Gently pry around the front cover using the plastic opening tool.

    • Carefully separate front cover from body of camera.

  6. Sony Cyber-shot DSC-TX7 Front Sliding Lens Cover Replacement: 6 단계, 이미지 1/1
    • The front cover is now removed from the camera and the internal hardware is now visible.

    • They front cover will still be connected by a ribbon. Be careful not to break the ribbon.

  7. Sony Cyber-shot DSC-TX7 Front Sliding Lens Cover Replacement, Front Sliding Lens Cover: 7 단계, 이미지 1/2 Sony Cyber-shot DSC-TX7 Front Sliding Lens Cover Replacement, Front Sliding Lens Cover: 7 단계, 이미지 2/2
    • Remove the three 4mm length screws located on the inside of the front cover with the Phillips #00 screwdriver.

  8. Sony Cyber-shot DSC-TX7 Front Sliding Lens Cover Replacement: 8 단계, 이미지 1/2 Sony Cyber-shot DSC-TX7 Front Sliding Lens Cover Replacement: 8 단계, 이미지 2/2
    • Wiggle sliding lens cover after all screws are removed and separate from front cover.

결론

To reassemble your device, follow these instructions in reverse order.

Leslie Mundell

회원 가입일: 03/18/15

411 평판

안내서 4개 작성하였습니다

Michigan Tech, Team 1-8, Lauer Spring 2015 Michigan Tech, Team 1-8, Lauer Spring 2015 회원

MTU-LAUER-S15S1G8

2 회원들

안내서 10개 작성하였습니다

댓글 0개

댓글 쓰기

조회 통계:

24 시간 전: 0

7일 전: 5

30일 전: 15

전체 시간: 655