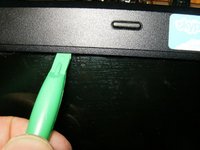
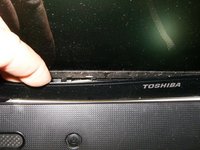
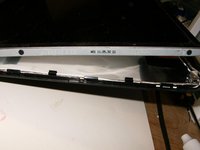
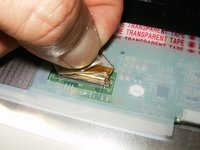
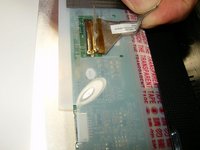
주요 콘텐츠로 건너뛰기

Toshiba Satellite C655D-S5200 LCD Replacement

필요한 것

  1. Toshiba Satellite C655D-S5200 LCD Replacement, LCD: 1 단계, 이미지 1/3 Toshiba Satellite C655D-S5200 LCD Replacement, LCD: 1 단계, 이미지 2/3 Toshiba Satellite C655D-S5200 LCD Replacement, LCD: 1 단계, 이미지 3/3
    • Here is the Toshiba Satellite C655D-S5200

    • Open the laptop with the LCD facing forward. There are four rubber caps, one in each corner

    • Removing the plugs reveal the Phillips screws

  2. Toshiba Satellite C655D-S5200 LCD Replacement: 2 단계, 이미지 1/3 Toshiba Satellite C655D-S5200 LCD Replacement: 2 단계, 이미지 2/3 Toshiba Satellite C655D-S5200 LCD Replacement: 2 단계, 이미지 3/3
    • Remove all four screws, tow on top left and right corner

    • One on the bottom left corner

    • and the bottom right corner.

    • Here are the four M3x5mm screws

  3. Toshiba Satellite C655D-S5200 LCD Replacement: 3 단계, 이미지 1/3 Toshiba Satellite C655D-S5200 LCD Replacement: 3 단계, 이미지 2/3 Toshiba Satellite C655D-S5200 LCD Replacement: 3 단계, 이미지 3/3
    • Use a plastic opening tool, or similar to pop the bezel of the LCD assembly

    • Continue to slide the tool all the way across the top

    • Once the bezel has been released from the tabs, it can be further released be applying some gently manual pulling

  4. Toshiba Satellite C655D-S5200 LCD Replacement: 4 단계, 이미지 1/3 Toshiba Satellite C655D-S5200 LCD Replacement: 4 단계, 이미지 2/3 Toshiba Satellite C655D-S5200 LCD Replacement: 4 단계, 이미지 3/3
    • Continue to pull gently on the sides

    • and finally on the bottom.

    • With all the tabs released the bezel can now be removed.

  5. Toshiba Satellite C655D-S5200 LCD Replacement: 5 단계, 이미지 1/3 Toshiba Satellite C655D-S5200 LCD Replacement: 5 단계, 이미지 2/3 Toshiba Satellite C655D-S5200 LCD Replacement: 5 단계, 이미지 3/3
    • Here is the LCD assembly without the bezel

    • Remove the Phillips screw that connects the LCD frame to the back cover. This is the left one

    • Remove the right one as well

  6. Toshiba Satellite C655D-S5200 LCD Replacement: 6 단계, 이미지 1/3 Toshiba Satellite C655D-S5200 LCD Replacement: 6 단계, 이미지 2/3 Toshiba Satellite C655D-S5200 LCD Replacement: 6 단계, 이미지 3/3
    • The LCD can now be moved forward and away from the rear cover

    • There are three screws on either side that hold the panel to the frame. Remove those

    • Here are the three M2x4 screws

  7. Toshiba Satellite C655D-S5200 LCD Replacement: 7 단계, 이미지 1/3 Toshiba Satellite C655D-S5200 LCD Replacement: 7 단계, 이미지 2/3 Toshiba Satellite C655D-S5200 LCD Replacement: 7 단계, 이미지 3/3
    • Remove the three Phillips screws on the right side as well.

    • with the screws removed the panel can now be moved out of the LCD frame. The LCD is still connected by the display cable.

    • The display cable is secured to the connector with some clear adhesive. Remove this frist

  8. Toshiba Satellite C655D-S5200 LCD Replacement: 8 단계, 이미지 1/2 Toshiba Satellite C655D-S5200 LCD Replacement: 8 단계, 이미지 2/2
    • Remove the display cable carefully.

    • With the display cable disconnected, the LCD can now be removed and replaced.

결론

To reassemble your device, follow these instructions in reverse order.

다른 한 분이 해당 안내서를 완성하였습니다.

oldturkey03

회원 가입일: 09/29/10

783,919 평판

안내서 119개 작성하였습니다

Global Fixers Global Fixers 회원

Community

33 회원들

안내서 552개 작성하였습니다

댓글 0개

댓글 쓰기

조회 통계:

24 시간 전: 0

7일 전: 4

30일 전: 12

전체 시간: 1,516