주요 콘텐츠로 건너뛰기

X-Street STR Viper Remote Control Motherboard Replacement

필요한 것

  1. X-Street STR Viper Remote Control Motherboard Replacement, Remote Control Motherboard: 1 단계, 이미지 1/1
    • Turn off the remote control. Flip power switch to the off position.

    • Remove the battery from bottom of the remote control for further safety measures.

  2. X-Street STR Viper Remote Control Motherboard Replacement: 2 단계, 이미지 1/1
    • Remove all seven 3mm Phillips #2 screws from the underside panel.

  3. X-Street STR Viper Remote Control Motherboard Replacement: 3 단계, 이미지 1/1
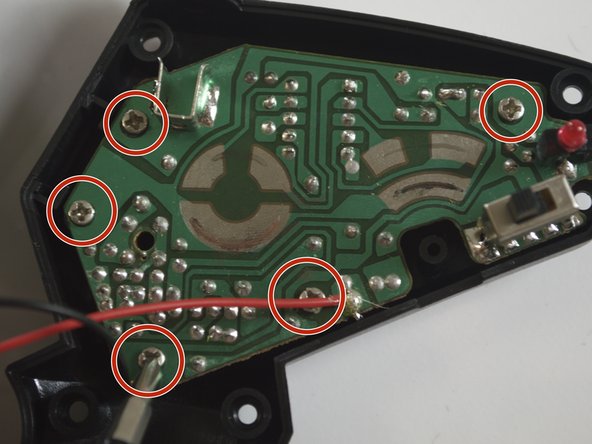
    • Remove five 3mm Phillips #2 screws that connect the motherboard to the back outer shell.

  4. X-Street STR Viper Remote Control Motherboard Replacement: 4 단계, 이미지 1/1
    • Detach the motherboard. Use soldering tools to desolder the red and black wires from the motherboard. To do this, refer to the how to solder/desolder page.

  5. X-Street STR Viper Remote Control Motherboard Replacement: 5 단계, 이미지 1/1
    • Replace the motherboard. Solder the wires back on to the new motherboard using the soldering kit. The black wire should be on the left and the red wire should be on the right.

결론

To reassemble your device, follow these instructions in reverse order.

Cate Kraska

회원 가입일: 04/01/15

129 평판

안내서 1개 작성함

Cal Poly, Team 12-6, Lancaster Spring 2015 Cal Poly, Team 12-6, Lancaster Spring 2015 회원

CPSU-LANCASTER-S15S12G6

4 회원들

안내서 6개 작성하였습니다

댓글 0개

댓글 쓰기

조회 통계:

24 시간 전: 0

7일 전: 2

30일 전: 7

전체 시간: 659