소개
This guide will show you how to remove the optical disc drive from the motherboard on the Xbox One S. When taking apart the disc drive, make sure to gently and firmly detach the connectors.
필요한 것
-
-
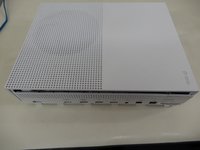
Begin by working at the case on the rear where the warranty sticker is located. Insert the plastic opening tool into the gap between the bottom of the case and the grated top side. Then find the clips in between that hold the case in place. Use the opening tool to pop the clips out. The best method is to pry the black case away from the bottom.
-
Use the opening tool to pop the clips out. The best method is to pry the black case away from the bottom.
Important!!
You've to start from the back corner where is the information label, because there is a main clip behind a warranty sticker
They should add this to the guide! I didnt know that, and did some minor damage to the bottom piece where that main clip is.
I dont mind because it's my own Xbox, but what if it belonged to a customer?
They should add this to the guide! I didnt know that, and did some minor damage to the bottom piece where that main clip is.
I dont mind because it's my own Xbox, but what if it belonged to a customer?
💯% same opinion!
I legitimately cannot open the case where the warranty sticker is, ive tried everything, im resorting to a fork to try and open this
-
-
-
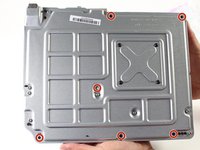
Use a T10 Torx screwdriver to remove the six green 50 mm long screws from the metal case labeled F1 through F6.
My F3 isn't coming out. The screwdriver isn't sitting tight like it is for the other ones. Any idea on how to fix that?
ben mccord - 답글
-
-
-
-
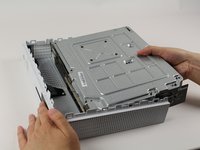
Gently separate the interior case from the white exterior case using the appropriate method.
-
Pry the white plastic sides outwards at the rear to separate from the plastic I/O shield.
“appropriate method is not descriptive like Mr. Ross’s comment. The original poster should edit the description to ensure people do in fact remove the box from the case appropriately. I would also add arrows to the picture.
____________⬆️
↖️Yes! I see it the same way!↗️
⬅️Arrows are always a good thing!➡️
↙️Can't do anything wrong with them! ↘️
____________⬇️
😅😅
I didn't realize that metal ribbon was connecting the case to the console and I yanked it w out realizing it was there. How o I get a replacement?
-
-
-
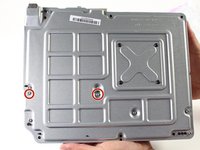
To replace the hard drive, flip over the console and remove the two 10 mm T-10 Torx screws, C3 and C5, from the backside of the Xbox One S.
Some of my silver were gold screws, so just letting people know to look out for that!
The Torx screw circled on the left is actually C5
I found the same. On my Xbox One S, it's C3 and C5 that hold in the hard drive caddy. C4 holds in the optical disk caddy.
jamesr -
Funny thing on my console rev t t3 built feb 2018 it’s C4 and C5
KingofRome - 답글
-
-
-
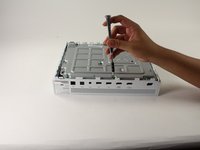
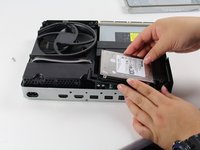
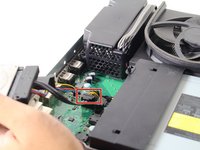
Gently disconnect the hard drive from the motherboard (at the two plastic connector bodies).
Do not remove the cable!!!! You can change while the cables are plugged. It took 2 hours trying to put mm precisely all the little pins because of the removal of the cables.
Please update the post, I could easily end up as the Aaron, breaking the XBOX completly.
Yes, this has also happened to me the connectors had broken and the pins bent and snapped off.
c3 and c5 are reversed in the pictures
-
-
-
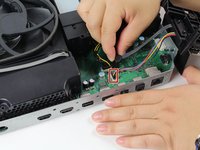
To remove the optical disc drive, remove the silver 10 mm T-10 Torx screw labeled "C4."
-


To reassemble your device, follow these instructions in reverse order.
To reassemble your device, follow these instructions in reverse order.
다른 20명이 해당 안내서를 완성하였습니다.
팀

Cal Poly, Team S22-G3, Livingston Spring 2017 Cal Poly, Team S22-G3, Livingston Spring 2017 회원
CPSU-LIVINGSTON-S17S22G3
4 회원들
안내서 59개를 작성함
댓글 3개
alles schwachsinn: habe an meiner xbox one s dfas optische Laufwerk ausgetauscht ,da beim alten die spiele immer einfrohren .Alles nach Anleitung wie hier beschrieben . nun geht Garnichts mehr , kein bild kein ton geschweige noch ein spiel neu zu installiren .
Muy bien explicado. Tengo un problema, ya que remplacé la unidad de disco, la consola prende y funciona, pero marca que hay error con la unidad, que puedo usar la consola peor no leer discos... Agradecería me pudieran orientar. Saludos