주요 콘텐츠로 건너뛰기

Xbox Series X Wireless Controller (Model 1914) Joystick Replacement

필요한 것

  1. Xbox Series X Wireless Controller (Model 1914) Joystick Replacement, Joystick: 1 단계, 이미지 1/1
    • Have everything you will need on-hand at your workspace. This includes:

    • Your tools:

    • A Torx screwdriver with a T8 sized head (2.31mm) and a T6 sized head (1.70mm)

    • A soldering rod and solder

    • Spudger

    • Tweezers (optional)

    • The replacement joysticks

    • A clean, uncluttered place to work and keep your screws organized.

  2. Xbox Series X Wireless Controller (Model 1914) Joystick Replacement: 2 단계, 이미지 1/1
    • Start by flipping the controller over and opening the battery compartment located on the middle back of the controller.

    • Remove the batteries and place both the cover and the batteries off to the side for now.

    • Hold the Xbox button for a few seconds to drain any remaining power.

    • This will make sure you don't shock yourself or short the device.

  3. Xbox Series X Wireless Controller (Model 1914) Joystick Replacement: 3 단계, 이미지 1/1
    • Next, take your opening tool and pry off the grip plates.

    • Using your opening tool, insert it into the grove found on the back of the grips.

    • Slide the tool throughout the groove, prying in the spots that you feel the most resistance until it comes free.

    • If done properly, you'll hear clicks as the clips come loose from the frame.

    • Repeat this until the grip cover comes off.

    • Do the same for the other grip.

    • This step requires some force so advise caution when applying force to the grips.

  4. Xbox Series X Wireless Controller (Model 1914) Joystick Replacement: 4 단계, 이미지 1/3 Xbox Series X Wireless Controller (Model 1914) Joystick Replacement: 4 단계, 이미지 2/3 Xbox Series X Wireless Controller (Model 1914) Joystick Replacement: 4 단계, 이미지 3/3
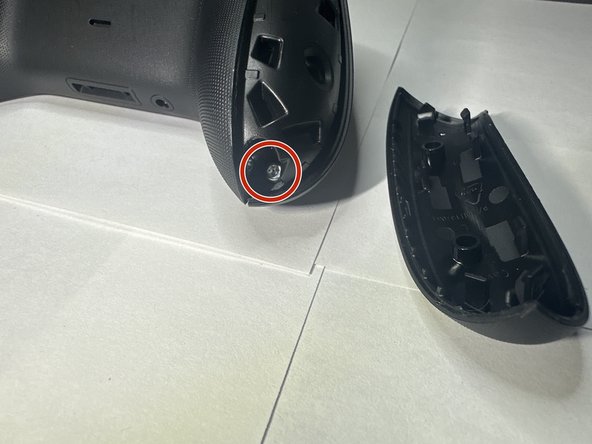
    • After removing the grip plates, remove the 5 screws holding the front plate.

    • Use a T8 sized Torx bit for these screws.

    • The screws are shown in the picture, two in each grip and one in the battery bay.

    • The battery bay screw is underneath the sticker. You can either poke through it with your tool or peel it away.

  5. Xbox Series X Wireless Controller (Model 1914) Joystick Replacement: 5 단계, 이미지 1/2 Xbox Series X Wireless Controller (Model 1914) Joystick Replacement: 5 단계, 이미지 2/2
    • After removing the back screws, the face plate should be easy to remove. Remove it and place it to the side for later.

    • Next, locate the joysticks covers and remove them by simply pulling them up from the controller.

    • Place the joysticks off to the side.

  6. Xbox Series X Wireless Controller (Model 1914) Joystick Replacement: 6 단계, 이미지 1/2 Xbox Series X Wireless Controller (Model 1914) Joystick Replacement: 6 단계, 이미지 2/2
    • Next is the sync button plate.

    • Place your spudger as shown and gently peel the plate off using the same method as before.

    • Remove the sync plate and place it off to the side for later.

  7. Xbox Series X Wireless Controller (Model 1914) Joystick Replacement: 7 단계, 이미지 1/3 Xbox Series X Wireless Controller (Model 1914) Joystick Replacement: 7 단계, 이미지 2/3 Xbox Series X Wireless Controller (Model 1914) Joystick Replacement: 7 단계, 이미지 3/3
    • After that, locate the RB and LB bumper piece and, using your metal spudger, place it between the frame and the hinge.

    • Gently pry the piece away and off, doing the same for the other end of the bumper piece.

    • Having done this successfully, the bumper piece should come off cleanly and with little effort.

    • Set the bumper piece off to the side.

  8. Xbox Series X Wireless Controller (Model 1914) Joystick Replacement: 8 단계, 이미지 1/1
    • By now, the back plastic frame should simply fall off the main components.

    • Take the back piece off and leave it off to the side for now.

  9. Xbox Series X Wireless Controller (Model 1914) Joystick Replacement: 9 단계, 이미지 1/2 Xbox Series X Wireless Controller (Model 1914) Joystick Replacement: 9 단계, 이미지 2/2
    • Take the main piece and flip it over to show the main components.

    • Next, we will be removing both triggers.

    • Move the triggers forward and expose the back parts of the trigger.

    • Using the T6 sized bit, remove the screw from the trigger and place it safely off to the side.

    • Do the same for the other trigger and set the pieces off to the side.

  10. Xbox Series X Wireless Controller (Model 1914) Joystick Replacement: 10 단계, 이미지 1/1
    • With the trigger frames out of the way, remove the trigger weights from the triggers and place them out of the way.

    • These weights are attached by wires and cannot be removed easily so just follow the wire, loosening it until it is out as far as it can go.

  11. Xbox Series X Wireless Controller (Model 1914) Joystick Replacement: 11 단계, 이미지 1/2 Xbox Series X Wireless Controller (Model 1914) Joystick Replacement: 11 단계, 이미지 2/2
    • Next, we will disconnect the wires for the select and menu buttons.

    • Using either your fingers or a set of tweezers, gently pull the connection up and away to disconnect it.

    • Do this for both connections.

    • While here, remove the two screws above the connections. These connect the motherboard to the frame.

  12. Xbox Series X Wireless Controller (Model 1914) Joystick Replacement: 12 단계, 이미지 1/1
    • Next is the grip rumble weights.

    • Simply, using your hands or forceps, remove the weights by sliding them towards you and lifting them out.

    • These weights are also connected by wires, keep this in mind when removing them.

  13. Xbox Series X Wireless Controller (Model 1914) Joystick Replacement: 13 단계, 이미지 1/2 Xbox Series X Wireless Controller (Model 1914) Joystick Replacement: 13 단계, 이미지 2/2
    • With both set of rumble weights out of the way, next is the board screws.

    • Using the T6 bit screwdriver, unscrew the screws located on next to where the grip rumble weights were.

    • Set these screws aside for now.

  14. Xbox Series X Wireless Controller (Model 1914) Joystick Replacement: 14 단계, 이미지 1/3 Xbox Series X Wireless Controller (Model 1914) Joystick Replacement: 14 단계, 이미지 2/3 Xbox Series X Wireless Controller (Model 1914) Joystick Replacement: 14 단계, 이미지 3/3
    • Flip the controller over.

    • Following the cord attached to the trigger it should be attached to the controller via small tracks.

    • Gently pull the wire out from the tracks and lay the wire and trigger parts out of the way.

    • The trigger rumble weight cannot be completely removed so just keep it as much as possible out of the way.

  15. Xbox Series X Wireless Controller (Model 1914) Joystick Replacement: 15 단계, 이미지 1/3 Xbox Series X Wireless Controller (Model 1914) Joystick Replacement: 15 단계, 이미지 2/3 Xbox Series X Wireless Controller (Model 1914) Joystick Replacement: 15 단계, 이미지 3/3
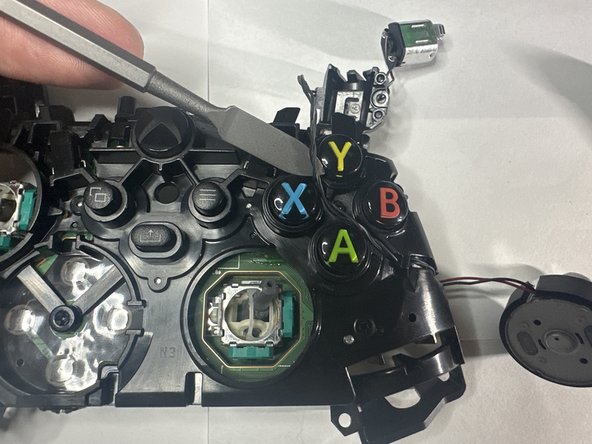
    • Find the D-pad plate surrounding the outer rim of the D-pad.

    • Using your spudger, slide it underneath the piece and pull it up from the controller.

    • The D-pad plate is attached at the top and bottom parts of the rim. Keep this in mind when applying pressure to remove this piece. Try to keep the pressure around those areas.

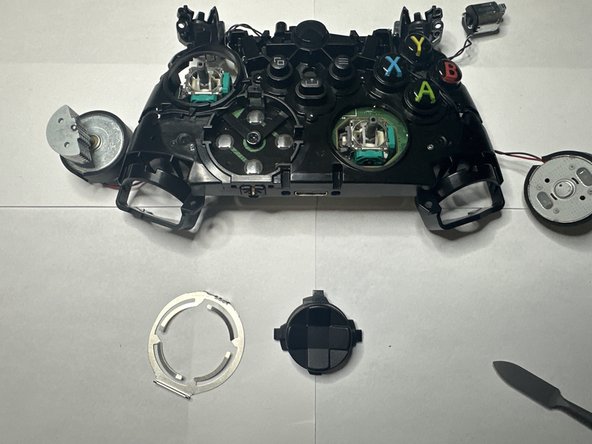
    • Remove the plate and set it to the side.

    • Taking off the plate should free the plastic D-pad. Remove it from the controller and place both the plate and cover to the side for now.

  16. Xbox Series X Wireless Controller (Model 1914) Joystick Replacement: 16 단계, 이미지 1/2 Xbox Series X Wireless Controller (Model 1914) Joystick Replacement: 16 단계, 이미지 2/2
    • This step involves flipping over the controller to continue but, the motherboard is no longer connected to the controller frame, so when flipping it over, keep the loose parts together.

    • After flipping over the controller, isolate the loose motherboard, the one with the joysticks attached.

    • Lay the board flat and observe for any debris or clear obstructions.

  17. Xbox Series X Wireless Controller (Model 1914) Joystick Replacement: 17 단계, 이미지 1/2 Xbox Series X Wireless Controller (Model 1914) Joystick Replacement: 17 단계, 이미지 2/2
    • Flip the board over.

    • Locate the joystick solder nubs on the back of the bottom of the board.

    • Using the soldering iron, heat it up to around 350-375 degrees Fahrenheit, and then lay the tip on the aforementioned nubs.

    • Hold it for around 5-7 seconds or until the solder nub liquefies. Repeat this for the rest of the nubs.

    • Having done this, the joystick should slide out the board. Install the replacement joystick by sliding in the joystick prongs into the slots that the old joystick sat in.

    • If the replacement joystick does not slide in properly, check the prongs to make sure they are aliened with the slots.

    • With the joystick in, solder the prongs until they are secured into place on the boards.

결론

To reassemble your device, follow these instructions in reverse order.

다른 한 분이 해당 안내서를 완성하였습니다.

Josh Lucas

회원 가입일: 03/05/24

274 평판

안내서 1개 작성함

CSU Los Angeles, Team 7-11, Grodsky Spring 2024 CSU Los Angeles, Team 7-11, Grodsky Spring 2024 회원

CSULA-GRODSKY-S24S7G11

2 회원들

안내서 1개 작성하였습니다

댓글 0개

댓글 쓰기

조회 통계:

24 시간 전: 81

7일 전: 483

30일 전: 843

전체 시간: 878