주요 콘텐츠로 건너뛰기
Xbox Series X Wireless Controller Daughterboard Replacement

Xbox Series X Wireless Controller Daughterboard Replacement

Arthur Shi

Arthur Shi

최종 수정일 February 9, 2025

예상시간 없음
조정
단지 전제 조건
이 안내서는 다른 안내서의 선행 작업으로 사용하기 위한 것입니다. 그 자체로는 불완전합니다.

Prereq-only guide to remove the daughterboard/joystick board from the Xbox X/S controller.

필요한 것

도구

더보기...

  1. Xbox Series X Wireless Controller Daughterboard Replacement, Disconnect the antenna cables: 1 단계, 이미지 3개 중 1개 Xbox Series X Wireless Controller Daughterboard Replacement, Disconnect the antenna cables: 1 단계, 이미지 3개 중 2개 Xbox Series X Wireless Controller Daughterboard Replacement, Disconnect the antenna cables: 1 단계, 이미지 3개 중 3개
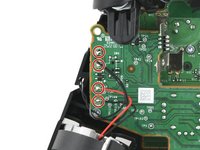
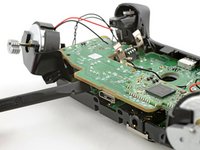
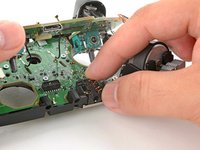
    • Slide one arm of a pair of tweezers under the antenna coaxial cable connector, as close to the metal head as possible.

    • Lift the connector straight up to disconnect it.

    • Be sure to lift the coaxial connector straight up off of the socket to avoid bending the connector.

    • Repeat the procedure for the second antenna cable.

    • During reassembly, align the connector over the socket and use your finger to press it into place. A tool like a spudger can slide off and damage the surface-mounted components around the connector.

  2. Xbox Series X Wireless Controller Daughterboard Replacement, Desolder the motor connections: 2 단계, 이미지 1개 중 1개
    이 단계에 사용된 도구:
    Silicone Work Mat
    $9.95
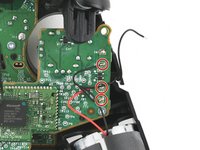
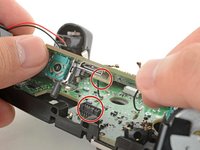
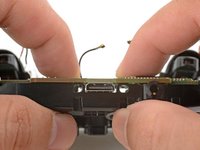
    • Use your soldering iron to heat up one of the motor wire solder pads.

    • Once the solder is melted, use tweezers to lift the wire away from the pad.

  3. Xbox Series X Wireless Controller Daughterboard Replacement: 4 단계, 이미지 2개 중 1개 Xbox Series X Wireless Controller Daughterboard Replacement: 4 단계, 이미지 2개 중 2개
    • Desolder the seven remaining wires connecting the four motors to the circuit board.

    • When you resolder these wires during reassembly, make sure to solder the red motor wires to the pads marked SQ3 and SQ7. This ensures that the large rumble motors spin in the correct direction.

  4. Xbox Series X Wireless Controller Daughterboard Replacement, Remove the daughterboard: 5 단계, 이미지 1개 중 1개
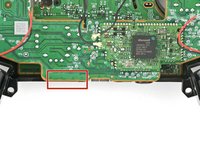
    • Use a Torx T5 driver to remove the two 7 mm‑long screws securing the daughterboard.

  5. Xbox Series X Wireless Controller Daughterboard Replacement: 6 단계, 이미지 3개 중 1개 Xbox Series X Wireless Controller Daughterboard Replacement: 6 단계, 이미지 3개 중 2개 Xbox Series X Wireless Controller Daughterboard Replacement: 6 단계, 이미지 3개 중 3개
    • The daughterboard is still connected to the main board by a socket.

    • Insert the flat end of a spudger between the daughterboard and the bottom edge of the frame at the location marked on the image.

    • Twist the spudger to push up the daughterboard and disconnect the socket.

  6. Xbox Series X Wireless Controller Daughterboard Replacement: 7 단계, 이미지 2개 중 1개 Xbox Series X Wireless Controller Daughterboard Replacement: 7 단계, 이미지 2개 중 2개
    • Lift and remove the daughterboard.

  7. Xbox Series X Wireless Controller Daughterboard Replacement, Reassembly tips: 8 단계, 이미지 3개 중 1개 Xbox Series X Wireless Controller Daughterboard Replacement, Reassembly tips: 8 단계, 이미지 3개 중 2개 Xbox Series X Wireless Controller Daughterboard Replacement, Reassembly tips: 8 단계, 이미지 3개 중 3개
    • During reassembly:

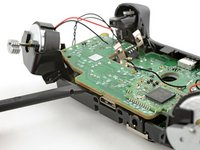
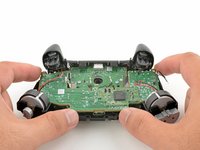
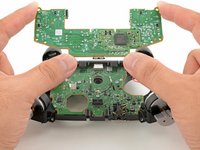
    • Line up the daughterboard socket to the main board socket.

    • Check that the headphone jack isn't out of position.

    • Check that the antenna cables aren't trapped between the two boards.

    • Use your fingers to gently squeeze the boards together to reconnect the socket.

결론

To reassemble your device, follow these instructions in reverse order.

Take your e-waste to an R2 or e-Stewards certified recycler.

Repair didn’t go as planned? Try some basic troubleshooting, or ask our Answers community for help.

Arthur Shi

회원 가입일: 01/03/18

282,700 평판

안내서 587개를 작성함

iFixit iFixit 회원

Staff

118 회원들

안내서 19,455개를 작성함

댓글 0개

댓글 쓰기

조회 통계:

지난 24시간: 0

지난 7일: 3

지난 30일: 5

전체 시간: 30