주요 콘텐츠로 건너뛰기

Zeki TBQG884B Digitizer Touch Screen

필요한 것

  1. Zeki TBQG884B Digitizer Touch Screen, Rear Case: 1 단계, 이미지 1/2 Zeki TBQG884B Digitizer Touch Screen, Rear Case: 1 단계, 이미지 2/2
    • Remove the two screws from the end of the device where the ports are located using a Phillips #1 screwdriver.

  2. Zeki TBQG884B Digitizer Touch Screen: 2 단계, 이미지 1/1
    • Place the tablet down so that the screen is facing away from you.

    • Insert the tip of your opening tool into the small gap between the gray and white plastic covering. Pry it open and you should hear the clips opening up.

    • Gently work your way around the perimeter of the tablet's edge.

  3. Zeki TBQG884B Digitizer Touch Screen: 3 단계, 이미지 1/2 Zeki TBQG884B Digitizer Touch Screen: 3 단계, 이미지 2/2
    • Remove the back cover

    • Remove any tape on the speaker and detach the speaker from the back plate.

    • The speaker is connected to the motherboard by two soldered wires. Don't break them when you remove the speaker.

  4. Zeki TBQG884B Digitizer Touch Screen, Motherboard: 4 단계, 이미지 1/1
    • Disconnect the Wi-Fi antenna cable from the motherboard.

  5. Zeki TBQG884B Digitizer Touch Screen: 5 단계, 이미지 1/1
    • Using the Phillips #1 screwdriver, remove the three screws from the motherboard..

  6. Zeki TBQG884B Digitizer Touch Screen: 6 단계, 이미지 1/1
    • Open the ZIF connector. Then, remove the ribbon that connects the motherboard and the screen.

  7. Zeki TBQG884B Digitizer Touch Screen: 7 단계, 이미지 1/1
    • Disconnect the other ZIF connector on the opposite side of the motherboard.

  8. Zeki TBQG884B Digitizer Touch Screen: 8 단계, 이미지 1/1
    • Remove the motherboard and now reinsert all connectors into a new motherboard.

    • In order to disconnect the battery and speaker wires from the motherboard, soldering is required. Be cautious as the soldering iron is hot.

  9. Zeki TBQG884B Digitizer Touch Screen, LCD Screen: 9 단계, 이미지 1/1
    • Use an opening tool to detach the clip between the front frame, and the metal loader.

    • There are several clips on each side of the frame. Detach ALL of them before you open the loader.

  10. Zeki TBQG884B Digitizer Touch Screen: 10 단계, 이미지 1/1
    • Lift the metal loader up and separate it from the LCD screen.

    • Detach each piece slowly to avoid damaging or dropping any fragile parts.

  11. Zeki TBQG884B Digitizer Touch Screen, Digitizer Touch Screen: 11 단계, 이미지 1/1
    • Separate the display from the digitizer.

결론

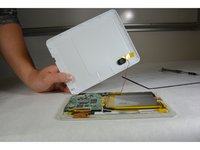
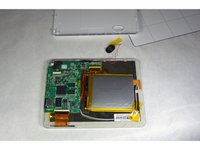
To reassemble your device, follow these instructions in reverse order.

다른 한 분이 해당 안내서를 완성하였습니다.

David Wyman

회원 가입일: 09/16/15

343 평판

안내서 3개 작성하였습니다

IUPUI, Team 1-3, Harley Fall 2015 IUPUI, Team 1-3, Harley Fall 2015 회원

IUPUI-HARLEY-F15S1G3

5 회원들

안내서 5개 작성하였습니다

댓글 0개

댓글 쓰기

조회 통계:

24 시간 전: 0

7일 전: 0

30일 전: 0

전체 시간: 800