주요 콘텐츠로 건너뛰기

iMac Intel 20" EMC 2105 and 2118 CPU Replacement

필요한 것

  1. iMac Intel 20" EMC 2105 and 2118 CPU Replacement, Access Door: 1 단계, 이미지 1/2 iMac Intel 20" EMC 2105 and 2118 CPU Replacement, Access Door: 1 단계, 이미지 2/2
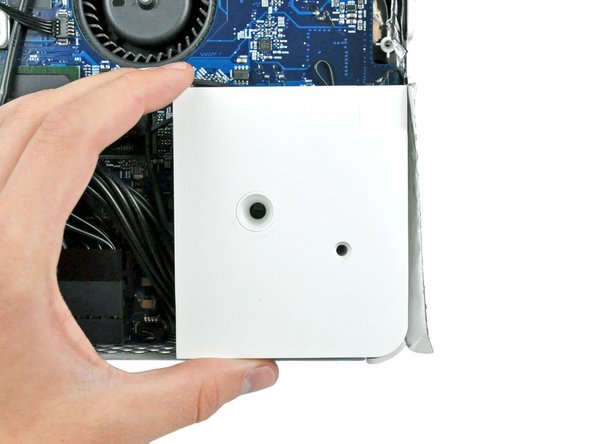
    • Loosen the two Phillips screws securing the access door to your iMac.

    • Both screws remain captive within the access door.

    • Remove the access door.

    • Before beginning the repair, unplug the computer and press and hold the power switch for 20-30 seconds, to discharge internal capacitors.

  2. iMac Intel 20" EMC 2105 and 2118 CPU Replacement, Front Bezel: 2 단계, 이미지 1/1
    • Remove the following screws along the lower edge of your iMac:

    • Three 6 mm T8 Torx screws

    • One 8 mm T8 Torx screw (Right side of the RAM slot on 2105)

  3. iMac Intel 20" EMC 2105 and 2118 CPU Replacement: 3 단계, 이미지 1/3 iMac Intel 20" EMC 2105 and 2118 CPU Replacement: 3 단계, 이미지 2/3 iMac Intel 20" EMC 2105 and 2118 CPU Replacement: 3 단계, 이미지 3/3
    이 단계에 사용된 도구:
    Plastic Cards
    $2.99
    구매
    • Re-orient your iMac so it sits upright on the stand.

    • Insert a plastic card up into the corner of the air vent slot near the top of the rear case.

    • Push the card toward the top of the iMac to release the front bezel latch.

    • Pull the front bezel away from the rear case.

    • Repeat this process for the other side of the front bezel.

    • It may be necessary to apply several layers of duct tape to the top of the access card to aid in releasing the latches. Or use two cards for the additional thickness.

    • If the bezel refuses to release, try lifting the lower edge of the front bezel slightly away from the rear case (detailed in the next few steps) and repeat the latch release process.

  4. iMac Intel 20" EMC 2105 and 2118 CPU Replacement: 4 단계, 이미지 1/2 iMac Intel 20" EMC 2105 and 2118 CPU Replacement: 4 단계, 이미지 2/2
    • Lay your iMac stand-side down on a flat surface.

    • To lift the front bezel off the iMac, simultaneously:

    • Use your thumbs to press in the RAM arms and hold the iMac down.

    • Use your index fingers to pull the small bridge of material on the front bezel toward yourself.

    • Pull the front bezel up with your index fingers.

    • Once the small bridge of material has cleared the RAM arms, lift the front bezel by its lower edge just enough to clear the bottom edge of the rear case.

  5. iMac Intel 20" EMC 2105 and 2118 CPU Replacement: 5 단계, 이미지 1/2 iMac Intel 20" EMC 2105 and 2118 CPU Replacement: 5 단계, 이미지 2/2
    • Lift the front bezel off the rear case and rotate it away from the bottom edge of the iMac, minding the camera and microphone cables still attached to its upper edge.

  6. iMac Intel 20" EMC 2105 and 2118 CPU Replacement: 6 단계, 이미지 1/1
    • If necessary, remove the strip of tape covering the microphone cable connector.

    • The microphone connector is located near the inside of top edge of your iMac.

  7. iMac Intel 20" EMC 2105 and 2118 CPU Replacement: 7 단계, 이미지 1/3 iMac Intel 20" EMC 2105 and 2118 CPU Replacement: 7 단계, 이미지 2/3 iMac Intel 20" EMC 2105 and 2118 CPU Replacement: 7 단계, 이미지 3/3
    • Disconnect the microphone cable.

    • Disconnect the camera cable by pulling its connector away from the socket on the camera board.

    • The camera cable connector and socket are delicate and easily bent. Remove with caution.

  8. iMac Intel 20" EMC 2105 and 2118 CPU Replacement, Lower EMI Shield: 8 단계, 이미지 1/1
    • Peel up the lower EMI shield from the rear case.

    • It is only necessary to peel the shield up from three sides. Leave it attached to the display.

    • If you happen to rip the EMI shield, use a piece of foil tape to cover the tear.

  9. iMac Intel 20" EMC 2105 and 2118 CPU Replacement: 9 단계, 이미지 1/1
    • Tape the EMI shield to the face of the display to keep it out of the way.

  10. iMac Intel 20" EMC 2105 and 2118 CPU Replacement, Display: 10 단계, 이미지 1/2 iMac Intel 20" EMC 2105 and 2118 CPU Replacement, Display: 10 단계, 이미지 2/2
    • Remove the two 5 mm T6 Torx screws securing the display data cable connector to the logic board.

    • Pull the display data cable connector up off the logic board by its black pull tab.

  11. iMac Intel 20" EMC 2105 and 2118 CPU Replacement: 11 단계, 이미지 1/1
    • Peel back the EMI tape from the two vertical edges of the display.

    • During reassembly, it is helpful to use several small strips of tape to hold the EMI shielding along the left and right edges of the display footprint out of the way before lowering the display into the rear case of your iMac.

  12. iMac Intel 20" EMC 2105 and 2118 CPU Replacement: 12 단계, 이미지 1/2 iMac Intel 20" EMC 2105 and 2118 CPU Replacement: 12 단계, 이미지 2/2
    • Allow the lower EMI shield to hang down from the display.

    • Remove the four 7.5 mm T10 Torx screws securing the display to the rear case.

    • The screws are recessed, so a thin magnetic screwdriver aids in removal. Most bit drivers are too short to reach these screws.

  13. iMac Intel 20" EMC 2105 and 2118 CPU Replacement: 13 단계, 이미지 1/1
    • Lift the lower edge of the display and rotate it toward the top edge of your iMac.

    • Do not lift it too much, as the inverter cables are still attached.

  14. iMac Intel 20" EMC 2105 and 2118 CPU Replacement: 14 단계, 이미지 1/2 iMac Intel 20" EMC 2105 and 2118 CPU Replacement: 14 단계, 이미지 2/2
    • Disconnect both inverter cables from the inverter board.

    • These connectors are seated very tightly in their sockets. It is helpful to use your fingernails or the tip of a spudger to push the ears on either side of the connectors to dislodge them from their sockets. A small pair of hemostats helps a lot.

  15. iMac Intel 20" EMC 2105 and 2118 CPU Replacement: 15 단계, 이미지 1/1
    • Disconnect the two inverter cables at the top edge of the inverter using the method explained in the previous step.

  16. iMac Intel 20" EMC 2105 and 2118 CPU Replacement: 16 단계, 이미지 1/1
    • Rotate the display until it is nearly perpendicular to the rear case and lift it up to peel it off the EMI shield stuck to its top edge.

  17. iMac Intel 20" EMC 2105 and 2118 CPU Replacement, Speakers: 17 단계, 이미지 1/2 iMac Intel 20" EMC 2105 and 2118 CPU Replacement, Speakers: 17 단계, 이미지 2/2
    • Remove the single T10 Torx screw securing the left speaker to the rear case.

    • Pull the left speaker out of the rear case.

    • The screw for the left speaker is longer than the screw for the right speaker.

  18. iMac Intel 20" EMC 2105 and 2118 CPU Replacement: 18 단계, 이미지 1/2 iMac Intel 20" EMC 2105 and 2118 CPU Replacement: 18 단계, 이미지 2/2
    • Use the flat end of a spudger to pry both antenna connectors up off the AirPort Extreme card.

    • Some models may have only one AirPort antenna wire.

  19. iMac Intel 20" EMC 2105 and 2118 CPU Replacement: 19 단계, 이미지 1/2 iMac Intel 20" EMC 2105 and 2118 CPU Replacement: 19 단계, 이미지 2/2
    이 단계에 사용된 도구:
    Metal Spudger
    $2.99
    구매
    • Use a metal spudger to disconnect the SATA data cable up off the logic board.

    • The SATA connector on most iMacs tends to stick in its socket on the logic board. If you are having trouble disconnecting the SATA cable, insert a metal spudger or any other thin tool into the gap between the SATA connector and its socket and twist the spudger's shaft to safely separate the two pieces.

  20. iMac Intel 20" EMC 2105 and 2118 CPU Replacement: 20 단계, 이미지 1/1
    • Pull the IR board cable connector away from its socket on the IR board.

    • Pull the connector parallel to the face of the logic board.

  21. iMac Intel 20" EMC 2105 and 2118 CPU Replacement: 21 단계, 이미지 1/1
    • De-route the speaker cables from beneath the IR Board and heatsink assembly.

  22. iMac Intel 20" EMC 2105 and 2118 CPU Replacement: 22 단계, 이미지 1/2 iMac Intel 20" EMC 2105 and 2118 CPU Replacement: 22 단계, 이미지 2/2
    • Remove the single T10 Torx screw securing the right speaker to the logic board.

    • Lift the right speaker out of the rear case and move it out of the way.

    • Both speakers are still attached to the logic board by the speaker cable.

  23. iMac Intel 20" EMC 2105 and 2118 CPU Replacement: 23 단계, 이미지 1/1
    • Disconnect the speaker cable connector by lifting it straight up off its socket on the logic board.

    • Pull the connector parallel to the face of the logic board.

  24. iMac Intel 20" EMC 2105 and 2118 CPU Replacement, Logic Board: 24 단계, 이미지 1/2 iMac Intel 20" EMC 2105 and 2118 CPU Replacement, Logic Board: 24 단계, 이미지 2/2
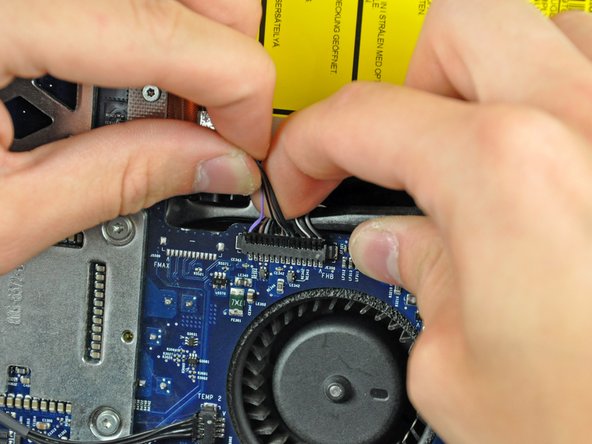
    • Disconnect the HDD fan and power button from the logic board by pulling their connectors straight up off the sockets on the logic board.

  25. iMac Intel 20" EMC 2105 and 2118 CPU Replacement: 25 단계, 이미지 1/1
    • If necessary, remove the pieces of tape holding the SATA data cable to the logic board.

    • Move the SATA data cable away from the face of the logic board.

  26. iMac Intel 20" EMC 2105 and 2118 CPU Replacement: 26 단계, 이미지 1/2 iMac Intel 20" EMC 2105 and 2118 CPU Replacement: 26 단계, 이미지 2/2
    • Disconnect the DC-In cable by simultaneously depressing both locking arms and pulling its connector away from the socket on the logic board toward the top of your iMac.

    • After both locking arms pass their retaining tabs, it is helpful to push the arms toward the top edge of your iMac while wiggling the connector.

  27. iMac Intel 20" EMC 2105 and 2118 CPU Replacement: 27 단계, 이미지 1/1
    • Pull the ambient light sensor cable connector up off the logic board.

  28. iMac Intel 20" EMC 2105 and 2118 CPU Replacement: 28 단계, 이미지 1/1
    • Use the flat end of a spudger to pry the Bluetooth antenna cable connector up off the Bluetooth board.

  29. iMac Intel 20" EMC 2105 and 2118 CPU Replacement: 29 단계, 이미지 1/1
    • Carefully de-route the IR board cable out from under the IR board and move it out of the way of the logic board.

  30. iMac Intel 20" EMC 2105 and 2118 CPU Replacement: 30 단계, 이미지 1/2 iMac Intel 20" EMC 2105 and 2118 CPU Replacement: 30 단계, 이미지 2/2
    • Disconnect the following connectors from the logic board:

    • Camera/IR board cable.

    • Optical drive fan.

    • When removing the optical drive fan connector, it is helpful to use a spudger or your fingernails to push the ears on either side of the connector toward the top edge of the iMac.

    • To aid in removing the camera/IR board connector, it is helpful to use one hand to pinch the cables against a spudger and pull up toward the top edge of the iMac while pulling up gently on the cables with your other hand.

  31. iMac Intel 20" EMC 2105 and 2118 CPU Replacement: 31 단계, 이미지 1/1
    • Disconnect the optical drive thermal sensor cable from the logic board by pulling its connector away from the socket on the logic board.

    • Pull the connector parallel to the face of the logic board.

  32. iMac Intel 20" EMC 2105 and 2118 CPU Replacement: 32 단계, 이미지 1/1
    • Remove the two T6 Torx screws securing the optical drive ribbon cable connector to the logic board.

  33. iMac Intel 20" EMC 2105 and 2118 CPU Replacement: 33 단계, 이미지 1/1
    • Use the flat end of a spudger to pry the optical drive ribbon cable connector up off the logic board.

    • The connector is most easily removed when prying from the top or bottom of the connector.

    • Bend the optical drive ribbon cable back away from the logic board.

    • Be very careful when moving the optical drive ribbon cable as it is delicate and easily ripped.

  34. iMac Intel 20" EMC 2105 and 2118 CPU Replacement: 34 단계, 이미지 1/1
    • Disconnect the following connectors from the logic board:

    • Hard drive thermal sensor cable.

    • CPU fan cable.

    • When removing these connectors, it is helpful to push the ears on either side of the connector with your fingernails or the tip of a spudger toward the top edge of the iMac.

  35. iMac Intel 20" EMC 2105 and 2118 CPU Replacement: 35 단계, 이미지 1/1
    • Remove the two T6 Torx screws securing the top of the heat sink framework to the chassis.

  36. iMac Intel 20" EMC 2105 and 2118 CPU Replacement: 36 단계, 이미지 1/1
    • Remove the following seven screws securing the logic board to the rear case:

    • Three coarse-thread T10 Torx.

    • Three fine-thread T10 Torx.

    • One long coarse-thread T10 Torx.

  37. iMac Intel 20" EMC 2105 and 2118 CPU Replacement: 37 단계, 이미지 1/1
    • Carefully rotate the top edge of the logic board out of the rear case and lift the board up out of the iMac, minding the RAM arms and any cables that may get caught.

    • Be especially careful with the hard drive thermal sensor cable that is routed underneath the heat sink framework.

    • Only handle the logic board by its edges.

  38. iMac Intel 20" EMC 2105 and 2118 CPU Replacement, Heat Sinks: 38 단계, 이미지 1/1
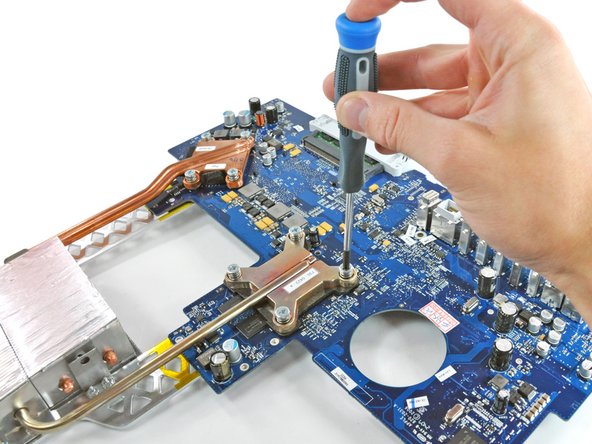
    • Remove the 6.1 mm T8 Torx screw from both sides of the heat sink nearest the logic board (two screws total).

  39. iMac Intel 20" EMC 2105 and 2118 CPU Replacement: 39 단계, 이미지 1/2 iMac Intel 20" EMC 2105 and 2118 CPU Replacement: 39 단계, 이미지 2/2
    • Remove the following ten screws:

    • Eight 7.8 mm T8 Torx.

    • Two 6.1 mm T8 Torx.

    • If the eight screws around the processors refuse to unscrew, use a Phillips screwdriver to hold the lug from the one side of the board while you remove the Torx screw from the other side.

  40. iMac Intel 20" EMC 2105 and 2118 CPU Replacement: 40 단계, 이미지 1/2 iMac Intel 20" EMC 2105 and 2118 CPU Replacement: 40 단계, 이미지 2/2
    • Carefully lift both metal heat sink brackets off the logic board.

  41. iMac Intel 20" EMC 2105 and 2118 CPU Replacement: 41 단계, 이미지 1/1
    • Lift the logic board off the heat sinks.

    • If a heat sink seems to be stuck, carefully pry it away from the logic board to separate the solidified thermal paste.

    • If you need to mount the heat sink back into the iMac, we have a thermal paste guide that makes replacing the thermal compound easy.

    • During reinstallation it is helpful to install the heat sinks one at a time, starting with the one closest to the logic board.

  42. iMac Intel 20" EMC 2105 and 2118 CPU Replacement, Remove Old CPU: 42 단계, 이미지 1/1
    • The CPU is mounted in a Zero Insertion Force (ZIF) socket. If you (gently!) try to pull the CPU out of its socket, you will find that it does not budge. You first need to release the chip from the socket. Turn the screw on the CPU socket 180 degrees counter-clockwise to release the old CPU. Then pull up on the CPU chip to remove it.

  43. iMac Intel 20" EMC 2105 and 2118 CPU Replacement, Insert New CPU: 43 단계, 이미지 1/1
    • Insert your new CPU into the ZIF socket. Note that two pins are missing from one corner of the grid. Match that corner with the corner of the socket that is missing the corresponding holes. Drop the chip in; it should go in without effort. Rotate the screw on the socket 180 degrees clockwise to lock the new CPU in place.

    • When reassembling don't forget to scrape off the old thermal paste and apply a new dose. The iFixit guide is good, but I was too cheap/impatient to follow those instructions. Instead I used a q-tip to swab rubbing alcohol on the heat sink and chip tops. Then I put on a dab of leftover heat sink paste that came with a CPU cooler for my PC.

  44. iMac Intel 20" EMC 2105 and 2118 CPU Replacement, Update Firmware: 45 단계, 이미지 1/1
    • Download the iMac41-iMac51 firmware updater from netkas.org. You have to register (free) before you can see the download. Follow the instructions there to update your firmware. After rebooting, your iMac4,1 now reports that it is an iMac5,1!

    • Here is a link for purchasing MacOSX 10.7 from the App Store. Wait a few days to receive the download key. The App Store will not let you download the Lion installer on your modified Mac. Download it instead from a newer Macintosh, by clicking the Download button under Purchases. Ignore any warnings. Find the download in /Applications.

    • After booting into Lion, do a Software Update to bring your Mac up to date.

결론

To reassemble your device, follow these instructions in reverse order.

다른 17명이 해당 안내서를 완성하였습니다.

gordonhamachi

회원 가입일: 12/20/14

3,446 평판

안내서 15개 작성하였습니다

댓글 5개

So I basically performed this: https://www.tekrevue.com/stayin-alive-up...

EXCEPT it does NOT boot with the new CPU in it. It is already an iMac 5,1 with the newer Firmware and already recognizes the 4GB of RAM and already has the latest Firmware version as well from Apple. It boots with 10.9.5 on a SSD with all the modified kexts etc. everything works based on what it can do. the CPU is the ONLY variable that causes problems. There is NO boot chime, the fans spin up super fast and loud. There is also NO screen display as well. Attempting to do CMD+OPT+P+R has no effect with the newer T7600 2.33 installed. I even swapped out the RAM module between single installs 1 at a time and in different banks, no change. And I only get 2/3 LED 1&2 of the lights that come on not LED 3. But it does come on with the original CPU. Any thoughts would be greatly appreciated, thanks.

Cory S - 답글

My only experience is with EMC2105, not EMC2118 (I inherited EMC2118 from an existing guide that I leveraged). I wonder what would happen if you downgraded your firmware to an iMac 4,1 and then performed the CPU upgrade procedure. That might work if the firmware installer detects the CPU and does some CPU-specific setup. On the other hand, that would be risky as it might brick your system. I’d probably just live with the slightly slower original iMac 5,1 CPU (T7400 at 2.16 GHz) unless you feel lucky or want to contribute to the collective knowledge.

gordonhamachi -

Will the SSD work with this model instead of original HDD?

vadim10 - 답글

Yes, an SSD will work. There’s even a repair guide (authored by someone else) explaining how to install a new hard drive or SSD. iMac Intel 20" EMC 2105 and 2118 Hard Drive Replacement

gordonhamachi -

will it run a 800mhz cpu

jensagerbo@live.dk

JEA - 답글

댓글 쓰기

조회 통계:

24 시간 전: 3

7일 전: 21

30일 전: 59

전체 시간: 17,075