이 버전에는 잘못된 편집 사항이 있을 수 있습니다. 최신 확인된 스냅샷으로 전환하십시오.
필요한 것
-
이 단계는 번역되지 않았습니다. 번역을 도와주십시오
-
Unplug your iMac's AC cord along with any peripheral devices.
-
Lay your iMac face-down on a soft, clean surface as shown.
-
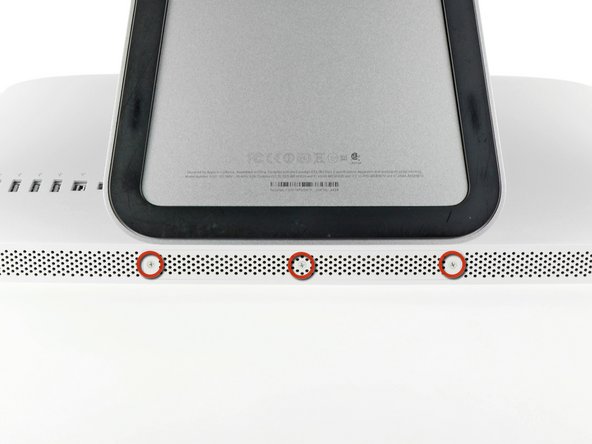
Loosen the three Phillips screws securing the access door to the bottom edge of your iMac.
-
Remove the access door.
-
-
이 단계는 번역되지 않았습니다. 번역을 도와주십시오
-
Gently slide the black plastic RAM pull tab out from the RAM slot.
-
Pull the black plastic tab away from the bottom edge of the iMac to eject the module(s) on that side of the RAM bay.
-
-
이 단계는 번역되지 않았습니다. 번역을 도와주십시오
-
Slide the old RAM module(s) out of their slots in the RAM bay and set them aside.
-
-
이 단계는 번역되지 않았습니다. 번역을 도와주십시오
-
Repeat the process in the previous steps to remove the RAM module(s) from the other side of the RAM bay.
-
-
이 단계는 번역되지 않았습니다. 번역을 도와주십시오
-
Be sure the small notch cut into each RAM module (shown in the first picture) mates with the protrusion in each RAM slot (shown in the second picture).
-
-
이 단계는 번역되지 않았습니다. 번역을 도와주십시오
-
Stick a suction cup near each of the two top corners of the glass panel.
-
If your suction cups refuse to stick, try cleaning both the glass panel and the suction cup with a mild solvent.
-
-
이 단계는 번역되지 않았습니다. 번역을 도와주십시오
-
Gently lift the glass panel perpendicular to the face of the LCD enough to clear the steel mounting pins attached along the underside of the top edge of the glass panel.
-
Pull the glass panel away from the lower edge of the iMac and carefully set it aside.
-
-
이 단계는 번역되지 않았습니다. 번역을 도와주십시오
-
Remove the eight 8 mm T10 Torx screws securing the display to the outer case.
-
-
이 단계는 번역되지 않았습니다. 번역을 도와주십시오
-
Pull the vertical sync cable connector out of its socket on the LED driver board near the top left corner of your iMac.
-
-
이 단계는 번역되지 않았습니다. 번역을 도와주십시오
-
Rotate the display out of the outer case enough to disconnect the LED backlight power cable from the LED driver board.
-
-
이 단계는 번역되지 않았습니다. 번역을 도와주십시오
-
Grab the plastic pull tab secured to the display data cable lock and rotate it towards upwards.
-
Pull the display data cable straight out of its socket on the logic board.
-
-
이 단계는 번역되지 않았습니다. 번역을 도와주십시오
-
Disconnect the LCD thermal sensor cable connector from its socket on the logic board.
-
-
이 단계는 번역되지 않았습니다. 번역을 도와주십시오
-
Carefully pull the display toward the top edge of your iMac and lift it out of the outer case, minding any cables that may get caught.
-
-
이 단계는 번역되지 않았습니다. 번역을 도와주십시오
-
Remove the following four screws:
-
One 9.3 mm T10 Torx screw with a large head
-
Three 9.3 mm T10 Torx screws with a normal sized head
-
-
-
이 단계는 번역되지 않았습니다. 번역을 도와주십시오
-
Pull the optical drive thermal sensor connector straight up from its socket on the logic board. Pull parallel to the board.
-
-
이 단계는 번역되지 않았습니다. 번역을 도와주십시오
-
Lift the inner edge of the optical drive and maneuver its connector past the GPU frame attached to the logic board.
-
Carefully pull the optical drive off its mounting pins on the right side of the outer case to gain clearance for disconnecting the optical drive cable.
-
Allow the optical drive to hang down as you de-route the optical drive thermal sensor connector from behind the GPU heat sink.
-
-
이 단계는 번역되지 않았습니다. 번역을 도와주십시오
-
Disconnect the optical drive cable by pulling its connector away from the optical drive.
-
Remove the optical drive from the iMac.
-
-
이 단계는 번역되지 않았습니다. 번역을 도와주십시오
-
Remove the single 13 mm T10 Torx screw securing the optical drive fan to the outer case.
-
-
이 단계는 번역되지 않았습니다. 번역을 도와주십시오
-
Pull the optical drive fan connector away from its socket on the logic board.
-
Remove the optical drive fan from the iMac.
-
-
이 단계는 번역되지 않았습니다. 번역을 도와주십시오
-
In the proceeding steps, you will disconnect the following cables:
-
SD Board
-
Left/Right Speaker and Microphone
-
Audio Port
-
Wi-Fi Antenna
-
Right Temperature Sensor, Bluetooth/Ambient Light Sensor/Camera/Left Temperature, and Hard Drive Fan
-
CPU Fan/Ambient Temperature and Power Button
-
IR Sensor
-
-
이 단계는 번역되지 않았습니다. 번역을 도와주십시오
-
Disconnect the microphone, left speaker, and right speaker cables by pulling their connectors toward the right side of the iMac.
-
-
이 단계는 번역되지 않았습니다. 번역을 도와주십시오
-
Use the flat end of a spudger to pry all three AirPort antenna connectors up from their sockets on the AirPort board.
-
-
이 단계는 번역되지 않았습니다. 번역을 도와주십시오
-
Pull the hard drive fan connector toward the top edge of the iMac to disconnect it from its socket on the logic board.
-
-
이 단계는 번역되지 않았습니다. 번역을 도와주십시오
-
Use your thumbnails on both sides of the Bluetooth/ambient light sensor/camera/left temperature connector to push it toward the top edge of the iMac and out of its socket on the logic board.
-
-
이 단계는 번역되지 않았습니다. 번역을 도와주십시오
-
Use your thumbnails to push the right temperature sensor connector toward the top edge of the iMac and out of its socket.
-
-
이 단계는 번역되지 않았습니다. 번역을 도와주십시오
-
Pull the CPU fan/ambient temperature sensor connector toward the bottom left edge of the iMac and out of its socket on the logic board.
-
-
이 단계는 번역되지 않았습니다. 번역을 도와주십시오
-
Pull the power button connector toward the bottom left corner of the iMac to disconnect it from its socket on the logic board.
-
-
이 단계는 번역되지 않았습니다. 번역을 도와주십시오
-
Use your thumbs to push the IR sensor connector toward the top edge of the iMac and out of its socket on the logic board.
-
Pull the IR sensor board up from behind the front face of the outer case.
-
Remove the IR sensor and set it aside.
-
-
이 단계는 번역되지 않았습니다. 번역을 도와주십시오
-
Pull the audio port cable connector toward the left side of the iMac to disconnect it from the logic board.
-
Peel the audio port cable off the front face of the logic board and let it hang down as shown in the second picture.
-
-
이 단계는 번역되지 않았습니다. 번역을 도와주십시오
-
Remove the following seven screws:
-
Two 7 mm T10 torx screws
-
One 30 mm T10 Torx screw
-
Two 25 mm T10 Torx screws
-
Two 21 mm T10 Torx screws
-
-
이 단계는 번역되지 않았습니다. 번역을 도와주십시오
-
Remove the following four screws:
-
One 9.3 mm T10 coarse-threaded screw
-
One 25 mm T10 coarse-threaded screw
-
Two 22 mm fine-threaded screws
-
Pull the upper right and lower left corners of the power supply away from the rear case to dislodge the mounting posts attached to the power supply's corners.
-
-
이 단계는 번역되지 않았습니다. 번역을 도와주십시오
-
Carefully lift the power supply out of the outer case and rotate it to expose the cable lock as shown, minding the DC-out and AC-in cables still attaching it to the iMac.
-
Disconnect the DC-out cable by depressing the locking mechanism on the connector while you pull the connector away from its socket on the power supply.
-
Once the locking mechanism has cleared the socket, pull the DC-in connector away from the power supply.
-
-
이 단계는 번역되지 않았습니다. 번역을 도와주십시오
-
Disconnect the AC-In cable by depressing the locking mechanism while pulling the connector away from its socket.
-
Remove the power supply from the outer case.
-
-
이 단계는 번역되지 않았습니다. 번역을 도와주십시오
-
Remove the plastic wall that is installed directly to the right of the LED driver board.
-
-
이 단계는 번역되지 않았습니다. 번역을 도와주십시오
-
Slightly pull the logic board away from the back of the outer case, then lift it upward to clear the lower front face of the outer case.
-
-
이 단계는 번역되지 않았습니다. 번역을 도와주십시오
-
Disconnect the LCD temperature cable by pulling its connector up and out of its socket on the logic board.
-
-
이 단계는 번역되지 않았습니다. 번역을 도와주십시오
-
Depress the locking mechanism and carefully pull the DC-In cable out of its socket on the back of the logic board.
-
-
이 단계는 번역되지 않았습니다. 번역을 도와주십시오
-
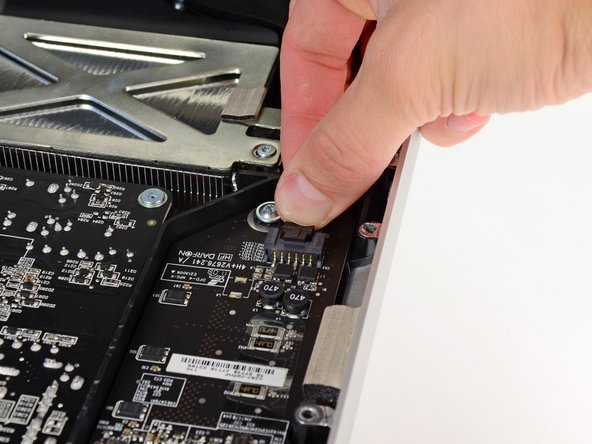
Being careful not to damage the socket on the logic board, gently pull the hard drive SATA data cable straight out of its socket on the logic board.
-
-
이 단계는 번역되지 않았습니다. 번역을 도와주십시오
-
Pull the hard drive power cable connector out of its socket on the logic board.
-
-
이 단계는 번역되지 않았습니다. 번역을 도와주십시오
-
Remove the logic board from the outer case, minding any cables that may get caught.
-


다른 54명이 해당 안내서를 완성하였습니다.

댓글 7개
En Français:
Il n'est marqué nulle part sur ce tuto qu'il ne faut pas toucher les parties métalliques qui tiennent ensemble refroidissement et carte mère. Dès que l'on touche ces parties, l'acier s'oxyde directement et la rouille apparait dans votre iMac alors ATTENTION !
-
In English:
It's not write in this tutorial that when should not touch with our hands the two metallic parts which hold the motherboard and coolings.
Take care of that because the metal gonna be oxided, and the rust will arrived !
Hey guys....I'm having a problem fitting back the logic board... It refuses to go go back in. It's like it has grown half an inch bigger lol.. Anyway is there any advice anyone can give or tips how to do it..its really annoying me now.
I have the same issue if you found the fix?
i had this issue as well and i figured out that the wall to the right of the power supply was making it difficult to get the logic board back in place; i removed that plastic wall and made sure no cables were blocking the board and it went back in no problem.
Some cables can stay between mother board and box, especially near to optic drive fan.
gerland -