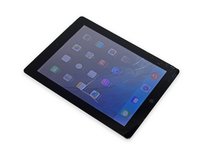
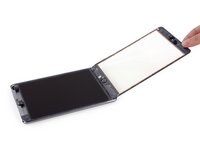
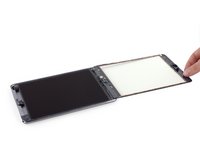
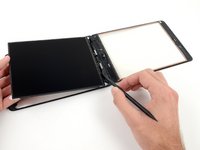
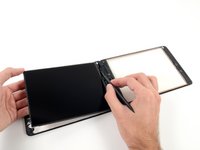
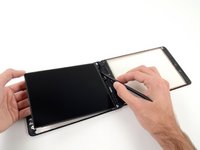
주요 콘텐츠로 건너뛰기

iPad Mini Wi-Fi Front Panel Assembly Replacement

단지 전제 조건
이 안내서는 다른 가이드의 선행 작업으로 사용하기 위한 것입니다. 그 자체로는 불완전합니다.

필요한 것

  1. iPad Mini Wi-Fi Front Panel Assembly Replacement, Front Panel: 1 단계, 이미지 1/3 iPad Mini Wi-Fi Front Panel Assembly Replacement, Front Panel: 1 단계, 이미지 2/3 iPad Mini Wi-Fi Front Panel Assembly Replacement, Front Panel: 1 단계, 이미지 3/3
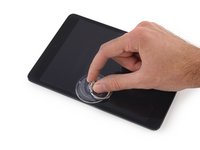
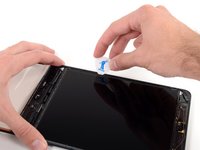
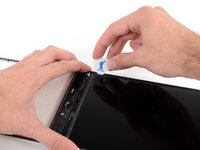
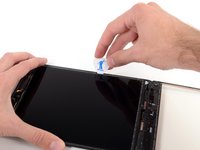
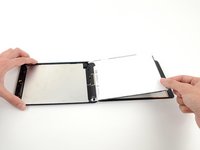
    • If your display glass is cracked, keep further breakage contained and prevent bodily harm during your repair by taping the glass.

    • Lay overlapping strips of clear packing tape over the iPad's display until the whole face is covered.

    • This will keep glass shards contained and provide structural integrity when prying and lifting the display.

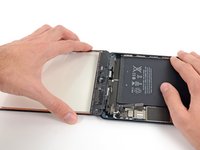
    • Do your best to follow the rest of the guide as described. However, once the glass is broken, it will likely continue to crack as you work, and you may need to use a metal prying tool to scoop the glass out.

    • Wear safety glasses to protect your eyes, and be careful not to damage the LCD screen.

  2. iPad Mini Wi-Fi Front Panel Assembly Replacement: 2 단계, 이미지 1/1
    • Handling it by the tab, place the heated iOpener on the side of the iPad to the left of the home button assembly.

    • Let the iOpener sit for about five minutes to soften the adhesive beneath the glass.

  3. iPad Mini Wi-Fi Front Panel Assembly Replacement: 3 단계, 이미지 1/3 iPad Mini Wi-Fi Front Panel Assembly Replacement: 3 단계, 이미지 2/3 iPad Mini Wi-Fi Front Panel Assembly Replacement: 3 단계, 이미지 3/3
    • Carefully place a suction cup halfway up the heated side.

    • Be sure the cup is completely flat on the screen to get a tight seal.

    • While holding the iPad down with one hand, pull up on the suction cup to slightly separate the front panel glass from from the rear case.

    • Be careful to only lift the glass enough to insert an opening pick—any more and you may risk cracking the glass.

  4. iPad Mini Wi-Fi Front Panel Assembly Replacement: 4 단계, 이미지 1/3 iPad Mini Wi-Fi Front Panel Assembly Replacement: 4 단계, 이미지 2/3 iPad Mini Wi-Fi Front Panel Assembly Replacement: 4 단계, 이미지 3/3
    • While holding the glass up with the suction cup, slide the point of an opening pick into the gap between the glass and body of the iPad.

    • Don't insert the opening pick any deeper than the black bezel on the side of the display. Inserting the pick too far may damage the LCD.

    • Pull the suction cup's plastic nub to release the vacuum seal and remove the suction cup from the display assembly.

  5. iPad Mini Wi-Fi Front Panel Assembly Replacement: 5 단계, 이미지 1/1
    • Reheat and reapply the iOpener.

    • Be careful not to overheat the iOpener during the repair procedure. Always wait at least ten minutes before reheating the iOpener.

    • Let it rest for a few minutes to reheat the left edge of the iPad.

  6. iPad Mini Wi-Fi Front Panel Assembly Replacement: 6 단계, 이미지 1/3 iPad Mini Wi-Fi Front Panel Assembly Replacement: 6 단계, 이미지 2/3 iPad Mini Wi-Fi Front Panel Assembly Replacement: 6 단계, 이미지 3/3
    • Place a second opening pick alongside the first and slide the pick down along the edge of the iPad, releasing the adhesive as you go.

    • Throughout the rest of the procedure, if you encounter significant resistance to sliding picks beneath the glass, stop and reheat the section you're working on. Forcing the picks risks cracking the glass.

  7. iPad Mini Wi-Fi Front Panel Assembly Replacement: 7 단계, 이미지 1/3 iPad Mini Wi-Fi Front Panel Assembly Replacement: 7 단계, 이미지 2/3 iPad Mini Wi-Fi Front Panel Assembly Replacement: 7 단계, 이미지 3/3
    • Continue moving the opening pick down the side of the display to release the adhesive.

    • If the opening pick gets stuck in the adhesive, "roll" the pick along the side of the iPad, continuing to release the adhesive.

  8. iPad Mini Wi-Fi Front Panel Assembly Replacement: 8 단계, 이미지 1/3 iPad Mini Wi-Fi Front Panel Assembly Replacement: 8 단계, 이미지 2/3 iPad Mini Wi-Fi Front Panel Assembly Replacement: 8 단계, 이미지 3/3
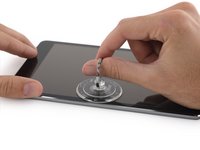
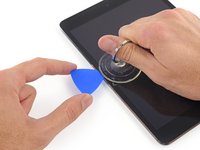
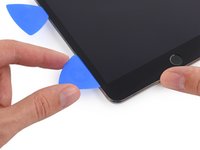
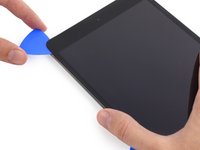
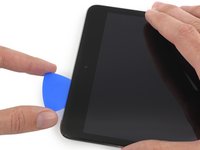
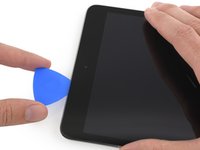
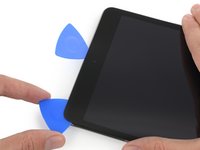
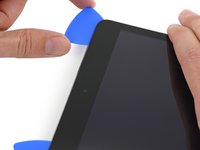
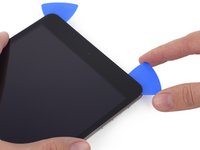
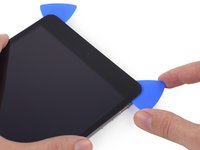
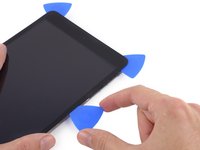
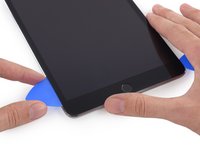
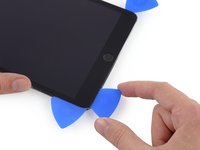
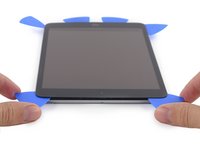
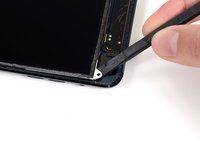
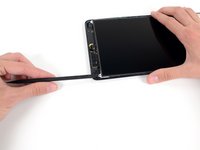
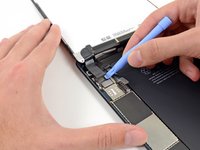
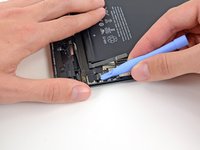
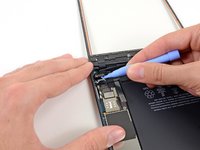
    • Take the first pick you inserted and slide it up toward the top corner of the iPad.

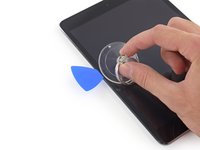
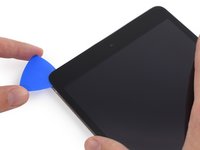
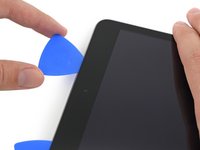
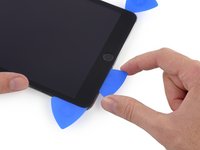
    • If you can see the tip of the opening pick through the front glass, don't panic—just pull the pick out a little bit. Most likely, everything will be fine, but try to avoid this as it may deposit adhesive on the front of the LCD that is difficult to clean off.

  9. iPad Mini Wi-Fi Front Panel Assembly Replacement: 9 단계, 이미지 1/1
    • Reheat the iOpener and place it on the top edge of the iPad, over the front-facing camera.

    • Be careful not to overheat the iOpener during the repair procedure. Wait at least ten minutes before reheating the iOpener.

    • If you have a flexible iOpener, you can bend it to heat both the upper left corner and the upper edge at the same time.

  10. iPad Mini Wi-Fi Front Panel Assembly Replacement: 10 단계, 이미지 1/3 iPad Mini Wi-Fi Front Panel Assembly Replacement: 10 단계, 이미지 2/3 iPad Mini Wi-Fi Front Panel Assembly Replacement: 10 단계, 이미지 3/3
    • Slide the opening pick around the top left corner of the iPad to separate the adhesive.

  11. iPad Mini Wi-Fi Front Panel Assembly Replacement: 11 단계, 이미지 1/3 iPad Mini Wi-Fi Front Panel Assembly Replacement: 11 단계, 이미지 2/3 iPad Mini Wi-Fi Front Panel Assembly Replacement: 11 단계, 이미지 3/3
    • Slide the opening pick along the top edge of the iPad, stopping just before you reach the camera.

    • The third image shows where the front-facing camera and housing are in the iPad.

    • Avoid sliding the opening pick over the front-facing camera, as you may smear adhesive onto the lens or damage the camera. The following steps will detail how to best avoid disturbing the front-facing camera.

  12. iPad Mini Wi-Fi Front Panel Assembly Replacement: 12 단계, 이미지 1/3 iPad Mini Wi-Fi Front Panel Assembly Replacement: 12 단계, 이미지 2/3 iPad Mini Wi-Fi Front Panel Assembly Replacement: 12 단계, 이미지 3/3
    • Pull the pick out slightly, and slide the very tip gently along the top of the front-facing camera section of the top edge.

  13. iPad Mini Wi-Fi Front Panel Assembly Replacement: 13 단계, 이미지 1/3 iPad Mini Wi-Fi Front Panel Assembly Replacement: 13 단계, 이미지 2/3 iPad Mini Wi-Fi Front Panel Assembly Replacement: 13 단계, 이미지 3/3
    • Leave the opening pick in the iPad slightly past the front-facing camera.

    • Take a second pick and insert it to the left of the camera, where the first pick just was. Slide it back to the corner to completely cut any remaining adhesive.

    • Leave the second pick in place to prevent the corner adhesive from re-sealing as it cools.

  14. iPad Mini Wi-Fi Front Panel Assembly Replacement: 14 단계, 이미지 1/3 iPad Mini Wi-Fi Front Panel Assembly Replacement: 14 단계, 이미지 2/3 iPad Mini Wi-Fi Front Panel Assembly Replacement: 14 단계, 이미지 3/3
    • Insert the previous pick deeper into the iPad and slide it away from the camera toward the corner.

  15. iPad Mini Wi-Fi Front Panel Assembly Replacement: 15 단계, 이미지 1/1
    • Leave the three picks in the corners of the iPad to prevent re-adhering of the front panel adhesive.

    • Reheat the iOpener and place it on the remaining long side of the iPad—along the volume and lock buttons.

  16. iPad Mini Wi-Fi Front Panel Assembly Replacement: 16 단계, 이미지 1/2 iPad Mini Wi-Fi Front Panel Assembly Replacement: 16 단계, 이미지 2/2
    • Slide the top right opening pick around the corner to fully release the top edge of the glass.

    • Leave this pick in place to keep the adhesive from re-sealing itself, and grab a new pick for the next step.

  17. iPad Mini Wi-Fi Front Panel Assembly Replacement: 17 단계, 이미지 1/3 iPad Mini Wi-Fi Front Panel Assembly Replacement: 17 단계, 이미지 2/3 iPad Mini Wi-Fi Front Panel Assembly Replacement: 17 단계, 이미지 3/3
    • Insert a new opening pick and slide it to the middle of the right edge of the iPad, releasing the adhesive as you go.

  18. iPad Mini Wi-Fi Front Panel Assembly Replacement: 18 단계, 이미지 1/3 iPad Mini Wi-Fi Front Panel Assembly Replacement: 18 단계, 이미지 2/3 iPad Mini Wi-Fi Front Panel Assembly Replacement: 18 단계, 이미지 3/3
    • Continue to slide the pick down the right edge of the iPad, releasing the adhesive.

  19. iPad Mini Wi-Fi Front Panel Assembly Replacement: 19 단계, 이미지 1/1
    • Leave the opening picks in place and reheat the iOpener.

    • Remember not to overheat the iOpener—no more than once every ten minutes.

    • Set the reheated iOpener on the home button end of the iPad and let it rest for a few minutes to soften the adhesive beneath the glass.

  20. iPad Mini Wi-Fi Front Panel Assembly Replacement: 20 단계, 이미지 1/3 iPad Mini Wi-Fi Front Panel Assembly Replacement: 20 단계, 이미지 2/3 iPad Mini Wi-Fi Front Panel Assembly Replacement: 20 단계, 이미지 3/3
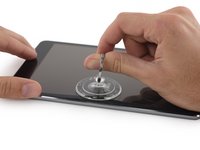
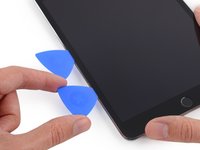
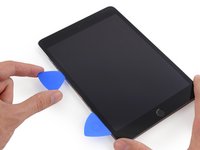
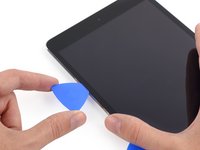
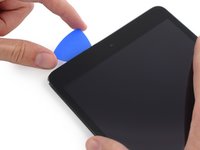
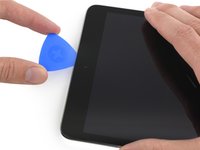
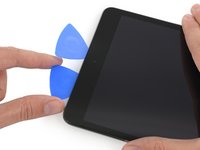
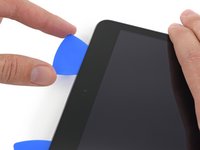
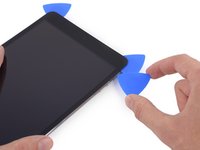
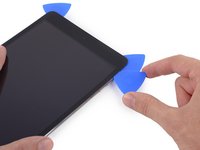
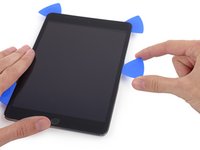
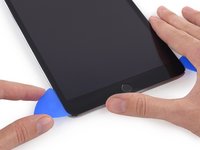
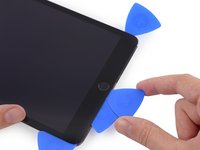
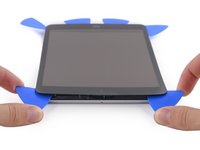
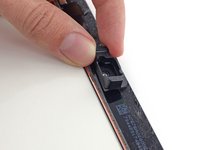
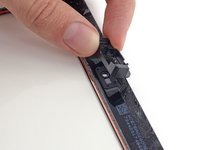
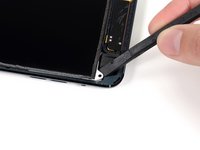
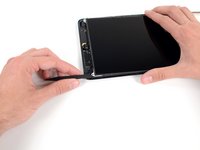
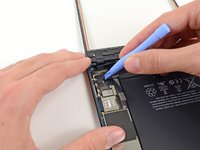
    • Slide the lower left pick to the lower left corner to cut the adhesive on that corner.

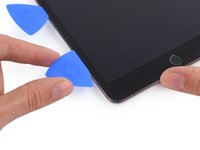
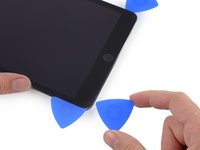
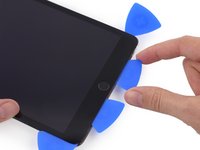
    • Leave the pick at the corner. Do not pry any farther, and do not remove the pick from the iPad.
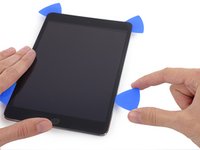
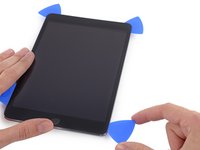
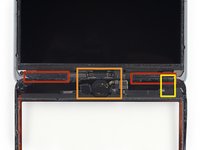
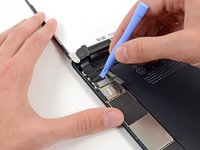
    • There are quite a few things to avoid beneath the lower bezel, so study the third image closely:

    • Antennas

    • Home button cavity

    • Digitizer cable

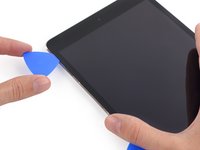
    • The following steps will direct you where to pry to avoid damage to these components. Only apply heat and pry where directed.

  21. iPad Mini Wi-Fi Front Panel Assembly Replacement: 21 단계, 이미지 1/3 iPad Mini Wi-Fi Front Panel Assembly Replacement: 21 단계, 이미지 2/3 iPad Mini Wi-Fi Front Panel Assembly Replacement: 21 단계, 이미지 3/3
    • Leave the pick from the last step in place to prevent the adhesive from re-sealing.

    • With a new pick, slice gently over the left-hand antenna, stopping before the home button.

    • Only slide the pick from the outer edge toward the center of the iPad. Do not move the pick back toward the outer edge, as moving in this direction may damage the antenna.

    • If you need to slide the pick over the lower section more than once, remove it and re-insert at the outer edge, and slide inwards.

    • Leave the pick in place before moving on.

  22. iPad Mini Wi-Fi Front Panel Assembly Replacement: 22 단계, 이미지 1/3 iPad Mini Wi-Fi Front Panel Assembly Replacement: 22 단계, 이미지 2/3 iPad Mini Wi-Fi Front Panel Assembly Replacement: 22 단계, 이미지 3/3
    • Insert the tip of one last pick next to the previous step's pick, and slide it beneath the home button.

    • Stop about an inch from the right-hand side to avoid cutting the digitizer cable.

    • Insert the pick slightly deeper and work it back toward the home button.

    • Again, be sure to only slide the pick toward the center of the iPad when it is fully inserted; otherwise you may damage the antenna beneath the glass.

  23. iPad Mini Wi-Fi Front Panel Assembly Replacement: 23 단계, 이미지 1/1
    • Reheat and reapply the iOpener to the top bezel of the iPad.

  24. iPad Mini Wi-Fi Front Panel Assembly Replacement: 24 단계, 이미지 1/2 iPad Mini Wi-Fi Front Panel Assembly Replacement: 24 단계, 이미지 2/2
    • Be very careful with this step. Take your time and ensure the adhesive is hot and soft, and that you've been through all of the adhesive with an opening pick. Don't be afraid to stop and reheat.

    • At the top of the iPad opposite the home button, you should have a pick lodged into each corner. Twist the picks to lift the glass slightly, separating the last of the adhesive along all four edges.

    • If you encounter a significant amount of resistance, stop twisting. Leave the picks in place, reheat, and reapply the iOpener to the problem areas, and run a pick through the sticking point one more time.

  25. iPad Mini Wi-Fi Front Panel Assembly Replacement: 25 단계, 이미지 1/2 iPad Mini Wi-Fi Front Panel Assembly Replacement: 25 단계, 이미지 2/2
    • Lift slowly and gently to further detach the adhesive along the lower edge.

  26. iPad Mini Wi-Fi Front Panel Assembly Replacement: 26 단계, 이미지 1/2 iPad Mini Wi-Fi Front Panel Assembly Replacement: 26 단계, 이미지 2/2
    • Once all of the adhesive has been separated, open the front glass like a page in a book and rest it on your workspace.

    • If reusing the front panel assembly during reassembly, you will need to replace the display adhesive. Use our display adhesive application guide to reapply your display adhesive and reseal your device.

  27. iPad Mini Wi-Fi Front Panel Assembly Replacement: 27 단계, 이미지 1/3 iPad Mini Wi-Fi Front Panel Assembly Replacement: 27 단계, 이미지 2/3 iPad Mini Wi-Fi Front Panel Assembly Replacement: 27 단계, 이미지 3/3
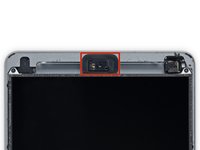
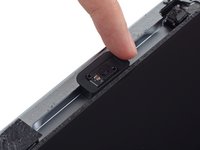
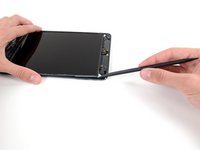
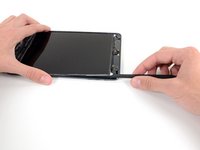
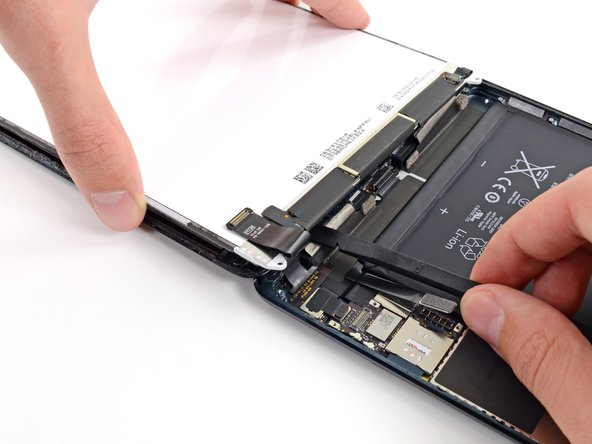
    • The front-facing camera housing may stick to the front panel; peel up the housing and place it back over the camera to protect it.

    • Rock the camera housing up on one edge to free it from the adhesive and remove it from the front panel.

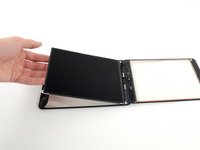
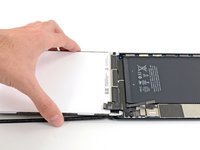
    • Return the front-facing camera housing to its recess in the rear case.

  28. iPad Mini Wi-Fi Front Panel Assembly Replacement, LCD Assembly: 28 단계, 이미지 1/3 iPad Mini Wi-Fi Front Panel Assembly Replacement, LCD Assembly: 28 단계, 이미지 2/3 iPad Mini Wi-Fi Front Panel Assembly Replacement, LCD Assembly: 28 단계, 이미지 3/3
    • Small pieces of foam tape cover the top and bottom right-hand screws securing the LCD to the rear case.

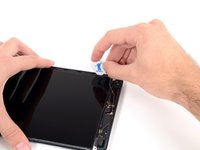
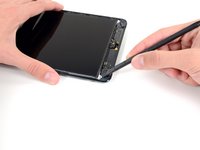
    • Use tweezers to peel up and remove the rectangular piece of foam tape covering the top right LCD screw.

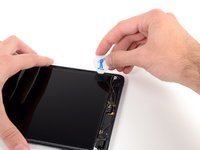
    • Remove the triangular tape covering the lower right LCD screw.

  29. iPad Mini Wi-Fi Front Panel Assembly Replacement: 29 단계, 이미지 1/2 iPad Mini Wi-Fi Front Panel Assembly Replacement: 29 단계, 이미지 2/2
    • The top left LCD screw may be covered by adhesive tape from the front panel.

    • If the tape is present, use the flat end of a spudger to pry the tape up and away, exposing the LCD screw beneath.

  30. iPad Mini Wi-Fi Front Panel Assembly Replacement: 30 단계, 이미지 1/1
    • Remove the four 3.9 mm Phillips #000 screws securing the LCD to the rear case.

  31. iPad Mini Wi-Fi Front Panel Assembly Replacement: 31 단계, 이미지 1/2 iPad Mini Wi-Fi Front Panel Assembly Replacement: 31 단계, 이미지 2/2
    • Use a pair of tweezers to peel up the small piece of tape connecting the LCD frame to the right speaker.

  32. iPad Mini Wi-Fi Front Panel Assembly Replacement: 32 단계, 이미지 1/3 iPad Mini Wi-Fi Front Panel Assembly Replacement: 32 단계, 이미지 2/3 iPad Mini Wi-Fi Front Panel Assembly Replacement: 32 단계, 이미지 3/3
    • A thin strip of foam tape on the LCD frame is covering a piece of tape connecting the LCD to the panel beneath it. To proceed, you'll have to break and peel up some of the foam tape to expose the tape hidden beneath.

    • Use a pair of thin tweezers to pull up the top of the foam tape surrounding the LCD.

    • Be careful not to touch the LCD with the tweezers, as you may damage the display.

    • Use the tweezers to peel the foam tape up to expose the top of the LCD.

  33. iPad Mini Wi-Fi Front Panel Assembly Replacement: 33 단계, 이미지 1/3 iPad Mini Wi-Fi Front Panel Assembly Replacement: 33 단계, 이미지 2/3 iPad Mini Wi-Fi Front Panel Assembly Replacement: 33 단계, 이미지 3/3
    • Insert the tip of a spudger between the LCD frame and the tape on the top of the LCD.

    • Slide the spudger along the space between the LCD frame and tape, separating the tape from the LCD frame.

  34. iPad Mini Wi-Fi Front Panel Assembly Replacement: 34 단계, 이미지 1/2 iPad Mini Wi-Fi Front Panel Assembly Replacement: 34 단계, 이미지 2/2
    • The LCD is glued to the metal LCD shield plate behind it along the top, left, and right edges. In order to safely loosen this adhesive, you'll be using a guitar pick to shift the LCD a couple of millimeters left and right several times.

    • Insert a guitar pick into the gap between the LCD and rear case, near the top of the left side of the LCD.

    • Bend the pick slightly away from the iPad, just enough to spread the gap between the LCD and rear case.

  35. iPad Mini Wi-Fi Front Panel Assembly Replacement: 35 단계, 이미지 1/3 iPad Mini Wi-Fi Front Panel Assembly Replacement: 35 단계, 이미지 2/3 iPad Mini Wi-Fi Front Panel Assembly Replacement: 35 단계, 이미지 3/3
    • Insert the guitar pick into three more locations down the left side of the LCD and bend it over in each location, to slide the LCD over to the right side of the rear case.

  36. iPad Mini Wi-Fi Front Panel Assembly Replacement: 36 단계, 이미지 1/3 iPad Mini Wi-Fi Front Panel Assembly Replacement: 36 단계, 이미지 2/3 iPad Mini Wi-Fi Front Panel Assembly Replacement: 36 단계, 이미지 3/3
    • Now switch to the right side of the LCD, and pry with the guitar pick in several places along the side to shift the LCD back to the left.

    • Repeat this and the previous step a few times, until the LCD is easily moved left and right.

  37. iPad Mini Wi-Fi Front Panel Assembly Replacement: 37 단계, 이미지 1/3 iPad Mini Wi-Fi Front Panel Assembly Replacement: 37 단계, 이미지 2/3 iPad Mini Wi-Fi Front Panel Assembly Replacement: 37 단계, 이미지 3/3
    • In the next few steps, you'll be sliding a spudger between the LCD and the metal backing plate to fully separate the LCD from the adhesive beneath.

    • Insert the flat end of a spudger between the LCD frame and the metal backing plate.

    • Be sure to get the spudger between the LCD frame and backing plate, and not beneath the plate. Prying up on the plate will damage it, because it is screwed down to the rear case beneath the LCD.

  38. iPad Mini Wi-Fi Front Panel Assembly Replacement: 38 단계, 이미지 1/3 iPad Mini Wi-Fi Front Panel Assembly Replacement: 38 단계, 이미지 2/3 iPad Mini Wi-Fi Front Panel Assembly Replacement: 38 단계, 이미지 3/3
    • Starting at the top right of the device, slide the spudger in between the LCD frame and metal backing plate, which will separate the adhesive as you push.

    • The goal is to separate the adhesive, not to pry the LCD up, so keep the pointed tip of the spudger as low as possible to prevent bending the LCD.

    • If inserting the spudger causes the corner of the LCD to bend up, repeat the steps with the guitar pick to further loosen the adhesive.

  39. iPad Mini Wi-Fi Front Panel Assembly Replacement: 39 단계, 이미지 1/3 iPad Mini Wi-Fi Front Panel Assembly Replacement: 39 단계, 이미지 2/3 iPad Mini Wi-Fi Front Panel Assembly Replacement: 39 단계, 이미지 3/3
    • Repeat the previous procedure along the top of the LCD.

    • Insert the flat end of the spudger between the LCD frame and metal backing plate and gently push the spudger in across the top of the device, separating adhesive.

  40. iPad Mini Wi-Fi Front Panel Assembly Replacement: 40 단계, 이미지 1/3 iPad Mini Wi-Fi Front Panel Assembly Replacement: 40 단계, 이미지 2/3 iPad Mini Wi-Fi Front Panel Assembly Replacement: 40 단계, 이미지 3/3
    • Continue with the left side of the LCD: insert the flat end of the spudger between the LCD and shield plate and insert the spudger as far as it will go.

    • At this point the LCD should be loosened from the adhesive holding it. If it is not, re-insert the spudger on the right side or top to fully free the LCD.

  41. iPad Mini Wi-Fi Front Panel Assembly Replacement: 41 단계, 이미지 1/1
    • Lift the LCD up a couple inches from the rear case to ensure it's free from the adhesive.

  42. iPad Mini Wi-Fi Front Panel Assembly Replacement: 42 단계, 이미지 1/2 iPad Mini Wi-Fi Front Panel Assembly Replacement: 42 단계, 이미지 2/2
    • Two wide strips of tape connect the LCD to the speakers.

    • While holding the LCD with one hand, Insert the flat end of a spudger into the gap between this tape and the left speaker.

    • Gently pull the LCD away from the speakers while rotating the spudger outward to separate the tape from the speaker.

  43. iPad Mini Wi-Fi Front Panel Assembly Replacement: 43 단계, 이미지 1/2 iPad Mini Wi-Fi Front Panel Assembly Replacement: 43 단계, 이미지 2/2
    • Insert the flat end of the spudger into the gap between the right speaker and the LCD tape.

    • While pulling the LCD away from the speakers, rotate the spudger outward, widening the gap and releasing the tape from the speaker.

  44. iPad Mini Wi-Fi Front Panel Assembly Replacement: 44 단계, 이미지 1/2 iPad Mini Wi-Fi Front Panel Assembly Replacement: 44 단계, 이미지 2/2
    • Flip the LCD over and rest it on top of the front panel glass.

    • Do not attempt to remove the LCD from the iPad, as it is still connected by its data cable.

  45. iPad Mini Wi-Fi Front Panel Assembly Replacement, LCD Shield Plate: 45 단계, 이미지 1/1
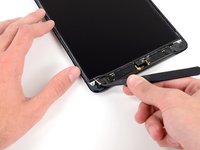
    • Remove the following screws securing the LCD shield plate to the rear case of the iPad:

    • Two 2.6 mm Phillips #00

    • Thirteen 1.7 mm Phillips #00

    • One additional 1.7 mm Phillips #00 on some devices.

  46. iPad Mini Wi-Fi Front Panel Assembly Replacement: 46 단계, 이미지 1/2 iPad Mini Wi-Fi Front Panel Assembly Replacement: 46 단계, 이미지 2/2
    • Insert the flat end of a spudger underneath the center of the LCD shield plate from the bottom end of the iPad.

    • Pry up on the spudger to free the plate from the sides of the rear case.

  47. iPad Mini Wi-Fi Front Panel Assembly Replacement: 47 단계, 이미지 1/1
    • Remove the LCD shield plate from the iPad.

  48. iPad Mini Wi-Fi Front Panel Assembly Replacement, Battery Connector: 48 단계, 이미지 1/1
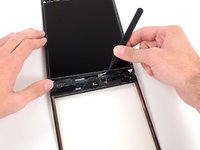
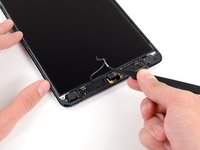
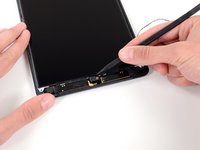
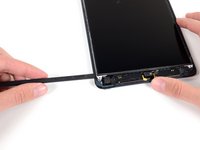
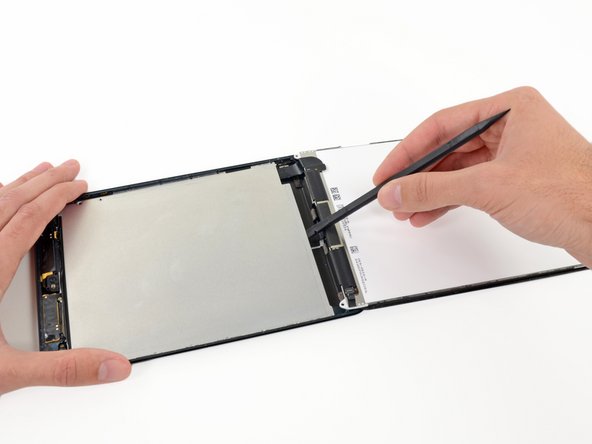
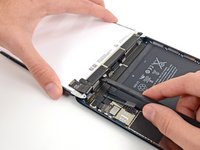
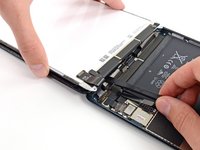
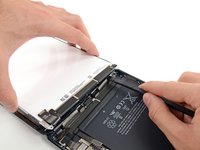
    • Remove the three 1.3 mm Phillips #00 screws securing the connector shield to the logic board.

    • Be sure to not substitute these three screws with any other screws, specifically the screws securing the LCD shield plate to the rear case of the iPad. Any slightly longer screws may strip the screw holes and result in irreparable damage to the logic board.

  49. iPad Mini Wi-Fi Front Panel Assembly Replacement: 49 단계, 이미지 1/1
    • Use a pair of tweezers to grasp and remove the connector shield from the iPad.

  50. iPad Mini Wi-Fi Front Panel Assembly Replacement: 50 단계, 이미지 1/2 iPad Mini Wi-Fi Front Panel Assembly Replacement: 50 단계, 이미지 2/2
    • Use a plastic opening tool to gently pry the battery connector up from its socket on the logic board.

    • Be very careful to only pry up on the battery connector and not on the socket itself. If you pry up on the logic board socket, you may break the connector entirely.

  51. iPad Mini Wi-Fi Front Panel Assembly Replacement, LCD: 51 단계, 이미지 1/2 iPad Mini Wi-Fi Front Panel Assembly Replacement, LCD: 51 단계, 이미지 2/2
    • Use a plastic opening tool to pry the LCD connector from its socket on the logic board.

    • Do not pry against the large IC next to the connector, or you may break it. Gently pry from the side of the connector as shown.

  52. iPad Mini Wi-Fi Front Panel Assembly Replacement: 52 단계, 이미지 1/3 iPad Mini Wi-Fi Front Panel Assembly Replacement: 52 단계, 이미지 2/3 iPad Mini Wi-Fi Front Panel Assembly Replacement: 52 단계, 이미지 3/3
    • The LCD is still connected to the rest of the iPad by two wide strips of adhesive tape that run up from the inside of the rear case to the front bottom LCD frame.

    • While holding the LCD with one hand, insert the flat end of a spudger between the LCD and tape on the iPad's right side.

    • Slide the spudger outward, separating the tape, while gently lifting up on the LCD to pull it away from the tape.

    • It may help to twist the spudger, to spread the gap the rest of the way and separate the LCD from the tape.

  53. iPad Mini Wi-Fi Front Panel Assembly Replacement: 53 단계, 이미지 1/3 iPad Mini Wi-Fi Front Panel Assembly Replacement: 53 단계, 이미지 2/3 iPad Mini Wi-Fi Front Panel Assembly Replacement: 53 단계, 이미지 3/3
    • While still holding the LCD up with one hand, move on to the iPad's left side and repeat the previous step's procedure to separate the second piece of tape.

    • Insert the flat end of a spudger between the LCD frame and tape, and slide outward while gently lifting up on the LCD.

  54. iPad Mini Wi-Fi Front Panel Assembly Replacement: 54 단계, 이미지 1/2 iPad Mini Wi-Fi Front Panel Assembly Replacement: 54 단계, 이미지 2/2
    • Lift and remove the LCD from the iPad Mini.

  55. iPad Mini Wi-Fi Front Panel Assembly Replacement, Front Panel Assembly: 55 단계, 이미지 1/2 iPad Mini Wi-Fi Front Panel Assembly Replacement, Front Panel Assembly: 55 단계, 이미지 2/2
    • Be very careful to pry evenly on the digitizer connector, and not on the socket at all. The socket and connector are very delicate and if you damage either, your digitizer won't work.

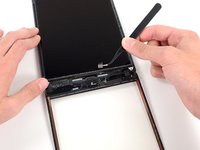
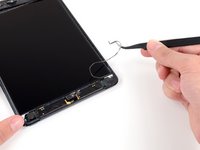
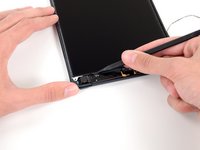
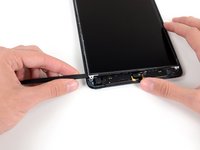
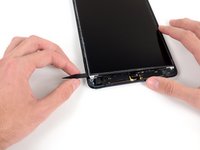
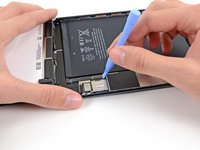
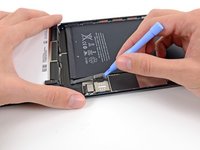
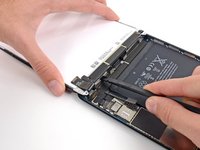
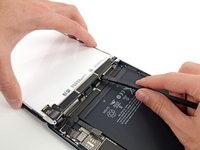
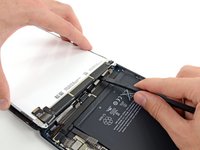
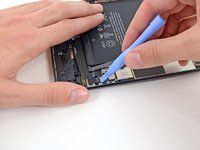
    • To minimize stress on the socket, try prying under the short edge of the connector, rather than the long edge which is shown in these images.

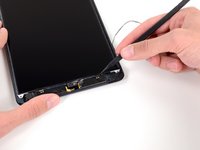
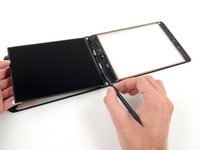
    • Gently pry the digitizer connector up from its socket on the logic board.

  56. iPad Mini Wi-Fi Front Panel Assembly Replacement: 56 단계, 이미지 1/2 iPad Mini Wi-Fi Front Panel Assembly Replacement: 56 단계, 이미지 2/2
    • Gently pry the digitizer cable board up from the rear case.

  57. iPad Mini Wi-Fi Front Panel Assembly Replacement: 57 단계, 이미지 1/2 iPad Mini Wi-Fi Front Panel Assembly Replacement: 57 단계, 이미지 2/2
    • Lift and remove the front panel from the iPad.

결론

To reassemble your device, follow these instructions in reverse order.

다른 32명이 해당 안내서를 완성하였습니다.

Andrew Optimus Goldheart

회원 가입일: 10/17/09

502,106 평판

안내서 407개 작성하였습니다

iFixit iFixit 회원

Staff

135 회원들

안내서 16,476개 작성하였습니다

댓글 3개

25 steps of advertising the bag full of rice, seriously?

Dave - 답글

Isn't it popcorn? =) It smells like popcorn

marcoac14 -

i say you have too many steps.

and youre missing some too.

i'd put that bad boy in the dehydro for 30 mins and the lcd and glass come out like butta.

spudger on the top and the lcd comes off like nothing!

60C

30mins

remember to also cover all the contacts on the new digi so you don't short it.

if you're wondering which, theyre on the bottom, look at the OEM glass and look at the replacment, see the gold that isn't covered?

cover it, as well as transfer the magnets over to the new glass.

presto!

you win!

Cheers guys hope i helped!

Jojo Melara - 답글

댓글 쓰기

조회 통계:

24 시간 전: 0

7일 전: 0

30일 전: 0

전체 시간: 21,875