이 버전에는 잘못된 편집 사항이 있을 수 있습니다. 최신 확인된 스냅샷으로 전환하십시오.
필요한 것
-
이 단계는 번역되지 않았습니다. 번역을 도와주십시오
-
If your display glass is cracked, keep further breakage contained and prevent bodily harm during your repair by taping the glass.
-
Lay overlapping strips of clear packing tape over the iPad's display until the whole face is covered. For particularly bad breaks, you may need to lay down two layers.
-
Do your best to follow the rest of the guide as described. However, once the glass is broken, it will likely continue to crack as you work, and you may need to use a metal prying tool to scoop the glass out.
-
-
이 단계는 번역되지 않았습니다. 번역을 도와주십시오
-
Apply a suction cup halfway up the heated side.
-
Be sure the cup is completely flat on the screen to get a tight seal.
-
While holding the iPad down with one hand, pull up on the suction cup with strong, steady force to create a gap.
-
-
이 단계는 번역되지 않았습니다. 번역을 도와주십시오
-
While holding the glass up with the suction cup, insert the point of an opening pick into the gap between the glass and body of the iPad.
-
-
이 단계는 번역되지 않았습니다. 번역을 도와주십시오
-
Insert a second opening pick alongside the first and slide the pick down along the edge of the iPad, releasing the adhesive as you go.
-
-
이 단계는 번역되지 않았습니다. 번역을 도와주십시오
-
Continue moving the opening pick down the side of the display to release the adhesive.
-
If the opening pick gets stuck in the adhesive, "roll" the pick along the side of the iPad, continuing to release the adhesive.
-
-
이 단계는 번역되지 않았습니다. 번역을 도와주십시오
-
Take the first pick you inserted and slide it up toward the top corner of the iPad.
-
-
이 단계는 번역되지 않았습니다. 번역을 도와주십시오
-
Reheat the iOpener and place it on the top edge of the iPad, over the front-facing camera.
-
If you have a flexible iOpener, you can bend it to heat both the upper left corner and the upper edge at the same time.
-
-
이 단계는 번역되지 않았습니다. 번역을 도와주십시오
-
Slide the opening pick around the top left corner of the iPad to separate the adhesive.
-
-
이 단계는 번역되지 않았습니다. 번역을 도와주십시오
-
Slide the opening pick along the top edge of the iPad, stopping just before you reach the camera.
-
As you reach the front-facing camera, pull the pick out slightly and continue sliding it across the top edge.
-
-
이 단계는 번역되지 않았습니다. 번역을 도와주십시오
-
Leave the opening pick in the iPad slightly past the front-facing camera.
-
Take a second pick and insert it to the left of the camera, where the first pick just was. Slide it back to the corner to completely cut any remaining adhesive.
-
Leave the second pick in place to prevent the corner adhesive from re-sealing as it cools.
-
-
-
이 단계는 번역되지 않았습니다. 번역을 도와주십시오
-
Insert the previous pick deeper into the iPad and slide it away from the camera toward the corner.
-
-
이 단계는 번역되지 않았습니다. 번역을 도와주십시오
-
Leave the three picks in the corners of the iPad to prevent re-adhering of the front panel adhesive.
-
Reheat the iOpener and place it on the remaining long side of the iPad—along the volume and lock buttons.
-
-
이 단계는 번역되지 않았습니다. 번역을 도와주십시오
-
Insert a new opening pick and slide it down the right edge of the iPad, releasing the adhesive as you go.
-
-
이 단계는 번역되지 않았습니다. 번역을 도와주십시오
-
Continue sliding the opening pick down the right edge of the iPad, reheating the edge using an iOpener if necessary.
-
-
이 단계는 번역되지 않았습니다. 번역을 도와주십시오
-
Leave the opening picks in place and reheat the iOpener.
-
Set the reheated iOpener on the home button end of the iPad and let it rest for a few minutes to soften the adhesive beneath the glass.
-
-
이 단계는 번역되지 않았습니다. 번역을 도와주십시오
-
Insert a new opening pick at the bottom right corner of the display, below the last opening pick you used to slice down the right edge.
-
Rotate the new pick around the lower right corner of the device.
-
-
이 단계는 번역되지 않았습니다. 번역을 도와주십시오
-
Slide the pick from the bottom right corner along the lower edge of the device. Stop about half an inch shy of the home button.
-
-
이 단계는 번역되지 않았습니다. 번역을 도와주십시오
-
Insert a final opening pick at the lower left corner of the iPad, directly below the existing one.
-
-
이 단계는 번역되지 않았습니다. 번역을 도와주십시오
-
Continue sliding the pick at the lower left edge of the display toward the center of the iPad, until it is roughly half an inch from the home button.
-
-
이 단계는 번역되지 않았습니다. 번역을 도와주십시오
-
Twist the two picks at the top edge of the iPad to break up the last of the adhesive holding the display assembly in place.
-
Lift the display from the top edge to open the device.
-
-
이 단계는 번역되지 않았습니다. 번역을 도와주십시오
-
Remove the four 1.2 mm Phillips screws over the battery/display connector bracket.
-
-
이 단계는 번역되지 않았습니다. 번역을 도와주십시오
-
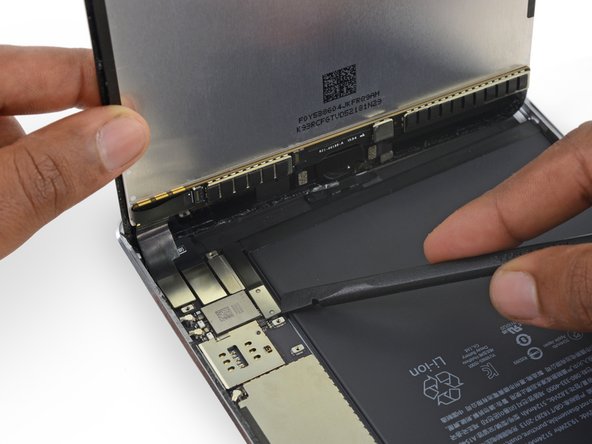
Use the flat tip of a spudger to disconnect the battery connector from its socket on the logic board.
-
-
이 단계는 번역되지 않았습니다. 번역을 도와주십시오
-
Use the pointed end of a spudger to disconnect the display data connector from its socket on the logic board.
-
Use the pointed end of a spudger to disconnect the digitizer cable connector from its socket on the logic board.
-
-
이 단계는 번역되지 않았습니다. 번역을 도와주십시오
-
Use the pointed tip of a spudger to flip up the retaining flap on the home button ZIF socket.
-
-
이 단계는 번역되지 않았습니다. 번역을 도와주십시오
-
Use tweezers to unplug the home button ribbon cable from the ZIF socket.
-
Continue peeling the ribbon cable up to the EMI shield.
-
-
이 단계는 번역되지 않았습니다. 번역을 도와주십시오
-
Use tweezers to lift the home button control hardware module off the display assembly.
-
-
이 단계는 번역되지 않았습니다. 번역을 도와주십시오
-
Use an opening pick to continue separating the home button ribbon cable from the display assembly.
-
-
이 단계는 번역되지 않았습니다. 번역을 도와주십시오
-
Use a plastic opening tool to pry the home button bracket off the display assembly.
-
-
이 단계는 번역되지 않았습니다. 번역을 도와주십시오
-
Heat an iOpener and lay it over the lower edge of the front panel to soften the adhesive holding the home button in place.
-
-
이 단계는 번역되지 않았습니다. 번역을 도와주십시오
-
Slowly push the home button up and out of the display assembly to separate the gasket from the front panel.
-


다른 15명이 해당 안내서를 완성하였습니다.

댓글 4개
Great tutorial but you should change the title to button removal. You never show how to replace it as suggested by the title.
Adam Tango - 답글
I would have appreciated some points on installing the button. I clearly missed something and the button is not solid. When I push on it it sinks into the iPad. It works but it isn’t right and I’m not willing to risk breaking the glass to try something different, especially since I still am not sure what needs to be done differently.
I replaced the new screen of iPhone Mini 4 with same original home button. But Home button does not work. Does it requires any microsoldering to home button work?
iRepairMan - 답글