주요 콘텐츠로 건너뛰기

iPhone 4S Power button Replacement

보관된 가이드
해당 안내서는 단지 역사적인 목적으로 보관됩니다. 최신 버전 안내서를 사용하여 수리 하십시오.

필요한 것

  1. iPhone 4S Power button Replacement, Rear Panel-Opening the Phone: 1 단계, 이미지 1/1
    • *Power off your phone before you start repairing

    • Remove the two small screws next to the dock connector

  2. iPhone 4S Power button Replacement, Take the Rear Panel off: 2 단계, 이미지 1/1
    • Use both thumbs to push the rear panel toward the top edge of the iPhone.

  3. iPhone 4S Power button Replacement: 3 단계, 이미지 1/1
    • Carefully pull the rear panel away from the iPhone. Be careful not to break the clips that attach it to the phone.

  4. iPhone 4S Power button Replacement: 4 단계, 이미지 1/1
    • Remove the two screws securing the battery connector to the logic board

    • detach the battery connector from the socket, then lift the bottom side of the connector and by placing the head of the tool in the middle of the speaker and the metal connector.

  5. iPhone 4S Power button Replacement: 5 단계, 이미지 1/1
    • Use the head of your tool to carefully pull up the pressure contact which is located underneath the battery.

    • don't rip the battery connector socket on the logic board, this is an essential part of the iPhone connected by four soldered points.

  6. iPhone 4S Power button Replacement: 6 단계, 이미지 1/1
    • Unscrew the two screws securing the dock connector cable cover.

    • Once completed, Remove the metal dock connector cable cover and place it on a safe area.

  7. iPhone 4S Power button Replacement: 7 단계, 이미지 1/1
    • Use the head of your tool to remove the dock cable up from its socket on the logic board.

  8. iPhone 4S Power button Replacement: 8 단계, 이미지 1/1
    • Once pulled up, Peel the dock connector cable off the logic board

  9. iPhone 4S Power button Replacement: 9 단계, 이미지 1/1
    • Unplug the cellular antenna cable out from under the metal fingers attached to the logic board and place it on the same side as the doc connector cable

  10. iPhone 4S Power button Replacement: 10 단계, 이미지 1/1
    • Take out four screws securing the cable cover to the logic board (the screws highlighted)

  11. iPhone 4S Power button Replacement: 11 단계, 이미지 1/1
    • Use the head of your tool to take off the cable cover tabs out of their slots.

    • Once completed, take off the cable cover from its edge nearest the top and remove it and put it in a safe place.

  12. iPhone 4S Power button Replacement: 12 단계, 이미지 1/1
    • Use the head of your tool to take off the camera connector to the logic board

    • The camera is now safe to remove, put it in a safe place

  13. iPhone 4S Power button Replacement: 13 단계, 이미지 1/2 iPhone 4S Power button Replacement: 13 단계, 이미지 2/2
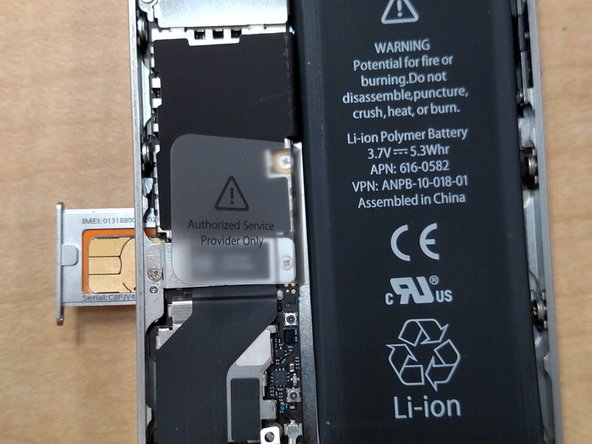
    • Use a paper clip to eject the sim card and put it in a safe place

  14. iPhone 4S Power button Replacement: 14 단계, 이미지 1/1
    • Take off the five labeled connectors

  15. iPhone 4S Power button Replacement: 15 단계, 이미지 1/1
    • Remove the highlighted screw

  16. iPhone 4S Power button Replacement: 16 단계, 이미지 1/1
    • Pry up the small grounding clip with the head of your tool and then remove it and put it in a safe place

  17. iPhone 4S Power button Replacement: 17 단계, 이미지 1/1
    • Remove the highlighted screw

  18. iPhone 4S Power button Replacement: 18 단계, 이미지 1/1
    • Disconnect the wifi connector highlighted with the head of your tool

  19. iPhone 4S Power button Replacement: 19 단계, 이미지 1/1
    • Peel up the piece of black tape

    • Remove the screw holding in the logic board

  20. iPhone 4S Power button Replacement: 20 단계, 이미지 1/1
    • Remove the selected screws

  21. iPhone 4S Power button Replacement: 21 단계, 이미지 1/1
    • Lift the logic board from the side that has the speaker

    • Remove the logic board.

  22. iPhone 4S Power button Replacement: 22 단계, 이미지 1/1
    • Take out the two screws keeping the lock button in place

  23. iPhone 4S Power button Replacement: 23 단계, 이미지 1/1
    • Once done, remove the power button with either tweezers or a sharp object

결론

To reassemble your device, follow these instructions in reverse order.

다른 6명이 해당 안내서를 완성하였습니다.

Miles

회원 가입일: 05/26/15

371 평판

안내서 1개 작성함

댓글 0개

댓글 쓰기

조회 통계:

24 시간 전: 1

7일 전: 4

30일 전: 4

전체 시간: 2,415