필요한 것
-
-
Pour commencer il faut retirer les morceaux de verre de l'ancienne lentille cassée.
-
-
-
Une fois les débris de la lentille de caméra en verre retirés, nettoyez bien les contours du support.
only my bottom lens is cracked, how do i get a nice crack on the top lens to break the rest out
Help! I had a small crack. In trying to remove the glass I damaged the lens underneath and caused damage to the actual camera.
The removal of the glass is very difficult. Can anyone provide any information on how to do it well? I have replaced iphone screens and batteries etc and this is by far the most difficult fix I’ve tried on iPhones.
what was your solution? how would you do it better? heating?
Adab Abu -
-
-
-
-
Pré-encollez la nouvelle lentille de caméra arrière iPhone X avec du sticker double face ou 2 points de colle.
-
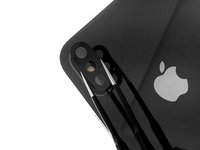
Positionnez la lentille de verre dans l'emplacement de son support à l'aide d'une pince droite de précision.
Any suggestion about what type of glue to use? …I can’t imagine that double-sided tape is a great option…?
I'd say like T7000 or T8000 glue
-


Félicitation ! Vous avez réparé votre iPhone XS, la lentille est remplacée, nettoyez la avec un chiffon microfibre. Vous pouvez maintenant prendre des photos et filmer normalement.
Félicitation ! Vous avez réparé votre iPhone XS, la lentille est remplacée, nettoyez la avec un chiffon microfibre. Vous pouvez maintenant prendre des photos et filmer normalement.
다른 5명이 해당 안내서를 완성하였습니다.

Took me almost an hour to gently break glass and clean area.
Do recommend heating the glass for easier removal.
All in all, 75 minutes for my first time. And replacement glass is a little smaller than original (bought somewhere online).
Adab Abu - 답글
Where did u get the replacement part from?
Nathanael H. W. -